注意
本文档适用于 Ceph 开发版本。
CRUSH 地图
The CRUSH算法
CRUSH 使用集群的地图(CRUSH 地图)将数据映射到 OSD,根据配置的复制策略和故障域在整个集群中分布数据。有关 CRUSH 的详细讨论,请参阅 99d07b: CRUSH - 受控、可扩展、去中心化的复制数据放置CRUSH - Controlled, Scalable, Decentralized Placement of Replicated Data
CRUSH 地图包含一个列表OSDs和host“桶” (rack) 的层次结构以及控制 CRUSH 在集群的池中复制数据方式的规则。通过反映安装的底层物理组织,CRUSH 可以模拟(并因此解决)相关设备故障的可能性。与 CRUSH 层次结构相关的因素包括机架、机柜、物理邻近性、共享电源、共享网络和故障域。通过将此信息编码到 CRUSH 地图中,CRUSH 放置策略在维护所需分布的同时将对象副本分布到故障域。例如,为了解决并发故障的可能性,最好确保数据副本位于位于或依赖于不同机架、机柜、电源、控制器或物理位置上的设备上。
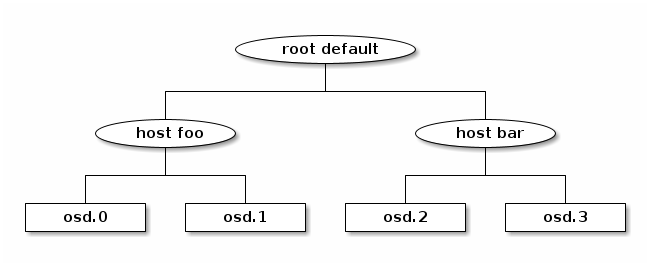
当 OSD 部署时,它们会自动添加到 CRUSH 地图中,位于运行 OSD 的节点命名的桶下。此行为与配置的 CRUSH 故障域相结合,确保副本或擦除代码片段分布到主机上,并且单个主机或其他类型的故障不会影响可用性。对于更大的集群,管理员必须仔细考虑他们选择的故障域。例如,对于中等到大型集群,在机架之间分布副本是典型的。host bucket that is named for the node on which the OSDs run. This
behavior, combined with the configured CRUSH failure domain, ensures that
replicas or erasure-code shards are distributed across hosts and that the
failure of a single host or other kinds of failures will not affect
availability. For larger clusters, administrators must carefully consider their
choice of failure domain. For example, distributing replicas across racks is
typical for mid- to large-sized clusters.
CRUSH 位置
OSD 在 CRUSH 地图层次结构中的位置称为其CRUSH location。CRUSH 位置的指定形式为键值对列表。例如,如果 OSD 位于特定的行、机架、机柜和主机中,并且也是“默认”CRUSH 根(大多数集群的情况如此)的一部分,则其 CRUSH 位置可以指定如下:
root=default row=a rack=a2 chassis=a2a host=a2a1
Note
键的顺序不重要。
键名(
=的左侧)必须是一个有效的 CRUSHtype。默认情况下,有效的 CRUSH 类型包括root,datacenter,room,row,pod,pdu,rack,chassis, andhost。这些定义的类型足以满足几乎所有集群,但可以通过修改 CRUSH 地图来自定义。
可以通过添加crush_location选项在ceph.conf来设置 OSD 的 CRUSH 位置,例如:
crush_location = root=default row=a rack=a2 chassis=a2a host=a2a1
添加此选项后,每次 OSD 启动时,它都会验证自己是否位于 CRUSH 地图中的正确位置,如果不是,则移动自己。要禁用此自动 CRUSH 地图管理,请将以下内容添加到ceph.conf配置文件中的[osd]部分:
osd_crush_update_on_start = false
注意,在大多数情况下,此操作是不必要的。
如果未设置crush_location如果没有明确设置root=default host=HOSTNAME,则使用OSD``s,
where the hostname is determined by the output of the ``hostname -s command.
Note
作为默认值crush_location,请记住包含root=default,因为现有的 CRUSH 规则引用它。
自定义位置钩子
可以使用自定义位置钩子在启动时生成更完整的 CRUSH 位置。
当在编写时某些位置字段未知时(例如,在跨多个数据中心部署单个配置时字段ceph.conf is written (for example, fields rack或datacenter),这很有用。
如果配置、执行和解析成功,则钩子的输出将替换任何先前设置的 CRUSH 位置。
钩子ceph.conf可以通过提供可执行文件(通常是脚本)的路径来启用
crush_location_hook = /path/to/customized-ceph-crush-location
此钩子传递几个参数(见下文)。钩子向stdout输出单行,其中包含 CRUSH 位置描述。参数类似于以下内容:
--id ID --type TYPE
这里id是守护进程标识符或(对于 OSD)是 OSD 编号,守护进程类型是osd, mds, mgr或mon.
例如,一个简单的钩子通过文件/etc/rack中的值指定机架位置(假设其中不包含空格)可能如下所示:
#!/bin/sh
echo "root=default rack=$(cat /etc/rack) host=$(hostname -s)"
CRUSH 结构
CRUSH 地图由(1)描述集群物理拓扑的层次结构以及(2)定义数据放置策略的一组规则组成。层次结构在叶节点处有设备(OSD),在内部节点处对应于其他物理特征或分组:主机、机架、行、数据中心等。规则确定副本如何根据该层次结构放置(例如,“在不同的机架中放置三个副本”)。
设备
设备是存储数据的单个 OSD(通常每个存储驱动器一个设备)。设备通过一个id(非负整数)name(通常osd.N,其中N是设备id).
的设备类)。在 Luminous 及更高版本发布中,OSD 可以有一个device class分配的设备类(例如,hdd或ssd或nvme),允许它们成为 CRUSH 规则的目标。设备类在主机中混合设备类型时特别有用。
类型与桶
在 CRUSH 的上下文中,“桶”是指层次结构中的任何内部节点:主机、机架、行等。CRUSH 地图定义了一系列类型用于标识这些节点。默认类型包括:
osd(ordevice)hostchassisrackrowpdupodroomdatacenterzoneregionroot
大多数集群只使用其中一小部分这些类型,其他类型可以根据需要定义。
层次结构使用设备(通常是类型osd)作为叶节点,并将非设备类型作为内部节点构建。根节点是类型root生成。
每个层次结构中的节点(设备或桶)都有一个权重指示该设备或层次结构子树应存储的相对数据比例的权重。权重在叶节点处设置,指示设备的大小。这些权重自动以“向上树”的方向求和:也就是说,节点的权重将是它包含的所有设备的权重之和。权重通常以 tebibytes (TiB) 为单位。root node will be the sum of the weights of all devices
contained under it. Weights are typically measured in tebibytes (TiB).
要获取集群 CRUSH 层次结构的简单视图,包括权重,请运行以下命令:
ceph osd tree
规则
CRUSH 规则定义控制数据如何在层次结构中的设备之间分布的策略。规则定义放置以及复制策略或分布策略,允许您指定 CRUSH 如何放置数据副本。例如,您可以创建一个规则选择两个目标进行双向镜像,另一个规则选择两个不同数据中心中的三个目标进行三向复制,还有一个规则在六个存储设备上进行擦除编码。有关 CRUSH 规则的详细讨论,请参阅第 3.2的CRUSH - 受控、可扩展、去中心化的复制数据放置.
可以通过命令行创建 CRUSH 规则,通过指定它们将治理的池类型(复制或擦除编码),故障域failure domain, and optionally a device class. In rare cases, CRUSH rules must be created by manually editing the CRUSH map.
要查看为集群定义的规则,请运行以下命令:
ceph osd crush rule ls
要查看规则的内容,请运行以下命令:
ceph osd crush rule dump
设备类别
每个设备可以可选地分配一个class。默认情况下,OSD 在启动时自动将其类设置为hdd, ssd或nvme,根据它们所支持的设备类型。
要显式设置一个或多个 OSD 的设备类,请运行以下形式的命令:
ceph osd crush set-device-class <class> <osd-name> [...]
一旦设置了设备类,直到旧类被取消之前,它不能更改为另一个类。要取消一个或多个 OSD 的旧类,请运行以下形式的命令:
ceph osd crush rm-device-class <osd-name> [...]
此限制允许管理员设置在 OSD 重启或由脚本更改时不会更改的设备类。
要创建一个针对特定设备类的放置规则,请运行以下形式的命令:
ceph osd crush rule create-replicated <rule-name> <root> <failure-domain> <class>
要将新的放置规则应用于特定池,请运行以下形式的命令:
ceph osd pool set <pool-name> crush_rule <rule-name>
设备类是通过创建一个或多个“影子”CRUSH 层次结构实现的。对于每个使用的设备类,将有一个只包含该类设备的影子层次结构。然后,CRUSH 规则可以将数据分布到相关的影子层次结构。这种方法与旧版本的 Ceph 客户端完全向后兼容。要查看显示影子项目的 CRUSH 层次结构,请运行以下命令:
ceph osd crush tree --show-shadow
一些在 Luminous 发布之前创建的较旧的集群依赖于手动制作的 CRUSH 地图来维护每个设备类型的层次结构。对于这些集群,有一个reclassify工具可以帮助它们过渡到设备类,而不会触发不必要的数据移动(见从遗留 SSD 规则迁移到设备类).
权重集
A weight set是计算数据放置时使用的另一组权重。CRUSH 地图中每个设备的正常权重是根据设备大小设置的,指示应在何处存储多少数据。然而,因为 CRUSH 是一个概率性伪随机放置过程,因此始终存在一些与理想分布的偏差(以投掷六次骰子六次的方式,很可能不会得到正好十个一和十个六)。权重集允许集群根据集群的具体情况(例如:层次结构、池)执行数值优化,以实现平衡分布。
Ceph 支持两种类型的权重集:
A compat权重集是每个设备和集群中每个节点的单个替代权重集。Compat 权重集不能期望纠正所有异常(例如,不同池的 PG 可能大小不同,负载级别也不同,但 balancer 主要以类似的方式对待它们)。然而,它们的主要优点是具有与以前版本的 Ceph向后兼容。这意味着即使权重集最早是在 Luminous v12.2.z 中引入的,旧版本(例如,Firefly)的客户端仍然可以在使用 compat 权重集平衡数据时连接到集群。
A per-pool权重集在灵活性方面更为灵活,因为它允许针对每个数据池进行优化放置。此外,还可以针对放置的每个位置调整权重,允许优化器纠正数据向具有相对于其同行较小权重的设备轻微倾斜(这种效应通常只有在非常大的集群中才明显,但可能会导致平衡问题)。
当使用权重集时,层次结构中每个节点的相关权重在以下命令的输出中的单独列(标记为(compat)或池名称)中可见:
ceph osd tree
如果同时使用compat和per-pool权重集,则特定池的数据放置将使用其自己的 per-pool 权重集(如果存在)。如果只使用compat权重集,则数据放置将使用 compat 权重集。如果都不使用,则数据放置将使用正常的 CRUSH 权重。
虽然权重集可以手动设置和调整,但我们建议如果集群正在运行 Luminous 或更高版本,则启用ceph-mgr balancer模块来自动执行这些任务。
修改 CRUSH 地图
添加/移动 OSD
Note
在正常情况下,OSD 在创建时会自动将自己添加到 CRUSH 地图中。本节中的命令很少需要。
要在运行集群的 CRUSH 地图中添加或移动 OSD,请运行以下形式的命令:
ceph osd crush set {name} {weight} root={root} [{bucket-type}={bucket-name} ...]
有关此命令参数的详细信息,请参阅以下内容:
name- 描述:
OSD 的完整名称。
- 类型:
字符串
- 必需:
是
- 示例:
osd.0
weight- 描述:
OSD 的 CRUSH 权重。通常,这是其大小,以 terabytes (TB) 为单位。
- 类型:
双
- 必需:
是
- 示例:
2.0
root- 描述:
OSD 所在的 CRUSH 层次结构的根节点(通常
default).- 类型:
键值对)。
- 必需:
是
- 示例:
root=default
bucket-type- 描述:
OSD 在 CRUSH 层次结构中的位置。
- 类型:
键值对。
- 必需:
否
- 示例:
datacenter=dc1 room=room1 row=foo rack=bar host=foo-bar-1
在以下示例中,命令将osd.0添加到层次结构中,或移动osd.0从先前位置:
ceph osd crush set osd.0 1.0 root=default datacenter=dc1 room=room1 row=foo rack=bar host=foo-bar-1
调整 OSD 权重
Note
在正常情况下,OSD 在创建时会自动将其正确权重添加到 CRUSH 地图中。本节中的命令很少需要。
要在运行集群中调整 OSD 的 CRUSH 权重,请运行以下形式的命令:
ceph osd crush reweight {name} {weight}
有关此命令参数的详细信息,请参阅以下内容:
name- 描述:
OSD 的完整名称。
- 类型:
字符串
- 必需:
是
- 示例:
osd.0
weight- 描述:
OSD 的 CRUSH 权重。
- 类型:
双
- 必需:
是
- 示例:
2.0
删除 OSD
Note
OSD 通常作为ceph osd purge`命令的结果从 CRUSH 地图中删除。此命令很少需要。
要从运行集群的 CRUSH 地图中删除 OSD,请运行以下形式的命令:
ceph osd crush remove {name}
有关name参数的详细信息,请参阅以下内容:
name- 描述:
OSD 的完整名称。
- 类型:
字符串
- 必需:
是
- 示例:
osd.0
添加 CRUSH 桶
Note
桶在添加 OSD 时隐式创建,并且创建它的命令指定了作为 OSD 位置一部分的{bucket-type}={bucket-name},前提是已经存在具有该名称的桶。本节中的命令通常用于手动调整 OSD 创建后层次结构的结构。此命令的用途之一是将一系列主机移动到新的机架级桶。此命令的另一用途是在 dummyhost桶(OSD 节点)以便桶在准备好接收数据之前不会接收任何数据。当它们准备好时,将桶移动到root中添加新的default根或任何其他根,如下所述。
要在运行集群的 CRUSH 地图中添加桶,请运行以下形式的命令:
ceph osd crush add-bucket {bucket-name} {bucket-type}
有关此命令参数的详细信息,请参阅以下内容:
bucket-name- 描述:
桶的完整名称。
- 类型:
字符串
- 必需:
是
- 示例:
rack12
bucket-type- 描述:
桶的类型。此类型必须已经在 CRUSH 层次结构中存在。
- 类型:
字符串
- 必需:
是
- 示例:
rack
在以下示例中,命令将rack12桶添加到层次结构中:
ceph osd crush add-bucket rack12 rack
移动桶
要将桶移动到 CRUSH 地图层次结构中的不同位置或位置,请运行以下形式的命令:
ceph osd crush move {bucket-name} {bucket-type}={bucket-name}, [...]
有关此命令参数的详细信息,请参阅以下内容:
bucket-name- 描述:
您要移动的桶的名称。
- 类型:
字符串
- 必需:
是
- 示例:
foo-bar-1
bucket-type- 描述:
桶的新位置在 CRUSH 层次结构中。
- 类型:
键值对。
- 必需:
否
- 示例:
datacenter=dc1 room=room1 row=foo rack=bar host=foo-bar-1
重命名桶
要在维护其在 CRUSH 地图层次结构中的位置的同时重命名桶,请运行以下形式的命令:
ceph osd crush rename-bucket {oldname} {newname}
删除桶
要从 CRUSH 层次结构中删除桶,请运行以下形式的命令:
ceph osd crush remove {bucket-name}
Note
删除桶之前,桶必须为空。换句话说,其中不能有任何 OSD 或任何其他 CRUSH 桶。
有关bucket-name参数的详细信息,请参阅以下内容:
bucket-name- 描述:
要删除的桶的名称。
- 类型:
字符串
- 必需:
是
- 示例:
rack12
在以下示例中,命令从rack12桶:
ceph osd crush remove rack12
创建 compat 权重集
Note
通常,如果需要,模块(如果模块已启用)会自动执行此操作。balancer module (provided that the module is enabled).
要创建一个compat权重集,请运行以下命令:
ceph osd crush weight-set create-compat
要调整 compat 权重集的权重,请运行以下形式的命令:
ceph osd crush weight-set reweight-compat {name} {weight}
要销毁 compat 权重集,请运行以下命令:
ceph osd crush weight-set rm-compat
创建 per-pool 权重集
要为特定池创建权重集,请运行以下形式的命令:
ceph osd crush weight-set create {pool-name} {mode}
Note
只有当所有服务器和守护进程都运行 Luminous v12.2.z 或更高版本时,才能使用 per-pool 权重集。
有关此命令参数的详细信息,请参阅以下内容:
pool-name- 描述:
RADOS 池的名称。
- 类型:
字符串
- 必需:
是
- 示例:
rbd
mode- 描述:
要么
flat或positional。一个平面权重集为所有设备或桶分配单个权重。一个位置权重集对结果放置映射中的每个位置都有可能具有不同的权重。例如:如果池的副本计数为3,则位置权重集将为每个设备和桶有三个权重。- 类型:
字符串
- 必需:
是
- 示例:
flat
要调整权重集中的项目的权重,请运行以下形式的命令:
ceph osd crush weight-set reweight {pool-name} {item-name} {weight [...]}
要列出现有的权重集,请运行以下命令:
ceph osd crush weight-set ls
要删除权重集,请运行以下形式的命令:
ceph osd crush weight-set rm {pool-name}
创建复制池的规则
当为复制池创建 CRUSH 规则时,有一个重要的决策要做:选择故障域。例如,如果您选择host作为故障域,则 CRUSH 将确保每个数据副本都存储在唯一的宿主机上。或者,如果您选择rack作为故障域,则每个数据副本都将存储在不同的机架中。您选择的故障域应受集群大小及其 CRUSH 拓扑的指导。
整个集群层次结构通常嵌套在名为default的根节点下。如果您自定义了层次结构,您可能希望创建一个嵌套在层次结构中其他节点下的规则。在为自定义层次结构创建此规则时,节点类型无关紧要,特别是规则不必嵌套在root节点上挂载文件系统。
下。可以创建一个规则,将数据放置限制在特定class的设备上。默认情况下,Ceph OSD 自动将自己分类为hdd或ssd,根据所使用的底层设备类型。这些设备类可以自定义。例如,可以将 OSD 的device
class设置为nvme以区分 SATA SSD 和 SATA SSD。或者,可以将它们设置为像ssd-testing或ssd-ethel这样随意的名称,以便规则和池可以灵活地约束使用(或避免使用)基于特定需求的特定 OSD 子集。
To create a rule for a replicated pool, run a command of the following form:
ceph osd crush rule create-replicated {name} {root} {failure-domain-type} [{class}]
有关此命令参数的详细信息,请参阅以下内容:
name- 描述:
The name of the rule.
- 类型:
字符串
- 必需:
是
- 示例:
rbd-rule
root- 描述:
The name of the CRUSH hierarchy node under which data is to be placed.
- 类型:
字符串
- 必需:
是
- 示例:
default
failure-domain-type- 描述:
The type of CRUSH nodes used for the replicas of the failure domain.
- 类型:
字符串
- 必需:
是
- 示例:
rack
class- 描述:
The device class on which data is to be placed.
- 类型:
字符串
- 必需:
否
- 示例:
ssd
Creating a rule for an erasure-coded pool
For an erasure-coded pool, similar decisions need to be made: what the failure
domain is, which node in the hierarchy data will be placed under (usually
default), and whether placement is restricted to a specific device class.
However, erasure-code pools are created in a different way: there is a need to
construct them carefully with reference to the erasure code plugin in use. For
this reason, these decisions must be incorporated into the erasure-code
profile. A CRUSH rule will then be created from the erasure-code profile,
either explicitly or automatically when the profile is used to create a pool.
To list the erasure-code profiles, run the following command:
ceph osd erasure-code-profile ls
To view a specific existing profile, run a command of the following form:
ceph osd erasure-code-profile get {profile-name}
Under normal conditions, profiles should never be modified; instead, a new profile should be created and used when creating either a new pool or a new rule for an existing pool.
An erasure-code profile consists of a set of key-value pairs. Most of these
key-value pairs govern the behavior of the erasure code that encodes data in
the pool. However, key-value pairs that begin with crush- govern the CRUSH
rule that is created.
The relevant erasure-code profile properties are as follows:
crush-root: the name of the CRUSH node under which to place data [default:
default].crush-failure-domain: the CRUSH bucket type used in the distribution of erasure-coded shards [default:
host].crush-osds-per-failure-domain: Maximum number of OSDs to place in each failure domain -- defaults to 1. Using a value greater than one will cause a CRUSH MSR rule to be created, see below. Must be specified if
crush-num-failure-domainsis specified.crush-num-failure-domains: Number of failure domains to map. Must be specified if
crush-osds-per-failure-domainis specified. Results in a CRUSH MSR rule being created.crush-device-class: the device class on which to place data [default: none, which means that all devices are used].
k和m (and, for the
lrcplugin, l): these determine the number of erasure-code shards, affecting the resulting CRUSH rule.After a profile is defined, you can create a CRUSH rule by running a command of the following form:
ceph osd crush rule create-erasure {name} {profile-name}
CRUSH MSR Rules
Creating an erasure-code profile with a crush-osds-per-failure-domain
value greater than one will cause a CRUSH MSR rule type to be created
instead of a normal CRUSH rule. Normal crush rules cannot retry prior
steps when an out OSD is encountered and rely on CHOOSELEAF steps to
permit moving OSDs to new hosts. However, CHOOSELEAF rules don’t
support more than a single OSD per failure domain. MSR rules, new in
squid, support multiple OSDs per failure domain by retrying all prior
steps when an out OSD is encountered. Using MSR rules requires that
OSDs and clients be required to support the CRUSH_MSR feature bit
(squid or newer).
Deleting rules
To delete rules that are not in use by pools, run a command of the following form:
ceph osd crush rule rm {rule-name}
Tunables
The CRUSH algorithm that is used to calculate the placement of data has been improved over time. In order to support changes in behavior, we have provided users with sets of tunables that determine which legacy or optimal version of CRUSH is to be used.
In order to use newer tunables, all Ceph clients and daemons must support the
new major release of CRUSH. Because of this requirement, we have created
profiles that are named after the Ceph version in which they were
introduced. For example, the firefly tunables were first supported by the
Firefly release and do not work with older clients (for example, clients
running Dumpling). After a cluster’s tunables profile is changed from a legacy
set to a newer or optimal set, the ceph-mon和ceph-osd options
will prevent older clients that do not support the new CRUSH features from
connecting to the cluster.
argonaut (legacy)
The legacy CRUSH behavior used by Argonaut and older releases works fine for
most clusters, provided that not many OSDs have been marked out.
bobtail (CRUSH_TUNABLES2)
The bobtail tunable profile provides the following improvements:
For hierarchies with a small number of devices in leaf buckets, some PGs might map to fewer than the desired number of replicas, resulting in
undersizedPGs. This is known to happen in the case of hierarchies withhostnodes that have a small number of OSDs (1 to 3) nested beneath each host.For large clusters, a small percentage of PGs might map to fewer than the desired number of OSDs. This is known to happen when there are multiple hierarchy layers in use (for example,,
row,rack,host,osd).When one or more OSDs are marked
out, data tends to be redistributed to nearby OSDs instead of across the entire hierarchy.
The tunables introduced in the Bobtail release are as follows:
choose_local_tries: Number of local retries. The legacy value is2, and the optimal value is0.
choose_local_fallback_tries: The legacy value is5, and the optimal value is 0.
choose_total_tries: Total number of attempts to choose an item. The legacy value is19, but subsequent testing indicates that a value of50is more appropriate for typical clusters. For extremely large clusters, an even larger value might be necessary.
chooseleaf_descend_once: Whether a recursivechooseleafattempt will retry, or try only once and allow the original placement to retry. The legacy default is0, and the optimal value is1.
Migration impact:
Moving from the
argonauttunables to thebobtailtunables triggers a moderate amount of data movement. Use caution on a cluster that is already populated with data.
firefly (CRUSH_TUNABLES3)
chooseleaf_vary_r
This firefly tunable profile fixes a problem with chooseleaf CRUSH step
behavior. This problem arose when a large fraction of OSDs were marked out, which resulted in PG mappings with too few OSDs.
This profile was introduced in the Firefly release, and adds a new tunable as follows:
chooseleaf_vary_r: Whether a recursive chooseleaf attempt will start with a non-zero value ofr, as determined by the number of attempts the parent has already made. The legacy default value is0, but with this value CRUSH is sometimes unable to find a mapping. The optimal value (in terms of computational cost and correctness) is1.
Migration impact:
For existing clusters that store a great deal of data, changing this tunable from
0to1will trigger a large amount of data migration; a value of4或5will allow CRUSH to still find a valid mapping and will cause less data to move.
straw_calc_version tunable
There were problems with the internal weights calculated and stored in the
CRUSH map for straw algorithm buckets. When there were buckets with a CRUSH
weight of 0 or with a mix of different and unique weights, CRUSH would
distribute data incorrectly (that is, not in proportion to the weights).
This tunable, introduced in the Firefly release, is as follows:
straw_calc_version: A value of0preserves the old, broken internal-weight calculation; a value of1fixes the problem.
Migration impact:
Changing this tunable to a value of
1and then adjusting a straw bucket (either by adding, removing, or reweighting an item or by using the reweight-all command) can trigger a small to moderate amount of data movement provided that the cluster has hit one of the problematic conditions.
This tunable option is notable in that it has absolutely no impact on the required kernel version in the client side.
hammer (CRUSH_V4)
The hammer tunable profile does not affect the mapping of existing CRUSH
maps simply by changing the profile. However:
There is a new bucket algorithm supported:
straw2. This new algorithm fixes several limitations in the originalstraw. More specifically, the oldstrawbuckets would change some mappings that should not have changed when a weight was adjusted, whilestraw2achieves the original goal of changing mappings only to or from the bucket item whose weight has changed.The
straw2type is the default type for any newly created buckets.
Migration impact:
Changing a bucket type from
strawtostraw2will trigger a small amount of data movement, depending on how much the bucket items’ weights vary from each other. When the weights are all the same no data will move, and the more variance there is in the weights the more movement there will be.
jewel (CRUSH_TUNABLES5)
The jewel tunable profile improves the overall behavior of CRUSH. As a
result, significantly fewer mappings change when an OSD is marked out of
the cluster. This improvement results in significantly less data movement.
The new tunable introduced in the Jewel release is as follows:
chooseleaf_stable: Determines whether a recursive chooseleaf attempt will use a better value for an inner loop that greatly reduces the number of mapping changes when an OSD is markedout. The legacy value is0, and the new value of1uses the new approach.
Migration impact:
Changing this value on an existing cluster will result in a very large amount of data movement because nearly every PG mapping is likely to change.
Client versions that support CRUSH_TUNABLES2
v0.55 and later, including Bobtail (v0.56.x)
Linux kernel version v3.9 and later (for the CephFS and RBD kernel clients)
Client versions that support CRUSH_TUNABLES3
v0.78 (Firefly) and later
Linux kernel version v3.15 and later (for the CephFS and RBD kernel clients)
Client versions that support CRUSH_V4
v0.94 (Hammer) and later
Linux kernel version v4.1 and later (for the CephFS and RBD kernel clients)
Client versions that support CRUSH_TUNABLES5
v10.0.2 (Jewel) and later
Linux kernel version v4.5 and later (for the CephFS and RBD kernel clients)
“Non-optimal tunables” warning
In v0.74 and later versions, Ceph will raise a health check (“HEALTH_WARN crush
map has non-optimal tunables”) if any of the current CRUSH tunables have
non-optimal values: that is, if any fail to have the optimal values from the
:ref:` default profile
<rados_operations_crush_map_default_profile_definition>`. There are two
different ways to silence the alert:
Adjust the CRUSH tunables on the existing cluster so as to render them optimal. Making this adjustment will trigger some data movement (possibly as much as 10%). This approach is generally preferred to the other approach, but special care must be taken in situations where data movement might affect performance: for example, in production clusters. To enable optimal tunables, run the following command:
ceph osd crush tunables optimalThere are several potential problems that might make it preferable to revert to the previous values of the tunables. The new values might generate too much load for the cluster to handle, the new values might unacceptably slow the operation of the cluster, or there might be a client-compatibility problem. Such client-compatibility problems can arise when using old-kernel CephFS or RBD clients, or pre-Bobtail
libradosclients. To revert to the previous values of the tunables, run the following command:ceph osd crush tunables legacyTo silence the alert without making any changes to CRUSH, add the following option to the
[mon]section of your ceph.conf file:mon_warn_on_legacy_crush_tunables = false
In order for this change to take effect, you will need to either restart the monitors or run the following command to apply the option to the monitors while they are still running:
ceph tell mon.\* config set mon_warn_on_legacy_crush_tunables false
Tuning CRUSH
When making adjustments to CRUSH tunables, keep the following considerations in mind:
Adjusting the values of CRUSH tunables will result in the shift of one or more PGs from one storage node to another. If the Ceph cluster is already storing a great deal of data, be prepared for significant data movement.
When the
ceph-osd和ceph-mondaemons get the updated map, they immediately begin rejecting new connections from clients that do not support the new feature. However, already-connected clients are effectively grandfathered in, and any of these clients that do not support the new feature will malfunction.If the CRUSH tunables are set to newer (non-legacy) values and subsequently reverted to the legacy values,
ceph-osddaemons will not be required to support any of the newer CRUSH features associated with the newer (non-legacy) values. However, the OSD peering process requires the examination and understanding of old maps. For this reason, if the cluster has previously used non-legacy CRUSH values, do not run old versions of theceph-osd守护进程 -- even if the latest version of the map has been reverted so as to use the legacy defaults.
The simplest way to adjust CRUSH tunables is to apply them in matched sets known as profiles. As of the Octopus release, Ceph supports the following profiles:
legacy: The legacy behavior from argonaut and earlier.
argonaut: The legacy values supported by the argonaut release.
bobtail: The values supported by the bobtail release.
firefly: The values supported by the firefly release.
hammer: The values supported by the hammer release.
jewel: The values supported by the jewel release.
optimal: The best values for the current version of Ceph. .. _rados_operations_crush_map_default_profile_definition:
default: The default values of a new cluster that has been installed from scratch. These values, which depend on the current version of Ceph, are hardcoded and are typically a mix of optimal and legacy values. These values often correspond to theoptimalprofile of either the previous LTS (long-term service) release or the most recent release for which most users are expected to have up-to-date clients.
To apply a profile to a running cluster, run a command of the following form:
ceph osd crush tunables {PROFILE}
This action might trigger a great deal of data movement. Consult release notes and documentation before changing the profile on a running cluster. Consider throttling recovery and backfill parameters in order to limit the backfill resulting from a specific change.
调整主 OSD 选择
When a Ceph client reads or writes data, it first contacts the primary OSD in
each affected PG’s acting set. By default, the first OSD in the acting set is
the primary OSD (also known as the “lead OSD”). For example, in the acting set
[2, 3, 4], osd.2 is listed first and is therefore the primary OSD.
However, sometimes it is clear that an OSD is not well suited to act as the
lead as compared with other OSDs (for example, if the OSD has a slow drive or a
slow controller). To prevent performance bottlenecks (especially on read
operations) and at the same time maximize the utilization of your hardware, you
can influence the selection of the primary OSD either by adjusting “primary
affinity” values, or by crafting a CRUSH rule that selects OSDs that are better
suited to act as the lead rather than other OSDs.
To determine whether tuning Ceph’s selection of primary OSDs will improve cluster performance, pool redundancy strategy must be taken into account. For replicated pools, this tuning can be especially useful, because by default read operations are served from the primary OSD of each PG. For erasure-coded pools, however, the speed of read operations can be increased by enabling fast read的远程文件系统存储池设置).
Primary Affinity
Primary affinity is a characteristic of an OSD that governs the likelihood
that a given OSD will be selected as the primary OSD (or “lead OSD”) in a given
acting set. A primary affinity value can be any real number in the range 0to1, inclusive.
As an example of a common scenario in which it can be useful to adjust primary affinity values, let us suppose that a cluster contains a mix of drive sizes: for example, suppose it contains some older racks with 1.9 TB SATA SSDs and some newer racks with 3.84 TB SATA SSDs. The latter will on average be assigned twice the number of PGs and will thus serve twice the number of write and read operations -- they will be busier than the former. In such a scenario, you might make a rough assignment of primary affinity as inversely proportional to OSD size. Such an assignment will not be 100% optimal, but it can readily achieve a 15% improvement in overall read throughput by means of a more even utilization of SATA interface bandwidth and CPU cycles. This example is not merely a thought experiment meant to illustrate the theoretical benefits of adjusting primary affinity values; this fifteen percent improvement was achieved on an actual Ceph cluster.
By default, every Ceph OSD has a primary affinity value of 1. In a cluster
in which every OSD has this default value, all OSDs are equally likely to act
as a primary OSD.
By reducing the value of a Ceph OSD’s primary affinity, you make CRUSH less likely to select the OSD as primary in a PG’s acting set. To change the weight value associated with a specific OSD’s primary affinity, run a command of the following form:
ceph osd primary-affinity <osd-id> <weight>
The primary affinity of an OSD can be set to any real number in the range
[0-1] inclusive, where 0 indicates that the OSD may not be used as
primary and 1 indicates that the OSD is maximally likely to be used as a
primary. When the weight is between these extremes, its value indicates roughly
how likely it is that CRUSH will select the OSD associated with it as a
primary.
The process by which CRUSH selects the lead OSD is not a mere function of a simple probability determined by relative affinity values. Nevertheless, measurable results can be achieved even with first-order approximations of desirable primary affinity values.
Custom CRUSH Rules
Some clusters balance cost and performance by mixing SSDs and HDDs in the same
replicated pool. By setting the primary affinity of HDD OSDs to 0,
operations will be directed to an SSD OSD in each acting set. Alternatively,
you can define a CRUSH rule that always selects an SSD OSD as the primary OSD
and then selects HDDs for the remaining OSDs. Given this rule, each PG’s acting
set will contain an SSD OSD as the primary and have the remaining OSDs on HDDs.
For example, see the following CRUSH rule:
rule mixed_replicated_rule {
        id 11
        type replicated
        step take default class ssd
        step chooseleaf firstn 1 type host
        step emit
        step take default class hdd
        step chooseleaf firstn 0 type host
        step emit
}
This rule chooses an SSD as the first OSD. For an N-times replicated pool,
this rule selects N+1 OSDs in order to guarantee that N copies are on
different hosts, because the first SSD OSD might be colocated with any of the
N HDD OSDs.
要避免额外的存储需求,您可以将 SSD 和 HDD 放在不同的主机上。但是,采取这种方法意味着所有客户端请求都将由具有 SSD 的主机接收。因此,建议为 SSD OSD 设置更快的 CPU,为 HDD OSD 设置更适度的 CPU,因为后者通常只执行恢复操作。这里 CRUSH 根ssd_hosts和hdd_hosts严格要求不包含任何相同的服务器,如下面的 CRUSH 规则中所示:
rule mixed_replicated_rule_two {
       id 1
       type replicated
       step take ssd_hosts class ssd
       step chooseleaf firstn 1 type host
       step emit
       step take hdd_hosts class hdd
       step chooseleaf firstn -1 type host
       step emit
}
Note
如果主 SSD OSD 失败,则对相关 PG 的请求将暂时从较慢的 HDD OSD 处提供服务,直到 PG 的数据已复制到替换的主 SSD OSD 上。
由 Ceph 基金会带给您
Ceph 文档是一个社区资源,由非盈利的 Ceph 基金会资助和托管Ceph Foundation. 如果您想支持这一点和我们的其他工作,请考虑加入现在加入.