注意
本文档适用于 Ceph 开发版本。
块设备和 OpenStack
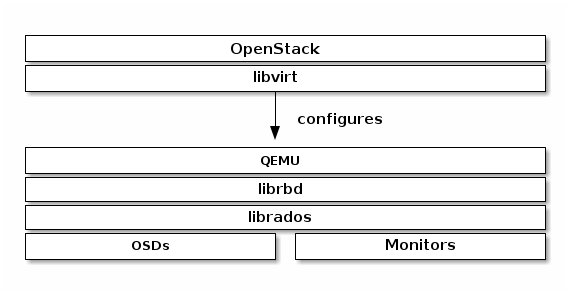
您可以通过libvirt将 Ceph 块设备镜像附加到 OpenStack 实例上,librbd. Ceph 在集群中的多个 OSD 之间条带化块卷,这意味着大型卷比独立服务器上的本地驱动器性能更好!
要在 OpenStack 中使用 Ceph 块设备,您必须先安装 QEMU,libvirt,和 OpenStack。我们建议为您的 OpenStack 安装使用单独的物理节点。OpenStack 推荐至少 8GB 的 RAM 和四核处理器。下图描绘了 OpenStack/Ceph 技术堆栈。
重要
要在 OpenStack 中使用 Ceph 块设备,您必须能够访问正在运行的 Ceph 存储集群。
OpenStack 的三个部分与 Ceph 的块设备集成:
镜像:OpenStack Glance 管理 VM 的镜像。镜像是不可变的。OpenStack 将镜像视为二进制大块,并相应地下载它们。
卷:卷是块设备。OpenStack 使用卷来启动 VM,或将要卷附加到正在运行的 VM。OpenStack 使用 Cinder 服务管理卷。
客户磁盘:客户磁盘是客户操作系统磁盘。默认情况下,当您启动虚拟机时,其磁盘在虚拟机管理程序(通常在
/var/lib/nova/instances/<uuid>/)的文件系统中显示为文件。在 OpenStack Havana 之前,在 Ceph 中启动 VM 的唯一方法是通过 Cinder 的启动从卷功能。但是,现在可以直接在 Ceph 中启动每个虚拟机,而无需使用 Cinder,这很有优势,因为它允许您轻松地使用活体迁移过程执行维护操作。此外,如果您的虚拟机管理程序死掉,也很方便触发nova evacuate并在其他地方几乎无缝地恢复虚拟机。为此,排他锁防止多个
您可以使用 OpenStack Glance 将镜像存储为 Ceph 块设备,并且您可以使用 Cinder 使用镜像的写时复制克隆来启动 VM。
以下说明详细介绍了 Glance、Cinder 和 Nova 的设置,尽管它们不必一起使用。您可以将镜像存储在 Ceph 块设备中,同时使用本地磁盘运行 VM,反之亦然。
重要
使用 QCOW2 来托管虚拟机磁盘是不推荐的。如果您想在 Ceph 中启动虚拟机(临时后端或从卷启动),请在 Glance 中使用raw图像格式。
Create a Pool
默认情况下,Ceph 块设备存在于rbd池中。您可以通过明确指定任何合适的池来使用它。我们建议为 Cinder 和 Glance 创建一个池。确保您的 Ceph 集群正在运行,然后创建池。
ceph osd pool create volumes
ceph osd pool create images
ceph osd pool create backups
ceph osd pool create vms
请参阅Create a Pool关于指定池的放置组数量的详细信息,请参阅放置组关于您应该为池设置多少放置组的详细信息。
新创建的池在使用前必须初始化。使用rbd工具初始化池:
rbd pool init volumes
rbd pool init images
rbd pool init backups
rbd pool init vms
配置 OpenStack Ceph 客户端
运行glance-api, cinder-volume, nova-compute和cinder-backup的节点充当 Ceph 客户端。每个节点都需要ceph.conf文件:
ssh {your-openstack-server} sudo tee /etc/ceph/ceph.conf </etc/ceph/ceph.conf
安装 Ceph 客户端软件包
在glance-api节点,您需要 Python 绑定librbd:
sudo apt-get install python-rbd
sudo yum install python-rbd
在nova-compute, cinder-backup和在cinder-volume节点上,使用 Python 绑定和客户端命令行工具:
sudo apt-get install ceph-common
sudo yum install ceph-common
设置 Ceph 客户端身份验证
如果您有cephx 身份验证启用,为 Nova/Cinder 和 Glance 创建一个新用户。执行以下操作:
ceph auth get-or-create client.glance mon 'profile rbd' osd 'profile rbd pool=images' mgr 'profile rbd pool=images'
ceph auth get-or-create client.cinder mon 'profile rbd' osd 'profile rbd pool=volumes, profile rbd pool=vms, profile rbd-read-only pool=images' mgr 'profile rbd pool=volumes, profile rbd pool=vms'
ceph auth get-or-create client.cinder-backup mon 'profile rbd' osd 'profile rbd pool=backups' mgr 'profile rbd pool=backups'
将client.cinder, client.glance, and
client.cinder-backup的密钥环添加到适当的节点,并更改其所有权:
ceph auth get-or-create client.glance | ssh {your-glance-api-server} sudo tee /etc/ceph/ceph.client.glance.keyring
ssh {your-glance-api-server} sudo chown glance:glance /etc/ceph/ceph.client.glance.keyring
ceph auth get-or-create client.cinder | ssh {your-volume-server} sudo tee /etc/ceph/ceph.client.cinder.keyring
ssh {your-cinder-volume-server} sudo chown cinder:cinder /etc/ceph/ceph.client.cinder.keyring
ceph auth get-or-create client.cinder-backup | ssh {your-cinder-backup-server} sudo tee /etc/ceph/ceph.client.cinder-backup.keyring
ssh {your-cinder-backup-server} sudo chown cinder:cinder /etc/ceph/ceph.client.cinder-backup.keyring
运行nova-compute的节点需要nova-compute
process:
ceph auth get-or-create client.cinder | ssh {your-nova-compute-server} sudo tee /etc/ceph/ceph.client.cinder.keyring
的密钥环文件。它们还需要将client.cinder用户的密钥存储在libvirt。libvirt 进程需要它来访问集群,同时从 Cinder 附加块设备。
在运行nova-compute:
ceph auth get-key client.cinder | ssh {your-compute-node} tee client.cinder.key
的节点上创建密钥的临时副本,然后在计算节点上,将密钥添加到libvirt并删除密钥的临时副本:
uuidgen
457eb676-33da-42ec-9a8c-9293d545c337

cat > secret.xml <<EOF
<secret ephemeral='no' private='no'>
  <uuid>457eb676-33da-42ec-9a8c-9293d545c337</uuid>
  <usage type='ceph'>
    <name>client.cinder secret</name>
  </usage>
</secret>
EOF
sudo virsh secret-define --file secret.xml
Secret 457eb676-33da-42ec-9a8c-9293d545c337 created
sudo virsh secret-set-value --secret 457eb676-33da-42ec-9a8c-9293d545c337 --base64 $(cat client.cinder.key) && rm client.cinder.key secret.xml
保存密钥的 uuid 以便稍后配置nova-compute。
重要
您不一定需要在所有计算节点上都有 uuid。但是从平台一致性角度来看,最好保持相同的 uuid。
配置 OpenStack 以使用 Ceph
配置 Glance
Glance 可以使用多个后端来存储镜像。要默认使用 Ceph 块设备,请按如下方式配置 Glance。
Kilo 及更高版本
编辑/etc/glance/glance-api.conf并在[glance_store]部分:
[glance_store]
stores = rbd
default_store = rbd
rbd_store_pool = images
rbd_store_user = glance
rbd_store_ceph_conf = /etc/ceph/ceph.conf
rbd_store_chunk_size = 8
下添加以下内容。有关 Glance 中可用的配置选项的更多信息,请参阅 OpenStack 配置参考:http://docs.openstack.org/.
启用图像的写时复制克隆
请注意,这会通过 Glance 的 API 暴露后端位置,因此启用此选项的端点不应公开访问。
任何 OpenStack 版本,除了 Mitaka
如果您想启用图像的写时复制克隆,请在[DEFAULT]部分:
show_image_direct_url = True
下添加以下内容。禁用缓存管理(任何 OpenStack 版本)
禁用 Glance 缓存管理,以避免图像在/var/lib/glance/image-cache/下被缓存,假设您的配置文件有flavor = keystone+cachemanagement:
[paste_deploy]
flavor = keystone
图像属性
我们建议使用以下属性来设置您的镜像:
hw_scsi_model=virtio-scsi:添加 virtio-scsi 控制器以获得更好的性能和丢弃操作的支持hw_disk_bus=scsi:将每个 Cinder 块设备连接到此控制器hw_qemu_guest_agent=yes:启用 QEMU 客户端代理os_require_quiesce=yes:通过 QEMU 客户端代理发送 fs-freeze/thaw 调用
配置 Cinder
OpenStack 需要一个驱动程序来与 Ceph 块设备交互。您还必须指定块设备的池名称。在您的 OpenStack 节点上,编辑/etc/cinder/cinder.conf并添加以下内容:
[DEFAULT]
...
enabled_backends = ceph
glance_api_version = 2
...
[ceph]
volume_driver = cinder.volume.drivers.rbd.RBDDriver
volume_backend_name = ceph
rbd_pool = volumes
rbd_ceph_conf = /etc/ceph/ceph.conf
rbd_flatten_volume_from_snapshot = false
rbd_max_clone_depth = 5
rbd_store_chunk_size = 4
rados_connect_timeout = -1
如果您使用cephx 身份验证,还配置您添加到libvirt的用户和 uuid,如之前所述:
[ceph]
...
rbd_user = cinder
rbd_secret_uuid = 457eb676-33da-42ec-9a8c-9293d545c337
请注意,如果您正在配置多个 Cinder 后端,glance_api_version = 2必须在[DEFAULT]部分。
配置 Cinder 备份
OpenStack Cinder 备份需要一个特定的守护进程,所以不要忘记安装它。在您的 Cinder 备份节点上,编辑/etc/cinder/cinder.conf并添加以下内容:
backup_driver = cinder.backup.drivers.ceph
backup_ceph_conf = /etc/ceph/ceph.conf
backup_ceph_user = cinder-backup
backup_ceph_chunk_size = 134217728
backup_ceph_pool = backups
backup_ceph_stripe_unit = 0
backup_ceph_stripe_count = 0
restore_discard_excess_bytes = true
配置 Nova 以附加 Ceph RBD 块设备
要附加 Cinder 设备(无论是普通块设备还是通过发出启动从卷命令),您必须告诉 Nova(和 libvirt)在附加设备时参考哪个用户和 UUID。libvirt 在连接和认证 Ceph 集群时会参考此用户。
[libvirt]
...
rbd_user = cinder
rbd_secret_uuid = 457eb676-33da-42ec-9a8c-9293d545c337
这两个标志也用于 Nova 临时后端。
配置 Nova
要直接从 Ceph 卷启动虚拟机,您必须配置 Nova 的临时后端。
建议在您的 Ceph 配置文件中启用 RBD 缓存;自 Giant 发布以来默认启用。此外,启用客户端管理员套接字可以收集指标,并且对于故障排除非常有价值。
此套接字可以在虚拟机管理程序(Nova 计算)节点上访问:
ceph daemon /var/run/ceph/ceph-client.cinder.19195.32310016.asok help
要启用 RBD 缓存和管理员套接字,请确保在每个虚拟机管理程序上的ceph.conf包含以下内容:
[client]
    rbd cache = true
    rbd cache writethrough until flush = true
    admin socket = /var/run/ceph/guests/$cluster-$type.$id.$pid.$cctid.asok
    log file = /var/log/qemu/qemu-guest-$pid.log
    rbd concurrent management ops = 20
配置这些目录的权限:
mkdir -p /var/run/ceph/guests/ /var/log/qemu/
chown qemu:libvirtd /var/run/ceph/guests /var/log/qemu/
请注意用户qemu和组libvirtd可能因您的系统而异。提供的示例适用于基于 RedHat 的系统。
提示
如果您的虚拟机已经正在运行,您可以简单地重新启动它以启用管理员套接字
重启 OpenStack
要激活 Ceph 块设备驱动程序并将块设备池名称加载到配置中,您必须重启相关的 OpenStack 服务。对于基于 Debian 的系统,请在适当的节点上执行以下命令:
sudo glance-control api restart
sudo service nova-compute restart
sudo service cinder-volume restart
sudo service cinder-backup restart
对于基于 Red Hat 的系统,执行:
sudo service openstack-glance-api restart
sudo service openstack-nova-compute restart
sudo service openstack-cinder-volume restart
sudo service openstack-cinder-backup restart
一旦 OpenStack 启动并运行,您应该能够创建一个卷并从中启动。
从块设备启动
您可以使用 Cinder 命令行工具从镜像创建卷:
cinder create --image-id {id of image} --display-name {name of volume} {size of volume}
You can use qemu-img转换为另一种格式。例如:
qemu-img convert -f {source-format} -O {output-format} {source-filename} {output-filename}
qemu-img convert -f qcow2 -O raw precise-cloudimg.img precise-cloudimg.raw
当 Glance 和 Cinder 都使用 Ceph 块设备时,图像是写时复制克隆,因此新卷创建得很快。在 OpenStack 仪表板中,您可以通过执行以下步骤从该卷启动:
启动一个新实例。
选择与写时复制克隆关联的镜像。
选择“从卷启动”。
选择您创建的卷。
由 Ceph 基金会带给您
Ceph 文档是一个社区资源,由非盈利的 Ceph 基金会资助和托管Ceph Foundation. 如果您想支持这一点和我们的其他工作,请考虑加入现在加入.