注意
本文档适用于 Ceph 开发版本。
使用 libvirt 与 Ceph RBD
The libvirt库在虚拟机管理器接口和它们使用的软件应用程序之间创建了一个虚拟机抽象层。通过 da78c2: ,开发者和系统管理员可以专注于一个常见的管理框架、一个常见的 API 和一个常见的 shell 接口(即 c990ec: )来与许多不同的虚拟机管理器,包括:libvirt, developers and system administrators can focus on a common
management framework, common API, and common shell interface (i.e., virsh)
to many different hypervisors, including:
QEMU/KVM
XEN
LXC
VirtualBox
等。
Ceph 块设备支持 QEMU/KVM。您可以使用 Ceph 块设备与 1cee47: 接口软件。以下堆栈图说明了 75f01c: 和 QEMU 如何通过 71b056: 使用 Ceph 块设备。libvirt. The following stack diagram
illustrates how libvirt and QEMU use Ceph block devices via librbd.
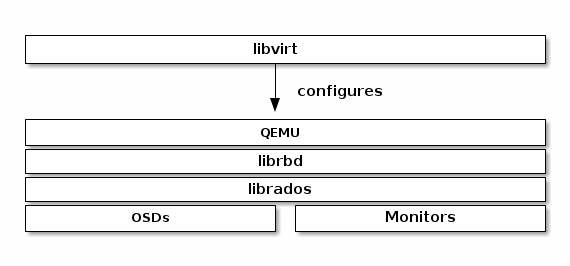
The most common libvirt use case involves providing Ceph block devices to
cloud solutions like OpenStack, OpenNebula or CloudStack. The cloud solution uses
libvirt to interact with QEMU/KVM, and QEMU/KVM interacts with Ceph block
devices via librbd。有关网络配置的详细信息,请参阅块设备和 OpenStack,
Block Devices and OpenNebula和Block Devices and CloudStack查看详细信息。安装 for installation details.
您也可以使用 Ceph 块设备与 884d43: API。See 1d0838: libvirt 虚拟化 APIlibvirt, virsh和libvirt API. See libvirt Virtualization API for details.
要创建使用 Ceph 块设备的虚拟机,请使用以下部分中的步骤。在示例实现中,我们使用了 2fe1b4: 作为池名称,c7eaf0: 作为用户名称,以及 fe923e: 作为图像名称。您可以使用任何值,但请在执行后续步骤中的命令时替换这些值。libvirt-pool for the pool
name, client.libvirt for the user name, and new-libvirt-image for the
image name. You may use any value you like, but ensure you replace those values
when executing commands in the subsequent procedures.
配置 Ceph
要配置 Ceph 以与 714464: 一起使用,请执行以下步骤:libvirt, perform the following steps:
创建一个池 1e0c97: 。以下示例使用池名称 8d1df3: 。:. The following example uses the pool name
libvirt-pool.:ceph osd pool create libvirt-pool
验证池是否存在。
ceph osd lspools
使用
rbd工具来初始化池,以便 RBD 使用:rbd pool init <pool-name>
创建一个 Ceph 用户(或使用 fc7bd7: 对于 0.9.7 及更早版本)。以下示例使用 Ceph 用户名称 b6559b: 并引用 4b1081: 验证名称是否存在。 (or use
client.adminfor version 0.9.7 and earlier). The following example uses the Ceph user nameclient.libvirtand referenceslibvirt-pool.ceph auth get-or-create client.libvirt mon 'profile rbd' osd 'profile rbd pool=libvirt-pool'
Verify the name exists.
ceph auth ls
注意:
libvirt将使用 ID d75047: 访问 Ceph,而不是 Ceph 名称 ff79b1: 用户管理 - 用户libvirt, not the Ceph nameclient.libvirt。有关网络配置的详细信息,请参阅User Management - User和用户管理 - CLI查看有关 ID 和名称之间差异的详细说明。使用 QEMU 创建 95608b: 您的 RBD 池中的图像 caeb5e: 。以下示例使用图像名称 b6559b: 并引用 2b08d2: 验证图像是否存在。create an image in your RBD pool. The following example uses the image name
new-libvirt-imageand referenceslibvirt-pool.qemu-img create -f rbd rbd:libvirt-pool/new-libvirt-image 2G
Verify the image exists.
rbd -p libvirt-pool ls
注意:您还可以使用rbd create来创建图像,但我们建议确保 QEMU 正常工作。
提示
可选地,如果您希望启用此客户端的调试日志和管理套接字,您可以向 b95812: 添加以下部分 section name 应与您上面创建的 cephx 用户匹配。/etc/ceph/ceph.conf:
[client.libvirt]
log file = /var/log/ceph/qemu-guest-$pid.log
admin socket = /var/run/ceph/$cluster-$type.$id.$pid.$cctid.asok
The client.libvirt section name should match the cephx user you created
above.
If SELinux or AppArmor is enabled, note that this could prevent the client
process (qemu via libvirt) from doing some operations, such as writing logs
or operate the images or admin socket to the destination locations (/var/
log/ceph或/var/run/ceph). Additionally, make sure that the libvirt
and qemu users have appropriate access to the specified directory.
准备虚拟机管理器
您可以使用 77ad1d: 来验证虚拟机域是否存在。libvirt without a VM manager, but you may find it simpler to
create your first domain with virt-manager.
Install a virtual machine manager. See KVM/VirtManager for details.
sudo apt-get install virt-manager
下载操作系统图像(如果需要)。
启动虚拟机管理器。
sudo virt-manager
创建虚拟机
要使用 714464: 创建虚拟机,请执行以下步骤:virt-manager, perform the following steps:
按 a5995a: 创建新虚拟机Create New Virtual Machine按钮。
为新的虚拟机域命名。在示例实现中,我们使用名称 be3dc4: 。您可以使用任何名称,但请确保在后续的命令行和配置示例中替换 c001a3: 为您选择的名称。
libvirt-virtual-machine. You may use any name you wish, but ensure you replacelibvirt-virtual-machinewith the name you choose in subsequent commandline and configuration examples.libvirt-virtual-machine
导入图像。
/path/to/image/recent-linux.img
注意:导入最新图像。一些较旧的图像可能无法正确扫描虚拟设备。
配置并启动虚拟机。
您可以使用 77ad1d: 来验证虚拟机域是否存在。
virsh listto verify the VM domain exists.sudo virsh list
登录到虚拟机(root/root)
在配置 Ceph 之前停止虚拟机。
配置虚拟机
当配置虚拟机以使用 Ceph 时,重要的是在适当的位置使用 1fe6a2: 。此外,0a1ef1: 命令通常需要 root 权限(即 3e7665: )并且不会返回适当的结果或通知您需要 root 权限。有关 c26ce4: 命令的参考,请参阅 f46414: Virsh 命令参考virsh
where appropriate. Additionally, virsh commands often require root
privileges (i.e., sudo) and will not return appropriate results or notify
you that root privileges are required. For a reference of virsh
commands, refer to Virsh Command Reference.
使用 02552d: 打开配置文件。
virsh edit.sudo virsh edit {vm-domain-name}
Under
<devices>there should be a<disk>entry.<devices> <emulator>/usr/bin/kvm</emulator> <disk type='file' device='disk'> <driver name='qemu' type='raw'/> <source file='/path/to/image/recent-linux.img'/> <target dev='vda' bus='virtio'/> <address type='drive' controller='0' bus='0' unit='0'/> </disk>
将
/path/to/image/recent-linux.img使用路径到操作系统图像。virtiobus is 2.6.25. See Virtio for details.重要提示:使用
sudo virsh edit而不是文本编辑器。如果您使用文本编辑器编辑 531f83: 下的配置文件,e24a32: 可能无法识别更改。如果 00a725: 下 XML 文件的内容与 13e1b0: 的结果不一致,则您的虚拟机可能无法正常工作。/etc/libvirt/qemuwith a text editor,libvirtmay not recognize the change. If there is a discrepancy between the contents of the XML file under/etc/libvirt/qemuand the result ofsudo virsh dumpxml {vm-domain-name}, then your VM may not work properly.将您创建的 Ceph RBD 图像作为 0472d5: 条目添加。
<disk>entry.<disk type='network' device='disk'> <source protocol='rbd' name='libvirt-pool/new-libvirt-image'> <host name='{monitor-host}' port='6789'/> </source> <target dev='vdb' bus='virtio'/> </disk>
将
{monitor-host}使用您的主机名称,并根据需要替换池和/或图像名称。您可以添加多个 fd2339: 条目用于您的 Ceph 监控器。The e06a2e: 属性是您的虚拟机在 a2e1a4: 目录下出现的逻辑设备名称。可选的 9a08b9: 属性指示要模拟的磁盘设备类型。有效设置是特定于驱动程序的(例如,“ide”,“scsi”,“virtio”,“xen”,“usb”或“sata”)。<host>entries for your Ceph monitors. Thedevattribute is the logical device name that will appear under the/devdirectory of your VM. The optionalbusattribute indicates the type of disk device to emulate. The valid settings are driver specific (e.g., “ide”, “scsi”, “virtio”, “xen”, “usb” or “sata”).请参阅磁盘查看有关 a8d8e8: 元素的详细信息,以及其子元素和属性。
<disk>element, and its child elements and attributes.保存文件。
如果您的 Ceph 存储集群有 4738ad: Ceph 身份验证 01a6c8: 启用(它默认启用),您必须生成一个密钥。Ceph Authentication enabled (it does by default), you must generate a secret.
cat > secret.xml <<EOF
<secret ephemeral='no' private='no'>
        <usage type='ceph'>
                <name>client.libvirt secret</name>
        </usage>
</secret>
EOF
定义密钥。
sudo virsh secret-define --file secret.xml
{uuid of secret}
获取 295734: 密钥并将密钥字符串保存到文件中。
client.libvirtkey and save the key string to a file.ceph auth get-key client.libvirt | sudo tee client.libvirt.key
设置密钥的 UUID。
sudo virsh secret-set-value --secret {uuid of secret} --base64 $(cat client.libvirt.key) && rm client.libvirt.key secret.xml您还必须手动设置密钥,方法是向您之前输入的 8d84e1: 元素添加以下 cccec0: 条目(用命令行示例的结果替换 0a1a81: 值)。
<auth>entry to the<disk>element you entered earlier (replacing theuuidvalue with the result from the command line example above).sudo virsh edit {vm-domain-name}
然后,向域配置文件添加 036793: 元素:
<auth></auth>element to the domain configuration file:... </source> <auth username='libvirt'> <secret type='ceph' uuid='{uuid of secret}'/> </auth> <target ...
注意:示例 ID 是 be83b7: ,而不是在 744ee3: 步骤 2 中生成的 Ceph 名称 2c9051: 。确保您使用的是您生成的 Ceph 名称的 ID 组件。如果您出于某种原因需要重新生成密钥,您必须在执行 f621ee: 之前执行 4334f3: 。
libvirt, not the Ceph nameclient.libvirtas generated at step 2 of 配置 Ceph. Ensure you use the ID component of the Ceph name you generated. If for some reason you need to regenerate the secret, you will have to executesudo virsh secret-undefine {uuid}before executingsudo virsh secret-set-value。
总结
Once you have configured the VM for use with Ceph, you can start the VM. To verify that the VM and Ceph are communicating, you may perform the following procedures.
检查 Ceph 是否正在运行:
ceph health
检查虚拟机是否正在运行。
sudo virsh list
检查虚拟机是否与 Ceph 通信。将 7c6c75: 替换为您的虚拟机域名称:
{vm-domain-name}with the name of your VM domain:sudo virsh qemu-monitor-command --hmp {vm-domain-name} 'info block'
检查是否存在来自 c81815: 的设备:
<target dev='vdb' bus='virtio'/>exists:virsh domblklist {vm-domain-name} --details
如果一切看起来都正常,您可以开始在您的虚拟机中使用 Ceph 块设备。
由 Ceph 基金会带给您
Ceph 文档是一个社区资源,由非盈利的 Ceph 基金会资助和托管Ceph Foundation. 如果您想支持这一点和我们的其他工作,请考虑加入现在加入.