入门:使用和部署模型
在前面两章中,我们已在模型注册表中注册了模型,并将其分配到某些生命周期阶段。在本章中,我们将学习如何访问和使用模型,以及如何利用模型注册表来触发自动化的 CI/CD 模型工作流。
如果你正在使用示例仓库,模型已经通过公开可读的 DVC 远程进行版本管理,因此你可以直接从那里获取并使用模型。如果你使用的是自己的仓库,则需要设置自己的 DVC 远程,并将数据(包括模型)推送到该远程。请查看 配置远程 了解具体操作方法。
下载模型
例如,为了本地测试或在 CI/CD 工作流中使用,下载模型构件非常有用。当模型由 DVC 进行版本管理时,可以通过 DVC Studio 用户界面轻松完成此操作。
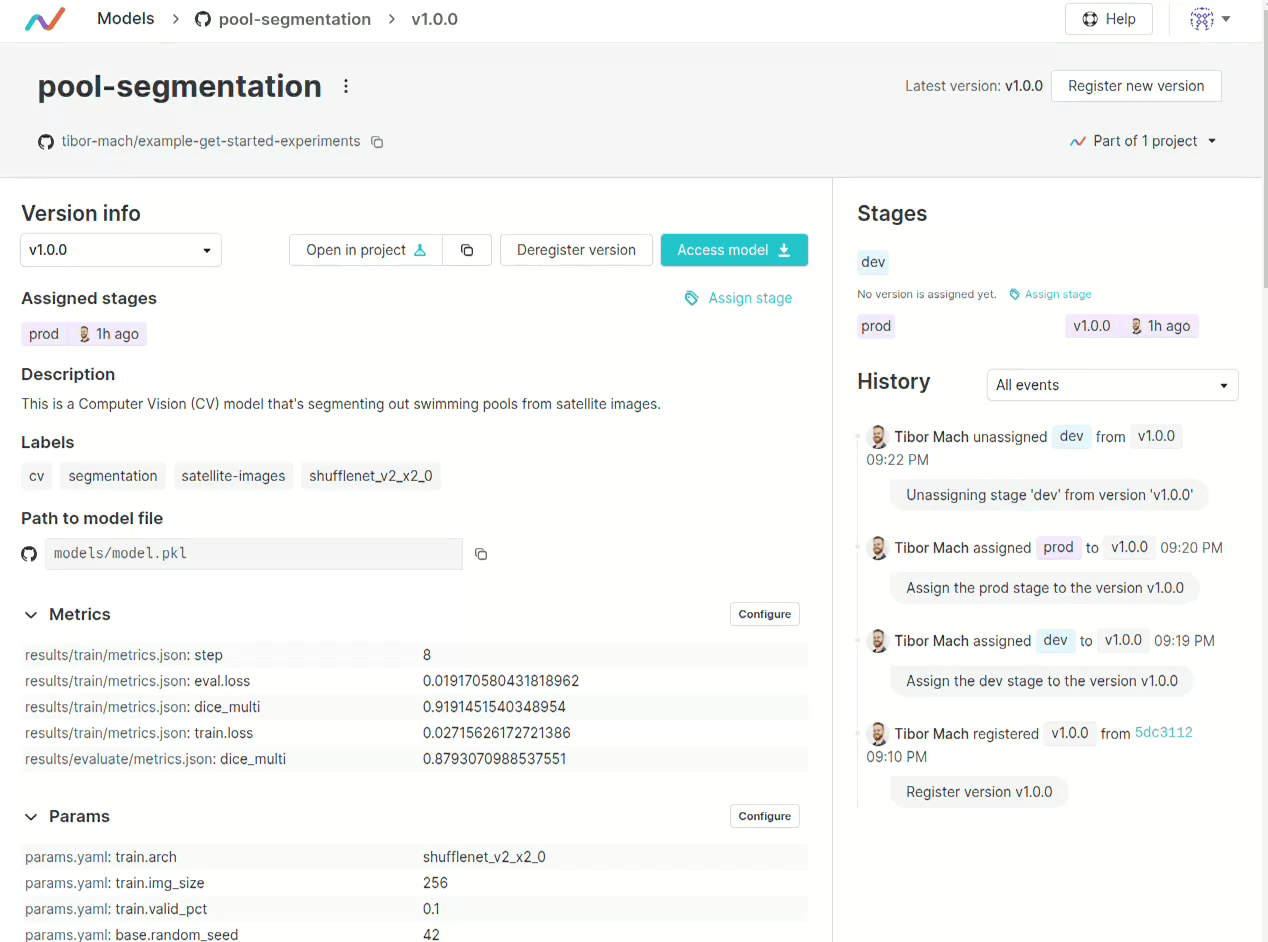
进入你模型的详细视图,在“版本信息”下选择所需的模型版本,然后点击“访问模型”按钮。
DVC Studio 会为你提供多种下载模型的方式——通过 CLI、Python 代码或直接通过网页浏览器。你可以在此查看通过浏览器下载模型的所有步骤:
以下是使用 CLI 的操作方式:
首先,配置 DVC Studio 访问令牌(只需执行一次):
$ dvc config --global studio.token <your Studio token>现在你可以使用以下命令下载模型:
$ dvc artifacts get https://github.com/<user>/example-get-started-experiments pool-segmentation这里你只需将 <user> 替换为你的 GitHub 用户名(在 GitLab 上 URL 类似)。这将从 URL 中 Git 仓库关联的 DVC 远程下载 pool-segmentation 模型的最新版本。你也可以指定不同的构件版本或模型注册表阶段。有关所有选项,请参阅 dvc artifacts get 文档。本指南后续部分 将介绍如何在 CI/CD 中使用此命令。
即使你完全没有 DVC Studio 账户,仍然可以使用 dvc artifacts get 下载模型,但你需要手动提供正确的 Git 和 DVC 远程凭据。更多细节请参见 文档。
将模型注册表操作连接到你的 CI/CD
正如我们在 模型管理章节 中提到的,所有 DVC 模型注册表操作都会以特定格式作为 Git 标签记录在你的 Git 仓库中。
这意味着我们可以在 Git 仓库中创建 CI/CD 操作,当有新版本注册或阶段被分配时自动触发。
接下来,我们将查看一个在 GitHub 和 GitLab 上运行的 CI/CD 工作流示例,每当我们将模型的某个版本分配给模型注册表中的“prod”阶段时,该工作流就会执行。该工作流模拟了模型部署过程,无需实际搭建部署环境(便于你更轻松地测试),但它包含了真实部署任务或其他任何 CI/CD 操作所需的所有要素。
你可以直接复用下面的 CICD 模板,并将其复制到你的项目中。然后,你只需将 DVC Studio 令牌 保存为 GitHub 密钥(或 GitLab CI 变量),以管理与 DVC 远程存储 的身份验证。这样我们只需在 GitHub/GitLab 上保存 DVC Studio 令牌,而由 DVC Studio 来管理具体的存储凭据。
在你自己的使用场景中,你可能需要对工作流进行一些修改,你可以在 下一节 找到关于 CICD 模板的更详细说明。在那里,你还可以了解如何在不使用 DVC Studio 的情况下设置这些 CICD 任务。
name: Deploy Model (Template)

on:
  # the workflow is triggered whenever a tag is pushed to the repository
  push:
    tags:
      - '*'
jobs:
  # This job parses the git tag with the GTO GitHub Action to identify model registry actions. You can most likely copy this job and what precedes it verbatim into your own workflow
  parse:
    runs-on: ubuntu-latest
    steps:
      - uses: actions/checkout@v3
      - name: 'Parse GTO tag'
        id: gto
        uses: iterative/gto-action@v2
    outputs:
      event: ${{ steps.gto.outputs.event }}
      name: ${{ steps.gto.outputs.name }}
      stage: ${{ steps.gto.outputs.stage }}
      version: ${{ steps.gto.outputs.version }}

  deploy-model:
    needs: parse
    # using the outputs from the "parse" job, we run this job only for actions
    # in the model registry and only when the model was assigned to a stage called "prod"
    # You can replace the conditions with your own
    if:
      ${{ needs.parse.outputs.event == 'assignment' && needs.parse.outputs.stage
      == 'prod' }}
    runs-on: ubuntu-latest
    steps:
      - uses: iterative/setup-dvc@v1
      # this step uses DVC to download the model from the remote repository and deploys the model
      # Model deployment is mocked here as it is specific to each deployment environment
      # The DVC Studio token is used to avoid having to store specific remote storage credentials on GitHub
      - name: Get Model For Deployment
        run: |
          dvc config --global studio.token ${{ secrets.DVC_STUDIO_TOKEN }}
          dvc artifacts get  ${{ github.server_url }}/${{ github.repository }} ${{ needs.parse.outputs.name }} --rev ${{ needs.parse.outputs.version }}
echo "The right model is available and you can use the rest of this command to deploy it. Good job!"# Deploy Model (Template)
workflow:
rules:
# Run the pipeline whenever a tag is pushed to the repository
- if: $CI_COMMIT_TAG
parse:
# This job parses the model tag to identify model registry actions
# You can most likely copy this job and what precedes it verbatim into your own workflow
image: python:3.11-slim
script:
# Install GTO to parse model tags
- pip install gto
# This job parses the model tags to identify model registry actions
- echo "CI_COMMIT_TAG - ${CI_COMMIT_TAG}"
- echo MODEL_NAME="$(gto check-ref ${CI_COMMIT_TAG} --name)" >> parse.env
- echo MODEL_VERSION="$(gto check-ref ${CI_COMMIT_TAG} --version)" >>
parse.env
- echo MODEL_EVENT="$(gto check-ref ${CI_COMMIT_TAG} --event)" >> parse.env
- echo MODEL_STAGE="$(gto check-ref ${CI_COMMIT_TAG} --stage)" >> parse.env
# Print variables saved to parse.env
- cat parse.env
artifacts:
reports:
dotenv: parse.env
deploy-model:
needs:
- job: parse
artifacts: true
image: python:3.11-slim
script:
# Check if the model is assigned to prod (variables from parse.env are only available in the 'script' section)
# You can replace the conditions with your own
- if [[ $MODEL_EVENT == 'assignment' && $MODEL_STAGE == 'prod' ]]; then echo
"Deploy model"; else exit 1; fi
# Install DVC
- pip install dvc
# Build commands to download and deploy the model
- dvc config --global studio.token ${DVC_STUDIO_TOKEN}
- dvc artifacts get ${CI_REPOSITORY_URL} ${MODEL_NAME} --rev
${MODEL_VERSION}
- echo "The right model is available and you can use the rest of this
command to deploy it. Good job!"要查看一个真实世界的模型部署示例,可以参考我们的示例仓库中的 类似工作流,该工作流会在模型被分配到某个阶段时,将其特定版本部署到 Amazon Sagemaker 端点用于推理。
CICD 模板的详细说明
设置工作流
在本小节中,我们将为 CICD 工作流设置一个触发器,并解析来自模型注册表操作的信息。这部分代码大多是样板代码,你可以直接原样复制粘贴到你自己的工作流中。
前往 .github/workflows/deploy-model-template.yml 文件。这是 GitHub 用来运行 CICD 工作流的文件。你可以在我们的示例仓库中查看该工作流的 运行记录。
在工作流文件的开头,你会看到如下代码
on:
  # the workflow is triggered whenever a tag is pushed to the repository
  push:
    tags:
- '*'workflow:
rules:
# the workflow is triggered whenever a tag is pushed to the repository
- if: $CI_COMMIT_TAG这段代码告诉 GitHub/GitLab 每当有标签推送到仓库时就运行该工作流。这意味着每次我们执行模型注册表操作时,工作流都会被触发。
接下来,我们希望工作流能够理解模型注册表事件,以便我们可以利用这些信息来调整其行为。这时我们的 GTO GitHub 动作就派上用场了——在工作流的“parse”任务中,它会解析所有标签,如果它们是 GTO 标签,则会提供模型名称、版本、阶段(如果有)以及模型注册表中的事件信息。
在 GitLab CI 中,我们无法使用 GitHub 动作。但仍然可以直接使用 gto check-ref 命令来实现相同的效果。
# This job parses the git tag with the GTO GitHub Action to identify model registry actions
parse:
  runs-on: ubuntu-latest
  steps:
    - uses: actions/checkout@v3
    - name: 'Parse GTO tag'
      id: gto
      uses: iterative/gto-action@v2
  outputs:
    event: ${{ steps.gto.outputs.event }}
    name: ${{ steps.gto.outputs.name }}
    stage: ${{ steps.gto.outputs.stage }}
version: ${{ steps.gto.outputs.version }}parse:
# This job parses the model tag to identify model registry actions
image: python:3.11-slim
script:
# Install GTO to parse model tags
- pip install gto
# This job parses the model tags to identify model registry actions
- echo "CI_COMMIT_TAG - ${CI_COMMIT_TAG}"
- echo MODEL_NAME="$(gto check-ref ${CI_COMMIT_TAG} --name)" >> parse.env
- echo MODEL_VERSION="$(gto check-ref ${CI_COMMIT_TAG} --version)" >>
parse.env
- echo MODEL_EVENT="$(gto check-ref ${CI_COMMIT_TAG} --event)" >> parse.env
- echo MODEL_STAGE="$(gto check-ref ${CI_COMMIT_TAG} --stage)" >> parse.env
# Print variables saved to parse.env
- cat parse.env
artifacts:
reports:
dotenv: parse.env部署模型
下一个名为“deploy-model”的任务将实际执行操作。首先,它使用上一小节中定义的“parse”任务的输出,并检查是否应执行该操作。如果标签是由模型注册表生成的,并且对应的操作是分配到“prod”阶段,则继续执行工作流的其余部分。你可以根据自己的具体工作流修改这些条件。
deploy-model:
  needs: parse
  # using the outputs from the "parse" job, we run this job only for actions
  # in the model registry and only when the model was assigned to a stage called "prod"
  # You can replace the conditions with your own
  if:
    ${{ needs.parse.outputs.event == 'assignment' && needs.parse.outputs.stage
== 'prod' }}deploy-model:
needs:
- job: parse
artifacts: true
image: python:3.11-slim
script:
# Check if the model is assigned to prod (variables from parse.env are only available in the 'script' section)
# You can replace the conditions with your own
- if [[ $MODEL_EVENT == 'assignment' && $MODEL_STAGE == 'prod' ]]; then echo
"Deploy model"; else exit 1; fi工作流的下一步是设置 DVC(使用 GitHub Action,但也可以像下面的 GitLab 示例一样手动完成)。这使我们能够运行与本章开头使用的相同的 dvc artifacts get 命令来下载模型。
最后,在工作流的最后一步,我们使用 dvc artifacts get 下载正确版本的模型,然后即可在 CICD 中进行部署或其它用途。
steps:
  - uses: iterative/setup-dvc@v1
  - name: Get Model For Deployment
    run: |
      dvc config --global studio.token ${{ secrets.DVC_STUDIO_TOKEN }}
      dvc artifacts get  ${{ github.server_url }}/${{ github.repository }} ${{ needs.parse.outputs.name }} --rev ${{ needs.parse.outputs.version }}
echo "The right model is available and you can use the rest of this command to deploy it. Good job!" script:
...
# Install DVC
- pip install dvc
# Build commands to download and deploy the model
- dvc config --global studio.token ${DVC_STUDIO_TOKEN}
- dvc artifacts get ${CI_REPOSITORY_URL} ${MODEL_NAME} --rev ${MODEL_VERSION}
- echo "The right model is available and you can use the rest of this command to deploy it. Good job!"这里,我们使用 parse 任务的输出来指定正确的模型版本。然后设置 DVC Studio 令牌,该令牌已作为 GitHub 密钥(或 GitLab CI 变量)存储在我们的仓库中,用于管理与 DVC 远程存储 的身份验证。这样,我们只需将 DVC Studio 令牌保存在 GitHub/GitLab 上,由 Studio 为我们管理具体的存储凭据。
最后,github.server_url 和 github.repository 是 GitHub 中的默认环境变量,它们组合起来构成我们在 GitHub 上的仓库 URL。在 GitLab 中,CI_REPOSITORY_URL 起到相同的作用。当然,我们也可以手动指定该 URL。
如果你不使用 DVC Studio,仍然可以使用 dvc artifacts get,但你需要将远程存储凭据保存在 GitHub/GitLab 上,并在 CI/CD 工作流中使用这些凭据配置 DVC。此外,你还需在工作流中检出仓库。更多细节请参见 文档。