注意
本文档适用于 Ceph 开发版本。
关于如何设置Ceph Kerberos认证的详细文档
本文档提供了关于 Kerberos 授权协议的详细信息。这是第 1 草稿,我们将努力随着可能发生的代码更改而保持其更新。
有几种这种协议的自由实现可用(MIT、Heimdal、MS 等),涵盖了广泛的操作系统。最初开发 Kerberos 的麻省理工学院(MIT)继续开发他们的 Kerberos 软件包,这是我们选择与之合作实现。MIT Kerberos.
请向 Daniel Oliveira (doliveira@suse.com)
最后更新:2018 年 12 月 3 日
背景
在我们进入Kerberos 详细信息,让我们定义一些术语,以便我们了解它可以做什么,它能做什么和不能做什么:
- 目录服务
目录服务是一个可定制的信息存储库,它作为一个单一的点,用户可以从该点定位网络中分布的资源和服务。这个可定制的信息存储库还向管理员提供了一个单一的点来管理其对象及其属性。虽然这个信息存储库对网络用户来说看起来是一个单一的点,但实际上它通常是分布式存储的。目录服务至少包含一个目录服务器和并且基于X.500 标准.
OpenLDAP、389 目录服务器、MS Active Directory、NetIQ eDirectory是一些很好的例子。
目录服务通常被描述为一次写入多次读取,这意味着通常存储在目录服务中的数据不会期望每次访问时都更改。
形成目录服务的数据库旨在处理.
- LDAP(轻量级目录访问协议 v3)
LDAP 是一组 LDAP 协议交换(不是服务器实现)它定义了数据访问的方法。LDAPv3 是由 IETF 在 RFC 2251 中定义的标准,它描述了数据如何在目录服务(数据模型或 DIT)中表示。
最后,它定义了数据如何加载到(导入)和从(导出)目录服务(使用 LDIF)。LDAP 没有定义数据如何存储或操作。数据存储是一个“自动魔法”过程,就标准而言,并由后端模块处理。
没有目录服务实现包含 LDAP v3 协议的所有功能。所有目录服务器实现都有其不同的问题和/或异常,以及可能不会像另一个目录服务器实现那样返回结果的功能。
- 身份验证
身份验证是验证凭据(如用户名/ID 和密码)以验证身份。系统使用凭据确定一个人是否是他们声称的人。
通常,身份验证是通过用户名和密码完成的,有时与(单因素、双因素或多因素)身份验证因素结合使用,
- 确保请求代表一个现有且有效的用户帐户。
授权发生在系统成功验证身份后,最终给予用户完全权限访问资源,如信息、文件、数据库等,几乎任何东西。它决定了访问系统的能力以及程度(给予何种权限/权利以及给谁/什么)。
- Auditing
审计将身份验证和授权的结果都取出来并记录到审计日志中。审计日志记录了身份验证和授权期间采取的所有行动,供管理员以后审查。虽然身份验证和授权是预防性系统(防止未经授权的访问),但审计是反应性系统(它提供了有关如何/何时/何地有人访问环境的详细日志)。 and records them into an audit log. The audit log records all actions taking by/during the authentication and authorization for later review by the administrators. While authentication and authorization are preventive systems (in which unauthorized access is prevented), auditing is a reactive system (in which it gives detailed log of how/when/where someone accessed the environment).
- Kerberos(KRB v5)
Kerberos 是一种网络身份验证协议。它旨在通过使用密钥加密(对称密钥)为客户端/服务器应用程序提供强大的身份验证。可以从 MIT 获取此协议的自由实现。然而,Kerberos 也存在于许多商业产品中。
它旨在为不安全的网络上的服务提供安全的身份验证。Kerberos 使用票据来验证用户或服务应用程序,并且永远不会在网络中以明文传输密码。因此,客户端和服务器都可以在不发送任何未加密的秘密的情况下证明他们的身份。
Kerberos 可用于单点登录(SSO)。SSO 的想法很简单,我们只想登录一次,然后能够使用我们有权访问的任何服务,而无需在每个服务上登录。
- 简单身份验证和安全层(SASL)
SASL(RFC 4422)是一个帮助开发人员实现不同身份验证机制(实现一系列挑战和响应)的框架,允许客户端和服务器为每个连接协商一个双方都接受的机制,而不是硬编码它们。
SASL 机制的例子:
ANONYMOUS(RFC 4505)
对于访客访问,意味着未经过身份验证
CRAM-MD5(RFC 2195)
基于HMAC-MD5的简单挑战-响应方案。比DIGEST-MD5和GSSAPI不安全。
DIGEST-MD5(RFC 2831)
HTTP Digest 兼容(部分)基于MD5的挑战-响应方案,提供数据安全层。它比PLAIN文本密码更受青睐,可以防止PLAIN文本攻击。它是LDAPv3服务器的强制身份验证方法。
EXTERNAL(RFCs 4422、5246、4301、2119)
其中身份验证在上下文中是隐式的(即;对于使用IPsec或TLS [TLS/SSL执行基于证书的身份验证] 的协议)。此方法使用公钥进行强身份验证。
GS2(RFC 5801)
支持任意GSS-API机制的SASL机制家族
NTLM(MS 专有)
MS Windows NT LAN Manager身份验证机制
OAuth 1.0/2.0(RFCs 5849、6749、7628)
委托资源访问的身份验证协议
OTP(RFC 2444)
一次性密码机制(取代SKEY机制)
PLAIN(RFC 4616)
简单明文密码机制(RFC 4616)。由于相对缺乏强度,这不是大多数应用程序的首选机制。
SCRAM(RFCs 5802、7677)
基于现代挑战-响应方案和通道绑定支持的机制
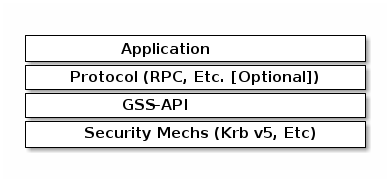
- 通用安全服务应用程序接口(GSSAPI)
GSSAPI(RFCs 2078、2743、2744、4121、4752)广泛用于协议实现者作为在其应用程序中实现 Kerberos v5 支持的一种方式。它提供了一个通用接口和消息格式,可以封装任何具有 GSSAPI 兼容库的身份验证交换。
它本身没有定义协议、身份验证或安全机制;相反,它使应用程序开发人员能够通过为安全服务提供一个统一的通用 API 来支持多种身份验证机制。
Microsoft Windows Kerberos实现不包括 GSSAPI 支持,而是包括Microsoft 专用 API,安全支持提供者接口(SSPI)。在 Windows 中,SSPI 客户端可以与GSSAPI 服务器.
大多数支持 GSSAPI 的应用程序也支持 Kerberos v5。
- 简单和受保护的 GSSAPI 协商机制(SPNEGO)
如我们所见,GSSAPI 解决了提供单个 API 给不同身份验证机制的问题。然而,它并没有解决协商使用哪种机制的问题。事实上,对于 GSSAPI 来说,要使其工作,相互通信的两个应用程序必须事先知道它们打算使用的身份验证机制,如果只支持一种机制(这意味着 Kerberos v5),这通常不是问题。
然而,如果有多种机制可供选择,则需要一种方法来安全地协商客户端和服务器之间相互支持的机制;这就是SPNEGO(RFC 2478、4178)发挥作用的地方。
SPNEGO为参与身份验证的两方提供了一个框架,让它们从一组可能的身份验证机制中选择,以保持安全协议对使用它的应用程序协议的不可见性。
它是一种使用GSSAPI 身份验证机制并在实现中协商几种可用的身份验证机制,选择一个用于满足应用程序协议身份验证需求的协议。
它是一种元协议完全在其他应用程序协议中传输;如果没有应用程序协议,它永远不会被直接使用。
这为什么重要?我们为什么关心?比如,根本不关心?
在了解了这些背景信息的情况下,我们可以轻松地描述一些事情,比如:
1.Ceph Kerberos 身份验证完全基于 MITKerberos实现,使用GSSAPI.
2. 目前我们仍然在使用Kerberos 默认后端数据库,但我们计划添加 LDAP 作为后端,这将为我们提供使用 GSSAPI(KRB5)进行身份验证和使用 LDAP(LDAPv3)进行授权,通过SASL 机制.
在我们开始之前
我们假设环境已经有一些外部服务正常运行:
Kerberos 需要正确配置,这也意味着(对于每个服务器和 KDC):
不仅 Kerberos,Ceph 也依赖于时间同步。
DNS 解析
双(正向和反向)区域,具有完整的域名(fqdn)
(hostname + domain.name)KDC 发现可以设置为使用 DNS
(srv resources)作为(RFCs 2052、2782),以及主机或域名传递给适当的领域(txt record).即使这些 DNS 条目/设置不是运行
Kerberos realm所必需的,它们确实有助于消除在所有客户端上进行手动配置的需要。这极其重要,一旦大多数 Kerberos 问题都与名称解析有关。Kerberos 在检查系统名称和主机查找时非常挑剔。
尽可能地,为了避免单点故障,为基础设施中的每个部分/组件设置备用、次要或从属,以避免
(ntp, dns, and kdc servers).
Also, the followingKerberos 术语很重要:
票据
票据或凭据是一组可用于验证客户端身份的信息。Kerberos 票据可以存储在文件中,也可以仅存在于内存中。
获得的第一张票据是票据授予票据(TGT),它允许客户端获得其他票据。这些额外的票据授予客户端特定服务的权限。这些额外票据的请求和授予是透明的。
TGT 在指定的时间过期,它允许客户端获得其他票据,这些票据授予权限给特定服务。请求和授予这些额外票据是用户透明的。
密钥分发中心(KDC)。
KDC 为客户端创建一个票据授予票据(TGT),使用客户端的密码作为密钥对其进行加密,并将加密的 TGT 发送回客户端。客户端然后尝试使用其密码解密 TGT。如果客户端成功解密 TGT(即,如果客户端给出了正确的密码),它将保留解密的 TGT,这表明客户端身份的证明。
KDC 由三个组件组成:
Kerberos 数据库,其中存储有关主体及其所属领域的信息等。
身份验证服务(AS)
票据授予服务(TGS)
客户端 f69981: 仅被授权用于一个文件系统:
任何用户、主机或服务发送票据请求。
主体
它是 Kerberos 可以分配票据的唯一身份。主体可以有任意数量的组件。每个组件由组件分隔符分隔,通常为
/。最后一个组件是域,它由领域分隔符与主体其余部分分开,通常为@.如果主体中没有领域组件,则假定主体位于它正在使用的上下文中的默认领域。
通常,主体分为三个部分:
The
primary,instance和realm主体格式的一个典型 Kerberos V5 主体是
primary/instance@REALM.The
primary是主体的第一部分。在用户的情况下,它与username相同。对于主机,主要词是host。对于 Ceph,将使用ceph作为主要名称,这使得组织和识别与 Ceph 相关的主体更容易。The
instance是一个可选的字符串,用于限定主体。实例与主体由斜杠/分隔。在用户的情况下,实例通常是null,但用户也可能有一个额外的主体,其实例称为admin,使用其中一个来管理数据库。主体
johndoe@MYDOMAIN.COM与主体johndoe/admin@MYDOMAIN.COM完全分开,具有单独的密码和单独的权限。在主机的情况下,实例是完整的主机名,即,osd1.MYDOMAIN.COM.The
realm是 Kerberos 领域。通常,Kerberos 领域是域名,以大写字母表示。例如,机器osd1.MYDOMAIN.COM将位于领域MYDOMAIN.COM.密钥表
密钥表文件存储了可用于代替给定主体的密码挑战的实际加密密钥。创建密钥表文件对于非交互式主体很有用,例如服务主体名称,它们通常与长时间运行的进程(如 Ceph 守护进程)相关联。密钥表文件不必与单个主体进行“1:1 映射”。多个不同的主体密钥可以存储在单个密钥表文件中:
密钥表文件允许用户/服务在不了解密码的情况下进行身份验证。由于这一点,密钥表应使用适当的控制进行保护,以防止未经授权的用户使用它。
默认客户端密钥表文件是
/etc/krb5.keytab
The ‘Ceph side’ of the things
为了配置到 KDC 的连接(从 Ceph 节点):
登录 Kerberos 客户端(Ceph 服务器节点)并确认其已正确配置,方法是检查和编辑
/etc/krb5.conf文件正确:/etc/krb5.conf [libdefaults] dns_canonicalize_hostname = false rdns = false forwardable = true dns_lookup_realm = true dns_lookup_kdc = true allow_weak_crypto = false default_realm = MYDOMAIN.COM default_ccache_name = KEYRING:persistent:%{uid} [realms] MYDOMAIN.COM = { kdc = kerberos.mydomain.com admin_server = kerberos.mydomain.com ... } ...
登录到KDC 服务器并确认其已正确配置为身份验证到所讨论的 Kerberos 领域:
与 Kerberos 相关的 DNS RRs:
/var/lib/named/master/mydomain.com
kerberos                IN A        192.168.10.21
kerberos-slave          IN A        192.168.10.22
_kerberos               IN TXT      "MYDOMAIN.COM"
_kerberos._udp          IN SRV      1 0 88 kerberos
_kerberos._tcp          IN SRV      1 0 88 kerberos
_kerberos._udp          IN SRV      20 0 88 kerberos-slave
_kerberos-master._udp   IN SRV      0 0 88 kerberos
_kerberos-adm._tcp      IN SRV      0 0 749 kerberos
_kpasswd._udp           IN SRV      0 0 464 kerberos
...
KDC 配置文件:
/var/lib/kerberos/krb5kdc/kdc.conf
[kdcdefaults]
        kdc_ports = 750,88
[realms]
        MYDOMAIN.COM = {
            acl_file = /var/lib/kerberos/krb5kdc/kadm5.acl
            admin_keytab = FILE:/var/lib/kerberos/krb5kdc/kadm5.keytab
            default_principal_flags = +postdateable +forwardable +renewable +proxiable
                                                    +dup-skey -preauth -hwauth +service
                                                    +tgt-based +allow-tickets -pwchange
                                                    -pwservice
            dict_file = /var/lib/kerberos/krb5kdc/kadm5.dict
            key_stash_file = /var/lib/kerberos/krb5kdc/.k5.MYDOMAIN.COM
            kdc_ports = 750,88
            max_life = 0d 10h 0m 0s
            max_renewable_life = 7d 0h 0m 0s
        }
...
仍然在 KDC 服务器上,运行 Kerberos 管理实用程序;
kadmin.local这样我们就可以列出所有已创建的主体。kadmin.local: listprincs K/M@MYDOMAIN.COM krbtgt/MYDOMAIN.COM@MYDOMAIN.COM kadmin/admin@MYDOMAIN.COM kadmin/changepw@MYDOMAIN.COM kadmin/history@MYDOMAIN.COM kadmin/kerberos.mydomain.com@MYDOMAIN.COM root/admin@MYDOMAIN.COM ...
为我们要通过 Kerberos 进行身份验证的每个 Ceph 集群节点添加一个主体我们想要:
添加主体:
kadmin.local: addprinc -randkey ceph/ceph-mon1 Principal "ceph/ceph-mon1@MYDOMAIN.COM" created. kadmin.local: addprinc -randkey ceph/ceph-osd1 Principal "ceph/ceph-osd1@MYDOMAIN.COM" created. kadmin.local: addprinc -randkey ceph/ceph-osd2 Principal "ceph/ceph-osd2@MYDOMAIN.COM" created. kadmin.local: addprinc -randkey ceph/ceph-osd3 Principal "ceph/ceph-osd3@MYDOMAIN.COM" created. kadmin.local: addprinc -randkey ceph/ceph-osd4 Principal "ceph/ceph-osd4@MYDOMAIN.COM" created. kadmin.local: listprincs K/M@MYDOMAIN.COM krbtgt/MYDOMAIN.COM@MYDOMAIN.COM kadmin/admin@MYDOMAIN.COM kadmin/changepw@MYDOMAIN.COM kadmin/history@MYDOMAIN.COM kadmin/kerberos.mydomain.com@MYDOMAIN.COM root/admin@MYDOMAIN.COM ceph/ceph-mon1@MYDOMAIN.COM ceph/ceph-osd1@MYDOMAIN.COM ceph/ceph-osd2@MYDOMAIN.COM ceph/ceph-osd3@MYDOMAIN.COM ceph/ceph-osd4@MYDOMAIN.COM ...
这与创建一个用户主体
kadmin.local: addprinc johndoe WARNING: no policy specified for johndoe@MYDOMAIN.COM; defaulting to no policy Enter password for principal "johndoe@MYDOMAIN.COM": Re-enter password for principal "johndoe@MYDOMAIN.COM": Principal "johndoe@MYDOMAIN.COM" created. ...
创建一个密钥表文件对于每个 Ceph 集群节点:
由于默认客户端密钥表文件是
/etc/krb5.keytab,我们将想要使用不同的文件名,因此我们指定要创建的密钥表文件和从哪个主体导出密钥:kadmin.local: ktadd -k /etc/gss_client_mon1.ktab ceph/ceph-mon1 Entry for principal ceph/ceph-mon1 with kvno 2, encryption type aes256-cts-hmac-sha1-96 added to keytab WRFILE:/etc/gss_client_mon1.ktab. Entry for principal ceph/ceph-mon1 with kvno 2, encryption type aes128-cts-hmac-sha1-96 added to keytab WRFILE:/etc/gss_client_mon1.ktab. Entry for principal ceph/ceph-mon1 with kvno 2, encryption type des3-cbc-sha1 added to keytab WRFILE:/etc/gss_client_mon1.ktab. Entry for principal ceph/ceph-mon1 with kvno 2, encryption type arcfour-hmac added to keytab WRFILE:/etc/gss_client_mon1.ktab. kadmin.local: ktadd -k /etc/gss_client_osd1.ktab ceph/ceph-osd1 Entry for principal ceph/ceph-osd1 with kvno 2, encryption type aes256-cts-hmac-sha1-96 added to keytab WRFILE:/etc/gss_client_osd1.ktab. Entry for principal ceph/ceph-osd1 with kvno 2, encryption type aes128-cts-hmac-sha1-96 added to keytab WRFILE:/etc/gss_client_osd1.ktab. Entry for principal ceph/ceph-osd1 with kvno 2, encryption type des3-cbc-sha1 added to keytab WRFILE:/etc/gss_client_osd1.ktab. Entry for principal ceph/ceph-osd1 with kvno 2, encryption type arcfour-hmac added to keytab WRFILE:/etc/gss_client_osd1.ktab. kadmin.local: ktadd -k /etc/gss_client_osd2.ktab ceph/ceph-osd2 Entry for principal ceph/ceph-osd2 with kvno 2, encryption type aes256-cts-hmac-sha1-96 added to keytab WRFILE:/etc/gss_client_osd2.ktab. Entry for principal ceph/ceph-osd2 with kvno 2, encryption type aes128-cts-hmac-sha1-96 added to keytab WRFILE:/etc/gss_client_osd2.ktab. Entry for principal ceph/ceph-osd2 with kvno 2, encryption type des3-cbc-sha1 added to keytab WRFILE:/etc/gss_client_osd2.ktab. Entry for principal ceph/ceph-osd2 with kvno 2, encryption type arcfour-hmac added to keytab WRFILE:/etc/gss_client_osd2.ktab. kadmin.local: ktadd -k /etc/gss_client_osd3.ktab ceph/ceph-osd3 Entry for principal ceph/ceph-osd3 with kvno 3, encryption type aes256-cts-hmac-sha1-96 added to keytab WRFILE:/etc/gss_client_osd3.ktab. Entry for principal ceph/ceph-osd3 with kvno 3, encryption type aes128-cts-hmac-sha1-96 added to keytab WRFILE:/etc/gss_client_osd3.ktab. Entry for principal ceph/ceph-osd3 with kvno 3, encryption type des3-cbc-sha1 added to keytab WRFILE:/etc/gss_client_osd3.ktab. Entry for principal ceph/ceph-osd3 with kvno 3, encryption type arcfour-hmac added to keytab WRFILE:/etc/gss_client_osd3.ktab. kadmin.local: ktadd -k /etc/gss_client_osd4.ktab ceph/ceph-osd4 Entry for principal ceph/ceph-osd4 with kvno 4, encryption type aes256-cts-hmac-sha1-96 added to keytab WRFILE:/etc/gss_client_osd4.ktab. Entry for principal ceph/ceph-osd4 with kvno 4, encryption type aes128-cts-hmac-sha1-96 added to keytab WRFILE:/etc/gss_client_osd4.ktab. Entry for principal ceph/ceph-osd4 with kvno 4, encryption type des3-cbc-sha1 added to keytab WRFILE:/etc/gss_client_osd4.ktab. Entry for principal ceph/ceph-osd4 with kvno 4, encryption type arcfour-hmac added to keytab WRFILE:/etc/gss_client_osd4.ktab. # ls -1 /etc/gss_client_* /etc/gss_client_mon1.ktab /etc/gss_client_osd1.ktab /etc/gss_client_osd2.ktab /etc/gss_client_osd3.ktab /etc/gss_client_osd4.ktab
我们也可以通过以下方式检查这些新创建的密钥表客户端文件:
# klist -kte /etc/gss_client_mon1.ktab Keytab name: FILE:/etc/gss_client_mon1.ktab KVNO Timestamp Principal ---- ------------------- ------------------------------------------------------ 2 10/8/2018 14:35:30 ceph/ceph-mon1@MYDOMAIN.COM (aes256-cts-hmac-sha1-96) 2 10/8/2018 14:35:31 ceph/ceph-mon1@MYDOMAIN.COM (aes128-cts-hmac-sha1-96) 2 10/8/2018 14:35:31 ceph/ceph-mon1@MYDOMAIN.COM (des3-cbc-sha1) 2 10/8/2018 14:35:31 ceph/ceph-mon1@MYDOMAIN.COM (arcfour-hmac) ...
一个新的设置参数在 Ceph 中添加了
gss_ktab_client_file,它指向与 Ceph 节点(或主体)(or principal)相关的密钥表文件。默认情况下,它指向
/var/lib/ceph/$name/gss_client_$name.ktab。因此,对于 Ceph 服务器osd1.mydomain.com,密钥表文件的位置和名称应该是:/var/lib/ceph/osd1/gss_client_osd1.ktab因此,我们需要
scp将这些新创建的密钥表文件从 KDC 复制到相应的 Ceph 集群节点(即:# for node in mon1 osd1 osd2 osd3 osd4; do scp /etc/gss_client_$node*.ktab root@ceph-$node:/var/lib/ceph/$node/; done或者,无论您感觉舒适的其他方式,只要每个密钥表客户端文件都能复制到正确的位置。
在这一点上,即使不使用任何密钥表客户端文件我们也应该能够身份验证一个用户主体:
# kdestroy -A && kinit -f johndoe && klist -f Password for johndoe@MYDOMAIN.COM: Ticket cache: KEYRING:persistent:0:0 Default principal: johndoe@MYDOMAIN.COM Valid starting Expires Service principal 10/10/2018 15:32:01 10/11/2018 07:32:01 krbtgt/MYDOMAIN.COM@MYDOMAIN.COM renew until 10/11/2018 15:32:01, Flags: FRI ...
假设密钥表客户端文件已经复制并可在 Kerberos 客户端(Ceph 集群节点)上获得,我们应该能够在继续之前使用它进行身份验证:
# kdestroy -A && kinit -k -t /etc/gss_client_mon1.ktab -f 'ceph/ceph-mon1@MYDOMAIN.COM' && klist -f Ticket cache: KEYRING:persistent:0:0 Default principal: ceph/ceph-mon1@MYDOMAIN.COM Valid starting Expires Service principal 10/10/2018 15:54:25 10/11/2018 07:54:25 krbtgt/MYDOMAIN.COM@MYDOMAIN.COM renew until 10/11/2018 15:54:25, Flags: FRI ...
如果存在并且可读,则使用默认客户端密钥表自动获取 GSSAPI 客户端应用程序的初始凭据。客户端密钥表中第一项的主机名用于默认获取初始凭据:
The
KRB5_CLIENT_KTNAME environment变量。The
default_client_keytab_name34792e: 中的配置变量[libdefaults].The hardcoded default,
DEFCKTNAME.
硬编码默认值
KRB5_CLIENT_KTNAME,因此我们内部设置环境变量gss_ktab_client_file, so/var/lib/ceph/osd1/gss_client_osd1.ktab, and change theceph.conffile to add the new authentication method./etc/ceph/ceph.conf [global] ... auth_cluster_required = gss auth_service_required = gss auth_client_required = gss gss_ktab_client_file = /{$my_new_location}/{$my_new_ktab_client_file.keytab} ...With that the GSSAPIs will then be able to read the keytab file and using the process of name and service resolution (provided by the DNS), able to request a TGT as follows:
User/Client sends principal identity and credentials to the KDC Server (TGT request).
KDC checks its internal database for the principal in question.
a TGT is created and wrapped by the KDC, using the principal’s key (TGT + Key).
The newly created TGT, is decrypted and stored in the credentials cache.
At this point, Kerberos/GSSAPI aware applications (and/or services) are able to check the list of active TGT in the keytab file.
** For Ceph Developers Only **
We certainly could have used straight native KRB5 APIs (instead of
GSSAPIs), but we wanted a more portable option as regards network security,
which is the hallmark of the GSS (Generic Security Standard) -API.
It does not actually provide security services itself.
Rather, it is a framework that provides security services to callers in a generic way.
The GSS-API does two main things:
It creates a security context in which data can be passed between applications. A context can be thought of as a sort of “state of trust” between two applications.
Applications that share a context know who each other are and thus can permit data transfers between them as long as the context lasts.
It applies one or more types of protection, known as “security services”, to the data to be transmitted.
GSS-API provides several types of portability for applications:
Mechanism independence. GSS-API provides a generic interface to the mechanisms for which it has been implemented. By specifying a default security mechanism, an application does not need to know which mechanism it is using (for example, Kerberos v5), or even what type of mechanism it uses. As an example, when an application forwards a user’s credential to a server, it does not need to know if that credential has a Kerberos format or the format used by some other mechanism, nor how the credentials are stored by the mechanism and accessed by the application. (If necessary, an application can specify a particular mechanism to use)
Protocol independence. The GSS-API is independent of any communications protocol or protocol suite. It can be used with applications that use, for example, sockets, RCP, or TCP/IP. RPCSEC_GSS “RPCSEC_GSS Layer” is an additional layer that smoothly integrates GSS-API with RPC.
Platform independence. The GSS-API is completely oblivious to the type of operating system on which an application is running.
Quality of Protection independence. Quality of Protection (QOP) is the name given to the type of algorithm used in encrypting data or generating cryptographic tags; the GSS-API allows a programmer to ignore QOP, using a default provided by the GSS-API. (On the other hand, an application can specify the QOP if necessary.)
The basic security offered by the GSS-API is authentication. Authentication is the verification of an identity: if you are authenticated, it means that you are recognized to be who you say you are.
The GSS-API provides for two additional security services, if supported by the underlying mechanisms:
Integrity: It’s not always sufficient to know that an application sending you data is who it claims to be. The data itself could have become corrupted or compromised.
The GSS-API provides for data to be accompanied by a cryptographic tag, known as an
Message Integrity Code (MIC), to prove that the data that arrives at your doorstep is the same as the data that the sender transmitted. This verification of the data’s validity is known as “integrity”.Confidentiality: Both authentication and integrity, however, leave the data itself alone, so if it’s somehow intercepted, others can read it.
The GSS-API therefore allows data to be encrypted, if underlying mechanisms support it. This encryption of data is known as “confidentiality”.
Mechanisms Available With GSS-API:
The current implementation of the GSS-API works only with the Kerberos v5 security mechanism.
Mechanism Name Object Identifier Shared Library Kernel Module ---------------------- ---------------------- -------------- -------------- diffie_hellman_640_0 1.3.6.4.1.42.2.26.2.4 dh640-0.so.1 diffie_hellman_1024_0 1.3.6.4.1.42.2.26.2.5 dh1024-0.so.1 SPNEGO 1.3.6.1.5.5.2 iakerb 1.3.6.1.5.2.5 SCRAM-SHA-1 1.3.6.1.5.5.14 SCRAM-SHA-256 1.3.6.1.5.5.18 GSS-EAP (arc) 1.3.6.1.5.5.15.1.1.* kerberos_v5 1.2.840.113554.1.2.2 gl/mech_krb5.so gl_kmech_krb5 Therefore: Kerberos Version 5 GSS-API Mechanism OID {1.2.840.113554.1.2.2} Kerberos Version 5 GSS-API Mechanism Simple and Protected GSS-API Negotiation Mechanism OID {1.3.6.1.5.5.2}There are two different formats:
The first,
{ 1 2 3 4 }, is officially mandated by the GSS-API specs.gss_str_to_oid()expects this first format.The second,
1.2.3.4, is more widely used but is not an official standard format.Although the GSS-API makes protecting data simple, it does not do certain things, in order to maximize its generic nature. These include:
Provide security credentials for a user or application. These must be provided by the underlying security mechanism(s). The GSS-API does allow applications to acquire credentials, either automatically or explicitly.
Transfer data between applications. It is the application’s responsibility to handle the transfer of all data between peers, whether it is security-related or “plain” data.
Distinguish between different types of transmitted data (for example, to know or determine that a data packet is plain data and not GSS-API related).
Indicate status due to remote (asynchronous) errors.
Automatically protect information sent between processes of a multiprocess program.
Allocate string buffers (“Strings and Similar Data”) to be passed to GSS-API functions.
它是一组函数,包括 API 和一种方法,用于处理身份验证,旨在尽可能将应用程序协议与安全协议的具体细节隔离开来。
gss_release_buffer()和gss_delete_name().
These are the basic steps in using the GSS-API:
Each application, sender and recipient, acquires credentials explicitly, if credentials have not been acquired automatically.
The sender initiates a security context and the recipient accepts it.
The sender applies security protection to the message (data) it wants to transmit. This means that it either encrypts the message or stamps it with an identification tag. The sender transmits the protected message. (The sender can choose not to apply either security protection, in which case the message has only the default GSS-API security service associated with it. That is authentication, in which the recipient knows that the sender is who it claims to be.)
The recipient decrypts the message (if needed) and verifies it (if appropriate).
(Optional) The recipient returns an identification tag to the sender for confirmation.
Both applications destroy the shared security context. If necessary, they can also deallocate any “leftover” GSS-API data.
Applications that use the GSS-API should include the file
gssapi.h.
** Kerberos 服务器设置 **
First and foremost, this is not a recommendation for a production
environment. We are not covering Master/Slave replication cluster or
anything production environment related (ntp/chrony, dns, pam/nss, sssd, etc).
Also, on the server side there might be different dependencies and/or
configuration steps needed, depending on which backend database will be used.
LDAP as a backend database is a good example of that.
On the client side there are different steps depending on which client backend
configuration will be used. For example PAM/NSS或SSSD (along with
LDAP for identity service, [and Kerberos for authentication service]) which is
the best suited option for joining MS Active Directory domains, and doing
User Logon Management.
By no means we intend to cover every possible scenario/combination here. These steps are for a simple get a (MIT) Kerberos Server up and running.
Please, note that rpm packages might have slightly different names, as well as the locations for the binaries and/or configuration files, depending on which Linux distro we are referring to.
Finally, keep in mind that some Linux distros will have their own wizards,
which can perform the basic needed configuration:
SUSE:
Kerberos server:
yast2 auth-server
Kerberos client:
pam/nss: yast2 ldapkrb
sssd: yast2 auth-client
However, we are going through the manual configuration.
In order to get a new MIT KDC Server running:
Install the KDC server by:
Install the needed packages:
SUSE: zypper install krb5 krb5-server krb5-client Additionally: for development: krb5-devel if using 'sssd': sssd-krb5 sssd-krb5-common REDHAT: yum install krb5-server krb5-libs krb5-workstation Additionally: 'Needs to be checked'
Edit the KDC Server configuration file:
/var/lib/kerberos/krb5kdc/kdc.conf [kdcdefaults] kdc_ports = 750,88 [realms] MYDOMAIN.COM = { acl_file = /var/lib/kerberos/krb5kdc/kadm5.acl admin_keytab = FILE:/var/lib/kerberos/krb5kdc/kadm5.keytab default_principal_flags = +postdateable +forwardable +renewable +proxiable +dup-skey -preauth -hwauth +service +tgt-based +allow-tickets -pwchange -pwservice dict_file = /var/lib/kerberos/krb5kdc/kadm5.dict key_stash_file = /var/lib/kerberos/krb5kdc/.k5.MYDOMAIN.COM kdc_ports = 750,88 max_life = 0d 10h 0m 0s max_renewable_life = 7d 0h 0m 0s } ...
Edit the Kerberos Client configuration file:
/etc/krb5.conf [libdefaults] dns_canonicalize_hostname = false rdns = false forwardable = true dns_lookup_realm = true //--> if using DNS/DNSMasq dns_lookup_kdc = true //--> if using DNS/DNSMasq allow_weak_crypto = false default_realm = MYDOMAIN.COM default_ccache_name = KEYRING:persistent:%{uid} [realms] MYDOMAIN.COM = { kdc = kerberos.mydomain.com admin_server = kerberos.mydomain.com ... } ...
Create the Kerberos database:
SUSE: kdb5_util create -s REDHAT: kdb5_util create -s
Enable and Start both ‘KDC and KDC admin’ servers:
SUSE: systemctl enable/start krb5kdc systemctl enable/start kadmind REDHAT: systemctl enable/start krb5kdc systemctl enable/start kadmin
- Create a Kerberos Administrator
Kerberos principals can be created either locally on the KDC server itself or through the network, using an ‘admin principal’. On the KDC server, using
kadmin.local:List the existing principals:
kadmin.local:  listprincs
K/M@MYDOMAIN.COM
krbtgt/MYDOMAIN.COM@MYDOMAIN.COM
kadmin/admin@MYDOMAIN.COM
kadmin/changepw@MYDOMAIN.COM
kadmin/history@MYDOMAIN.COM
kadmin/kerberos.mydomain.com@MYDOMAIN.COM
root/admin@MYDOMAIN.COM
...
b. In case we don’t have a built-in ‘admin principal’, we then create one (whatever
principal name, we are usingroot, once by defaultkinittries to authenticate using the same system login user name, unless aprincipalis passed as an argumentkinit principal):# kadmin.local -q "addprinc root/admin" Authenticating as principal root/admin@MYDOMAIN.COM with password. WARNING: no policy specified for root/admin@MYDOMAIN.COM; defaulting to no policy Enter password for principal "root/admin@MYDOMAIN.COM":
Confirm the newly created ‘admin principal’ has the needed permissions in the KDC ACL (if ACLs are changed,
kadmindneeds to be restarted):SUSE: /var/lib/kerberos/krb5kdc/kadm5.acl REDHAT: /var/kerberos/krb5kdc/kadm5.acl ############################################################################### #Kerberos_principal permissions [target_principal] [restrictions] ############################################################################### # */admin@MYDOMAIN.COM *
Create a simple ‘user principal’ (same steps as by The ‘Ceph side’ of the things; 4a):
kadmin.local:  addprinc johndoe
WARNING: no policy specified for johndoe@MYDOMAIN.COM; defaulting to no policy
Enter password for principal "johndoe@MYDOMAIN.COM":
Re-enter password for principal "johndoe@MYDOMAIN.COM":
Principal "johndoe@MYDOMAIN.COM" created.
Confirm the newly created ‘user principal’ is able to authenticate (same steps as by The ‘Ceph side’ of the things; 6):
# kdestroy -A && kinit -f johndoe && klist -f
Password for johndoe@MYDOMAIN.COM:
Ticket cache: KEYRING:persistent:0:0
Default principal: johndoe@MYDOMAIN.COM

Valid starting       Expires              Service principal
11/16/2018 13:11:16  11/16/2018 23:11:16  krbtgt/MYDOMAIN.COM@MYDOMAIN.COM
        renew until 11/17/2018 13:11:16, Flags: FRI
...
At this point, we should have a simple (MIT) Kerberos Server up and running:
Considering we will want to work with keytab files, for both ‘user and service’ principals, refer to The ‘Ceph side’ of the things starting at step 4.
Make sure you are comfortable with following and their
manpages:krb5.conf -> Krb client config file kdc.conf -> KDC server config file krb5kdc -> KDC server daemon kadmind -> KDC administration daemon kadmin -> Krb administration tool kdb5_util -> Krb low-level database administration tool kinit -> Obtain and cache Kerberos ticket-granting ticket tool klist -> List cached Kerberos tickets tool kdestroy -> Destroy Kerberos tickets tool
- Name Resolution
As mentioned earlier, Kerberos relies heavily on name resolution. Most of the Kerberos issues are usually related to name resolution, since Kerberos is very picky on both systems names和host lookups.
控制。如The ‘Ceph side’ of the things; step 2a, DNS RRs greatly improves service location and host/domain resolution, by using
(srv resources)和(txt record)respectively (as per 在我们开始之前; DNS 解析)./var/lib/named/master/mydomain.com kerberos IN A 192.168.10.21 kerberos-slave IN A 192.168.10.22 _kerberos IN TXT "MYDOMAIN.COM" _kerberos._udp IN SRV 1 0 88 kerberos _kerberos._tcp IN SRV 1 0 88 kerberos _kerberos._udp IN SRV 20 0 88 kerberos-slave _kerberos-master._udp IN SRV 0 0 88 kerberos _kerberos-adm._tcp IN SRV 0 0 749 kerberos _kpasswd._udp IN SRV 0 0 464 kerberos ...
For a small network or development environment, where a DNS server is not available, we have the option to use
DNSMasq, an ease-to-configure lightweight DNS server (along with some other capabilities).These records can be added to
/etc/dnsmasq.conf(in addition to the needed ‘host records’):/etc/dnsmasq.conf ... txt-record=_kerberos.mydomain.com,"MYDOMAIN.COM" srv-host=_kerberos._udp.mydomain.com,kerberos.mydomain.com,88,1 srv-host=_kerberos._udp.mydomain.com,kerberos-2.mydomain.com,88,20 srv-host=_kerberos-master._udp.mydomain.com,kerberos.mydomain.com,88,0 srv-host=_kerberos-adm._tcp.mydomain.com,kerberos.mydomain.com,749,0 srv-host=_kpasswd._udp.mydomain.com,kerberos.mydomain.com,464,0 srv-host=_kerberos._tcp.mydomain.com,kerberos.mydomain.com,88,1 ...
After ‘b)’ is all set, and
dnsmasqservice up and running, we can test it using:# nslookup kerberos Server: 192.168.10.1 Address: 192.168.10.1#53 Name: kerberos.mydomain.com Address: 192.168.10.21 # host -t SRV _kerberos._tcp.mydomain.com _kerberos._tcp.mydomain.com has SRV record 1 0 88 kerberos.mydomain.com. # host -t SRV {each srv-host record} # host -t TXT _kerberos.mydomain.com _kerberos.mydomain.com descriptive text "MYDOMAIN.COM" ...
As long as
name resolutionis working properly, eitherdnsmasq或named, Kerberos should be able to find the needed service records.
由 Ceph 基金会带给您
Ceph 文档是一个社区资源,由非盈利的 Ceph 基金会资助和托管Ceph Foundation. 如果您想支持这一点和我们的其他工作,请考虑加入现在加入.