
Web服务器设置
概览
为了让 Phalcon 应用的路由工作,你需要设置你的 Web 服务器以正确处理重定向。以下是常用 Web 服务器的指令:
PHP 内置
PHP 内置 Web 服务器不推荐用于生产环境。然而,你可以非常容易地在开发时使用它。语法如下:
如果你的应用程序入口点在/public/index.php或者你的项目是由Phalcon Devtools创建的,则可以通过以下命令启动 Web 服务器:
上述命令的作用是:
| 命令 | 描述 |
|---|---|
$(which php) | 将插入 PHP 可执行文件的绝对路径 |
-S localhost:8000 | 调用服务器模式并提供host:port |
-t public | 定义服务器根目录,PHP 需要此目录来为 JS、CSS 和 images 等公共资源路由请求 |
.htrouter.php | 每个请求将评估的入口点 |
The .htrouter.php文件必须包含:
<?php

declare(strict_types=1);

$uri = urldecode(
    parse_url($_SERVER['REQUEST_URI'], PHP_URL_PATH)
);

if ($uri !== '/' && file_exists(__DIR__ . '/public' . $uri)) {
    return false;
}

$_GET['_url'] = $_SERVER['REQUEST_URI'];

require_once __DIR__ . '/public/index.php';
如果你的入口点不是public/index.php,则需要调整.htrouter.php文件(最后一行)以及脚本调用。如果需要,还可以更改端口和绑定的网络接口。
执行上述命令后,访问http://localhost:8000/将显示你的站点。
PHP-FPM
The PHP-FPM(FastCGI 进程管理器) 通常用于处理 PHP 文件。如今,PHP-FPM 已捆绑到所有基于 Linux 的 PHP 发行版中。
在WindowsPHP-FPM 包含在 PHP 分发归档中。可以使用php-cgi.exe文件启动进程并设置选项。Windows 不支持 Unix 套接字,因此该脚本将在 TCP 模式下启动 fast-cgi,端口为9000.
创建文件php-fcgi.bat并添加以下内容:
@ECHO OFF
ECHO Starting PHP FastCGI...
set PATH=C:\PHP;%PATH%
c:\bin\RunHiddenConsole.exe C:\PHP\php-cgi.exe -b 127.0.0.1:9000
nginx
nginx是一个免费、开源、高性能的 HTTP 服务器和反向代理服务器,同时也是 IMAP/POP3 代理服务器。与传统服务器不同,nginx 不依赖线程来处理请求。相反,它使用一种更可扩展的事件驱动(异步)架构。这种架构在负载下使用较小且更重要的是可预测的内存用量。
Phalcon 与 nginx 和 PHP-FPM 提供了一套强大的工具,为 PHP 应用程序提供最佳性能。
安装 nginx
Phalcon配置
你可以使用以下潜在配置来设置 nginx 与 Phalcon:
server {
    # Port 80 will require nginx to be started with root permissions
    # Depending on how you install nginx to use port 80 you will need
    # to start the server with `sudo` ports about 1000 do not require
    # root privileges
    # listen      80;

    listen        8000;
    server_name   default;

    ##########################
    # In production require SSL
    # listen 443 ssl default_server;

    # ssl on;
    # ssl_session_timeout  5m;
    # ssl_protocols  SSLv2 SSLv3 TLSv1;
    # ssl_ciphers  ALL:!ADH:!EXPORT56:RC4+RSA:+HIGH:+MEDIUM:+LOW:+SSLv2:+EXP;
    # ssl_prefer_server_ciphers   on;

    # These locations depend on where you store your certs
    # ssl_certificate        /var/nginx/certs/default.cert;
    # ssl_certificate_key    /var/nginx/certs/default.key;
    ##########################

    # This is the folder that index.php is in
    root /var/www/default/public;
    index index.php index.html index.htm;

    charset utf-8;
    client_max_body_size 100M;
    fastcgi_read_timeout 1800;

    # Represents the root of the domain
    # https://localhost:8000/[index.php]
    location / {
        # Matches URLS `$_GET['_url']`
        try_files $uri $uri/ /index.php?_url=$uri&$args;
    }

    # When the HTTP request does not match the above
    # and the file ends in .php
    location ~ [^/]\.php(/|$) {
        # try_files $uri =404;

        # Ubuntu and PHP7.0-fpm in socket mode
        # This path is dependent on the version of PHP install
        fastcgi_pass  unix:/var/run/php/php7.0-fpm.sock;


        # Alternatively you use PHP-FPM in TCP mode (Required on Windows)
        # You will need to configure FPM to listen on a standard port
        # https://www.nginx.com/resources/wiki/start/topics/examples/phpfastcgionwindows/
        # fastcgi_pass  127.0.0.1:9000;

        fastcgi_index /index.php;

        include fastcgi_params;
        fastcgi_split_path_info ^(.+?\.php)(/.*)$;
        if (!-f $document_root$fastcgi_script_name) {
            return 404;
        }

        fastcgi_param PATH_INFO       $fastcgi_path_info;
        # fastcgi_param PATH_TRANSLATED $document_root$fastcgi_path_info;
        # and set php.ini cgi.fix_pathinfo=0

        fastcgi_param SCRIPT_FILENAME $document_root$fastcgi_script_name;
    }

    location ~ /\.ht {
        deny all;
    }

    location ~* \.(js|css|png|jpg|jpeg|gif|ico)$ {
        expires       max;
        log_not_found off;
        access_log    off;
    }
}
启动
根据你的系统,启动 nginx 的命令可以是以下之一:
Apache
Apache是一个流行且广为人知的跨平台 Web 服务器。
Phalcon配置
以下是你可以用以设置 Apache 与 Phalcon 的潜在配置。这些说明主要集中在mod_rewrite模块的配置上,允许使用友好 URL 和路由组件。一个常见的应用程序目录结构是:
文档根目录最常见的情况是将应用程序安装在文档根目录下的某个目录中。如果是这种情况,我们可以使用.htaccess文件。第一个文件将隐藏应用程序代码并将所有请求转发到应用程序的文档根目录 (public/)。
注意
注意,使用.htaccess文件要求你的 Apache 安装具有AllowOverride All选项设置。
# tutorial/.htaccess

<IfModule mod_rewrite.c>
    RewriteEngine on
    RewriteRule   ^$ public/    [L]
    RewriteRule   ((?s).*) public/$1 [L]
</IfModule>
第二个.htaccess文件位于public/目录中,它将所有 URI 重写到public/index.php安装模块。你也可以编译扩展并手动将其添加到你的
# tutorial/public/.htaccess

<IfModule mod_rewrite.c>
    RewriteEngine On
    RewriteCond   %{REQUEST_FILENAME} !-d
    RewriteCond   %{REQUEST_FILENAME} !-f
    RewriteRule   ^((?s).*)$ index.php?_url=/$1 [QSA,L]
</IfModule>
国际字符对于在 URI 参数中使用波斯字母 "م"(meem)的用户,存在一个关于mod_rewrite的问题。为了使匹配像英语字符一样正常工作,你需要更改你的.htaccess安装模块。你也可以编译扩展并手动将其添加到你的
# tutorial/public/.htaccess

<IfModule mod_rewrite.c>
    RewriteEngine On
    RewriteCond   %{REQUEST_FILENAME} !-d
    RewriteCond   %{REQUEST_FILENAME} !-f
    RewriteRule   ^([0-9A-Za-z\x7f-\xff]*)$ index.php?params=$1 [L]
</IfModule>
如果 URI 包含非英文字符,你可能需要进行上述更改以使mod_rewrite正确匹配你的路由。
Apache 配置
如果你不希望使用.htaccess文件,可以将相关指令移动到 Apache 的主配置文件中:
<IfModule mod_rewrite.c>

    <Directory "/var/www/test">
        RewriteEngine on
        RewriteRule  ^$ public/    [L]
        RewriteRule  ((?s).*) public/$1 [L]
    </Directory>

    <Directory "/var/www/tutorial/public">
        RewriteEngine On
        RewriteCond   %{REQUEST_FILENAME} !-d
        RewriteCond   %{REQUEST_FILENAME} !-f
        RewriteRule   ^((?s).*)$ index.php?_url=/$1 [QSA,L]
    </Directory>

</IfModule>
虚拟主机
以下配置适用于将应用程序安装在虚拟主机中的情况:
<VirtualHost *:80>

    ServerAdmin    admin@example.host
    DocumentRoot   "/var/vhosts/tutorial/public"
    DirectoryIndex index.php
    ServerName     example.host
    ServerAlias    www.example.host

    <Directory "/var/vhosts/tutorial/public">
        Options       All
        AllowOverride All
        Require       all granted
    </Directory>

</VirtualHost>
Lighttpd
lighttpd(发音为“lighty”)是一个开源的 Web 服务器,针对速度关键环境中优化,同时保持标准兼容、安全和灵活。它最初由 Jan Kneschke 编写作为 c10k 问题的概念验证——如何在一个服务器上并行处理 10,000 个连接,但已获得全球知名度。其名称是“light”和“httpd”的混合词。
安装 lighttpd
你可以使用以下潜在配置来设置lighttpd与 Phalcon:
server.modules = (
        "mod_indexfile",
        "mod_access",
        "mod_alias",
        "mod_redirect",
        "mod_rewrite",
)

server.document-root        = "/var/www/html/public"
server.upload-dirs          = ( "/var/cache/lighttpd/uploads" )
server.errorlog             = "/var/log/lighttpd/error.log"
server.pid-file             = "/var/run/lighttpd.pid"
server.username             = "www-data"
server.groupname            = "www-data"
server.port                 = 80

# strict parsing and normalization of URL for consistency and security
# https://redmine.lighttpd.net/projects/lighttpd/wiki/Server_http-parseoptsDetails
# (might need to explicitly set "url-path-2f-decode" = "disable"
#  if a specific application is encoding URLs inside url-path)
server.http-parseopts = (
  "header-strict"           => "enable",# default
  "host-strict"             => "enable",# default
  "host-normalize"          => "enable",# default
  "url-normalize-unreserved"=> "enable",# recommended highly
  "url-normalize-required"  => "enable",# recommended
  "url-ctrls-reject"        => "enable",# recommended
  "url-path-2f-decode"      => "enable",# recommended highly (unless breaks app)
  "url-path-dotseg-remove"  => "enable",# recommended highly (unless breaks app)
)

index-file.names            = ( "index.php", "index.html" )
url.access-deny             = ( "~", ".inc" )
static-file.exclude-extensions = ( ".php", ".pl", ".fcgi" )

compress.cache-dir          = "/var/cache/lighttpd/compress/"
compress.filetype           = ( "application/javascript", "text/css", "text/html", "text/plain" )

# default listening port for IPv6 falls back to the IPv4 port
include_shell "/usr/share/lighttpd/use-ipv6.pl " + server.port
include_shell "/usr/share/lighttpd/create-mime.conf.pl"
include "/etc/lighttpd/conf-enabled/*.conf"

#server.compat-module-load   = "disable"
server.modules += (
        "mod_compress",
        "mod_dirlisting",
        "mod_staticfile",
)

url.rewrite-once = ( "^(/(?!(favicon.ico$|css/|js/|img/)).*)" => "/index.php?_url=$1" )
# or
#url.rewrite-if-not-file = ( "/" => "/index.php?_rl=$1" )
WAMP
WampServer是一个 Windows 网络开发环境。它允许你使用 Apache2、PHP 和 MySQL 数据库创建 Web 应用程序。以下是有关如何在 WampServer 上安装 Phalcon 的详细说明。强烈建议使用最新版本的 WampServer。
注意
此指南中的路径应该是相对的,根据你的WAMP安装情况。
下载Phalcon
要让Phalcon在Windows上工作,你必须安装与你的架构和扩展匹配的正确版本。打开phpinfoWAMP提供的页面并检查Architecture和Extension Build值。这将使您能够下载正确的DLL。对于线程安全的、x64使用VS16和PHP 8.1的情况,您需要下载以下文件:
如果你的系统报告NTS (非线程安全) 那么你应该下载那个DLL。
WAMP同时提供32位和64位版本。从下载部分,您可以下载适合您WAMP安装的Phalcon DLL。
从存档中提取php_phalcon.dll并将文件php_phalcon.dll到PHP扩展文件夹。如果WAMP安装在C:\wamp文件夹中安装了XAMPP,那么扩展名应该在C:\wamp\bin\php\php8.1.0\ext(假设您的WAMP安装了PHP 8.1.0)。
编辑php.ini文件,它位于C:\wamp\bin\php\php8.1.0\php.ini。可以用记事本或类似程序进行编辑。我们推荐Notepad++以避免换行符问题。在文件末尾追加:
并保存它。
同时编辑php.ini文件,其位于C:\wamp\bin\apache\apache2.4.9\bin\php.ini。在文件末尾追加:
并保存它。
注意
上面的路径可能因你的Apache安装而有所不同。请相应地调整它。
重新启动Apache Web服务器。单击系统托盘中的WampServer图标。从弹出菜单中选择Restart All Services。查看托盘图标是否再次变为绿色。
打开浏览器导航至https://localhost。将会出现WAMP欢迎页面。检查extensions loaded部分以确保加载了Phalcon。
注意
恭喜!你现在正在使用Phalcon飞行。
XAMPP
XAMPP是一个易于安装的Apache发行版,包含MySQL、PHP和Perl。一旦你下载XAMPP,你只需解压缩它并开始使用。以下是有关如何在Windows上为XAMPP安装Phalcon的详细说明。强烈建议使用最新版本的XAMPP。
注意
此指南中的路径应该是相对的,根据你的WAMP安装情况。
下载Phalcon
要让Phalcon在Windows上工作,你必须安装与你的架构和扩展匹配的正确版本。打开phpinfoWAMP提供的页面并检查Architecture和Extension Build值。这将使您能够下载正确的DLL。对于线程安全的、x64使用VS16和PHP 8.1的情况,您需要下载以下文件:
如果你的系统报告NTS (非线程安全) 那么你应该下载那个DLL。
XAMPP提供了32位和64位版本的Apache和PHP:Phalcon对两者都有dll,只需选择适合已安装版本的正确dll。
从存档中提取php_phalcon.dll并将文件php_phalcon.dll复制到PHP扩展目录。如果你在C:\xampp文件夹中安装了XAMPP,那么扩展名应该在C:\xampp\php\ext
编辑php.ini文件,它位于C:\wamp\bin\php\php8.1.0\php.ini。可以用记事本或类似程序进行编辑。我们推荐Notepad++以避免换行符问题。在文件末尾追加:
并保存它。
在XAMPP控制中心重启Apache Web Server。这将加载新的PHP配置。打开你的浏览器访问https://localhost。XAMPP欢迎页面将会出现。点击链接phpinfo().
phpinfo将在屏幕上输出大量关于当前PHP状态的信息。向下滚动以检查Phalcon扩展是否已正确加载。
注意
恭喜!你现在正在使用Phalcon飞行。
Cherokee
Cherokee是一个高性能的Web服务器。它非常快、灵活且易于配置。
Phalcon配置
Cherokee提供了一个友好的图形界面来配置Web服务器几乎所有的设置。
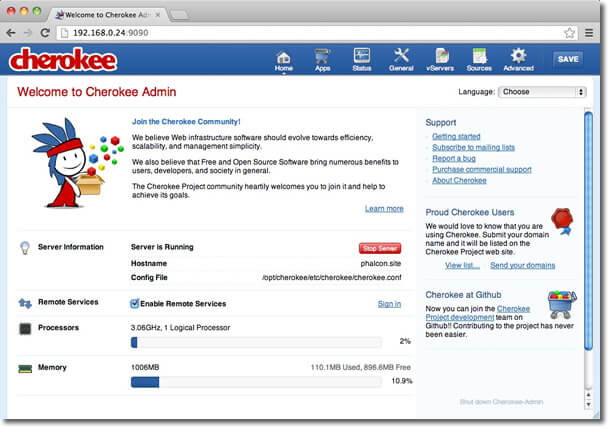
通过以root身份执行以下命令来启动Cherokee管理器/path-to-cherokee/sbin/cherokee-admin
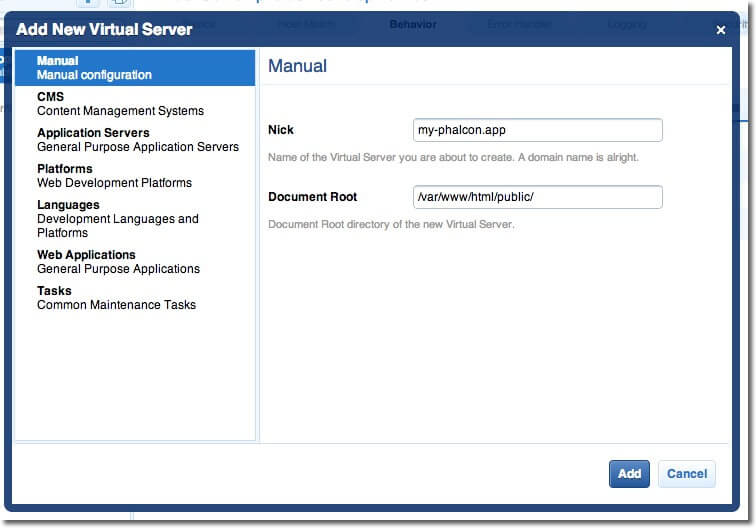
通过点击vServers创建一个新的虚拟主机,然后添加一个新的虚拟服务器:
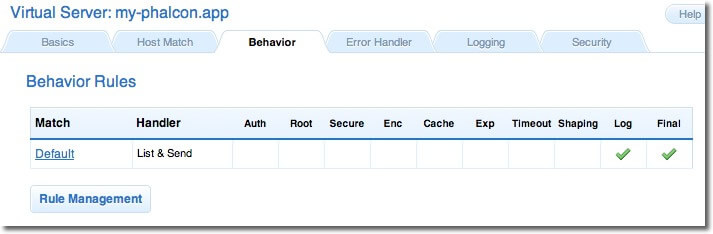
最近添加的虚拟服务器应出现在屏幕左侧栏。在Behaviors标签页,你会看到一组这个虚拟服务器的默认行为。点击Rule Management按钮。移除标记为Directory /cherokee_themes和Directory /icons:
添加PHP Language行为通过向导。此行为允许运行PHP应用程序:
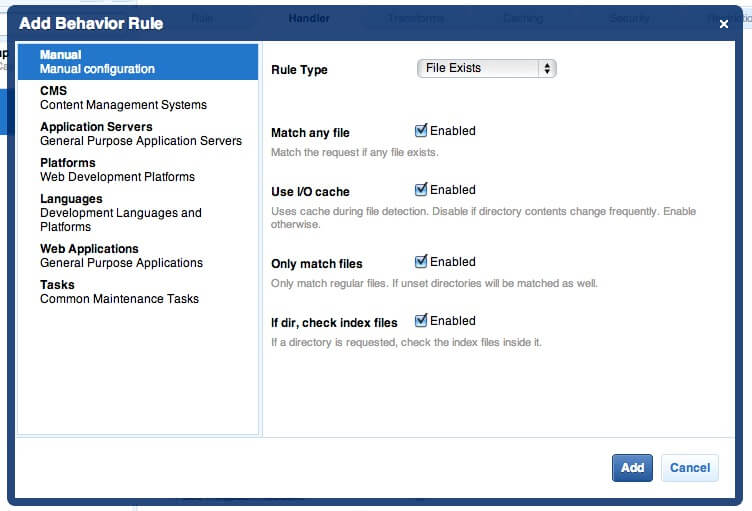
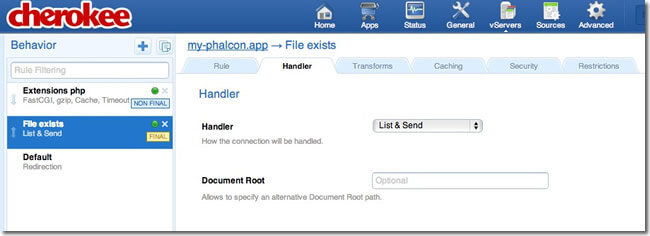
通常这种行为不需要额外设置。再添加另一个行为,这次是在Manual Configuration部分。在Rule Type中选择File Exists,然后确保Match any file已启用:
在Handler标签页选择List & Send作为处理器:
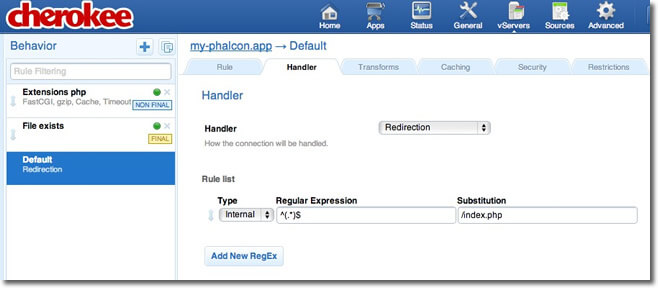
编辑Default行为以便启用URL重写引擎。将处理器更改为Redirection,然后向引擎添加以下正则表达式^(.*)$:
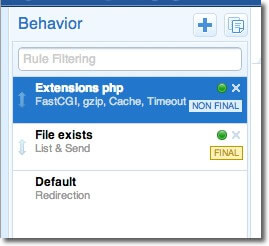
最后,确保行为具有以下顺序:
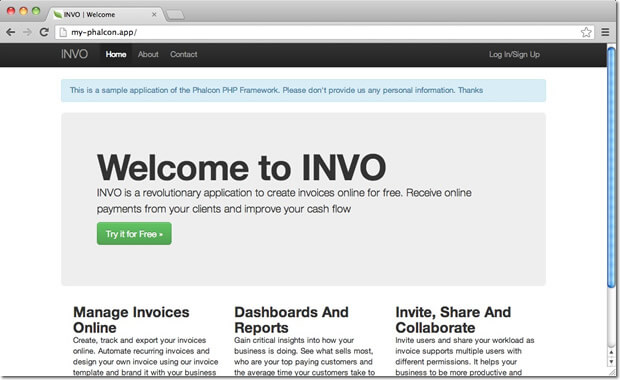
在浏览器中执行应用程序:
Caddy
Caddy是终极服务器,它使您的网站比任何其他解决方案更加安全、可靠和可扩展。
Phalcon配置
确保您的服务器可以通过Caddy的php_fastcgi指令使用PHP。
对于您的站点设置,可以使用以下内容: