
教程 - INVO
概览
INVO是一个小型应用程序,允许用户生成发票、管理客户和产品,以及注册和登录。它展示了Phalcon如何处理某些任务。在客户端,引导程序用于用户界面(UI)。该应用程序不会生成真实的发票,但演示了如何使用Phalcon实现这些功能。
注意
建议您在喜欢的编辑器中打开该应用程序,以便更轻松地跟随本教程。
注意
注意下面的代码已经格式化以提高可读性
结构
您可以将仓库克隆到本地机器上(或者下载它):GitHub。一旦克隆(或下载并解压),您将看到以下目录结构:
└── invo
    ├── config
    ├── db
    │   └── migrations
    │       └── 1.0.0
    ├── docker
    │   └── 8.0
    │   └── 8.1
    │── public
    │   ├── index.php
    │   └── js
    ├── src
    │   ├── Controllers
    │   ├── Forms
    │   ├── Models
    │   ├── Plugins
    │   ├── Providers
    ├── themes
    │   ├── about
    │   ├── companies
    │   ├── contact
    │   ├── errors
    │   ├── index
    │   ├── invoices
    │   ├── layouts
    │   ├── products
    │   ├── producttypes
    │   ├── register
    │   └── session
    └── var
        ├── cache
        └── logs
public/index.php 应用程序设置完成后,您可以通过访问以下URL在浏览器中打开它:https://localhost/invo。您将会看到与下图类似的界面:

该应用程序分为两个部分:前端和后端。前端是一个公共区域,访客可以在那里获取关于INVO的信息并请求联系方式。后端是一个管理区域,注册用户可以在那里管理他们的产品和客户。
路由
INVO 使用标准路由,这是由路由器组件内置的标准路由。这些路由匹配以下模式:
自定义路由/session/register执行控制器SessionController及其动作registerAction.
配置
自动加载器
对于本应用程序,我们使用Composer自带的自动加载器。如果需要,您可以轻松调整代码以使用Phalcon提供的自动加载器:
DotEnv
INVO 使用Dotenv\Dotenv库来检索每个安装实例特有的某些配置变量。
.env文件。有一个.env.example文件可用作参考,您可以复制/重命名它。 提供者(Providers)
我们需要在DI容器中注册应用程序所需的所有服务。框架提供了一个Phalcon\Di\Di的变体,Phalcon\Di\FactoryDefault。这个类预注册了一些服务,适合完整的MVC应用程序。因此,我们创建一个新的Phalcon\Di\FactoryDefault对象,然后调用提供者类来加载必要的服务,包括应用程序的配置。它们都位于Providers文件夹。
例如,Providers\ConfigProvider.php类加载了config/config.php文件,其中包含应用程序的配置:
<?php

namespace Invo\Providers;

use Exception;
use Phalcon\Di\DiInterface;
use Phalcon\Di\ServiceProviderInterface;

/**
 * Read the configuration
 */
class ConfigProvider implements ServiceProviderInterface
{
    public function register(DiInterface $di): void
    {
        $configPath = $di->offsetGet('rootPath') . '/config/config.php';
        if (!file_exists($configPath) || !is_readable($configPath)) {
            throw new Exception('Config file does not exist: ' . $configPath);
        }

        $di->setShared('config', function () use ($configPath) {
            return require_once $configPath;
        });
    }
}
Phalcon\Config\Config允许我们以面向对象的方式操作该文件。配置文件包含以下设置:
<?php

declare(strict_types=1);

use Phalcon\Config\Config;

return new Config([
    'database' => [
        'adapter'  => $_ENV['DB_ADAPTER'] ?? 'Mysql',
        'host'     => $_ENV['DB_HOST'] ?? 'locahost',
        'username' => $_ENV['DB_USERNAME'] ?? 'phalcon',
        'password' => $_ENV['DB_PASSWORD'] ?? 'secret',
        'dbname'   => $_ENV['DB_DBNAME'] ?? 'phalcon_invo',
        'charset'  => $_ENV['DB_CHARSET'] ?? 'utf8',
    ],
    'application' => [
        'viewsDir' => $_ENV['VIEWS_DIR'] ?? 'themes/invo',
        'baseUri'  => $_ENV['BASE_URI'] ?? '/',
    ],
]);
Phalcon没有定义设置的约定。分区帮助我们将选项按照对应用程序有意义的组进行组织。在我们的文件中,有两个稍后会使用的分区:application和database.
请求处理
在文件末尾(public/index.php),请求最终由Phalcon\Mvc\Application处理,它初始化了应用程序运行所需的所有服务。
<?php

use Phalcon\Mvc\Application;

// ...

/**
 * Init MVC Application and send output to the client
 */
(new Application($di))
    ->handle($_SERVER['REQUEST_URI'])
    ->send()
;
依赖注入
在上面代码块的第一行,应用程序类构造函数接收变量$container作为参数。
因为Phalcon高度解耦,我们需要容器能够在应用程序不同部分访问已注册的服务。相关组件是Phalcon\Di\Di。它是一个服务容器,还执行依赖注入和服务定位,在应用程序需要时实例化所有组件。
注册服务的方法有很多。在INVO中,大多数服务是使用匿名函数/闭包注册的。正因为如此,对象是延迟加载的,将应用程序所需的资源降到最低。
例如,在以下代码段中注册了Providers\SessionProvider服务。只有当应用程序需要访问会话数据时,才会调用该匿名函数:
<?php

use Phalcon\Session\Adapter\Stream as SessionAdapter;
use Phalcon\Session\Manager as SessionManager;

$di->setShared(
    'session',
    function () {
        $session = new SessionManager();
        $files   = new SessionAdapter(
            [
                'savePath' => sys_get_temp_dir(),
            ]
        );
        $session->setAdapter($files);
        $session->start();

        return $session;
    }
);
这里我们可以自由更改适配器、执行额外的初始化等。请注意,该服务是使用名称session注册的。这是一种约定,允许框架在DI容器中识别当前服务。
登录
A log in页面将允许我们使用后端控制器。后端控制器与前端控制器之间的划分是任意的。所有控制器都位于同一个目录中(src/Controllers/)。
要进入系统,用户必须拥有有效的用户名和密码。用户数据存储在表users在数据库中invo.
现在我们需要配置数据库连接。在服务容器中设置了一个名为db的服务,并带上了连接信息。与自动加载器一样,我们再次从配置文件中读取参数以配置该服务:
<?php

// ...

$dbConfig = $di->getShared('config')
               ->get('database')
               ->toArray()
;
$di->setShared('db', function () use ($dbConfig) {
    $dbClass = 'Phalcon\Db\Adapter\Pdo\\' . $dbConfig['adapter'];
    unset($dbConfig['adapter']);

    return new $dbClass($dbConfig);
});
此处,我们返回MySQL连接适配器的实例,因为$dbConfig['adapter']设置是Mysql。我们还可以添加其他功能,例如添加[日志记录器][logger]、分析器来测量查询执行时间,甚至将适配器更改成其他RDBMS。
下面的简单表单(themes/invo/session/index.volt)生成用户提交登录信息所需的HTML。为了提高可读性,移除了一些HTML代码:
<div>
    <div>
        <form action="/session/start" role="form" method="post">
            <fieldset>
                <div class="form-group">
                    <label for="email">Username/Email</label>
                    <div class="controls">
                        {{ text_field('email', 'class': "form-control") }}
                    </div>
                </div>
                <div class="form-group">
                    <label for="password">Password</label>
                    <div class="controls">
                        {{ password_field('password', 'class': "form-control") }}
                    </div>
                </div>
                <div class="form-group">
                    {{ submit_button('Login', 'class': 'btn btn-primary btn-large') }}
                </div>
            </fieldset>
        </form>
    </div>

    <div class="col-md-6">
        <div class="clearfix center">
            {{ link_to('register', 'Sign Up', 'class': 'btn btn-primary btn-large btn-success') }}
        </div>
    </div>
</div>
我们正在使用Volt作为模板引擎,而不是PHP。这是一个受Jinja启发的内置模板引擎,提供简单且用户友好的语法来创建模板。如果您之前使用过Jinja或Twig您会看到许多相似之处。
The SessionController::startAction函数(src/Controllers/SessionController.php)验证从表单提交的数据,并检查数据库中是否存在有效用户:
<?php

use Invo\Models\Users;

class SessionController extends ControllerBase
{
    // ...

    /**
     * This action authenticate and logs a user into the application
     */
    public function startAction(): void
    {
        if ($this->request->isPost()) {
            $email    = $this->request->getPost('email');
            $password = $this->request->getPost('password');

            /** @var Users|null $user */
            $user = Users::findFirst([
                "(email = :email: OR username = :email:) AND "
                . "password = :password: AND active = 'Y'",
                'bind' => [
                    'email'    => $email,
                    'password' => sha1($password),
                ],
            ]);

            if ($user) {
                $this->registerSession($user);
                $this->flash->success('Welcome ' . $user->name);

                $this->dispatcher->forward(
                    [
                        'controller' => 'invoices',
                        'action'     => 'index',
                    ]
                );

                return;
            }

            $this->flash->error('Wrong email/password');
        }

        $this->dispatcher->forward(
            [
                'controller' => 'session',
                'action'     => 'index',
            ]
        );
    }

    /**
     * Register an authenticated user into session data
     *
     * @param Users $user
     */
    private function registerSession(Users $user): void
    {
        $this->session->set(
            'auth',
            [
                'id'   => $user->id,
                'name' => $user->name,
            ]
        );
    }
}
初次查看代码时,您会注意到控制器中访问了几个公共属性,例如$this->flash, $this->request或$this->session. 控制器在 Phalcon 中自动绑定到Phalcon\Di\Di容器,因此容器中注册的所有服务都会以每个服务相同名称的属性形式出现在每个控制器中。如果该服务是第一次被访问,它将被自动实例化并返回给调用者。此外,这些服务被设置为共享的,因此无论我们在同一次请求中访问属性/服务多少次,都会返回相同的实例。这些服务是在 earlier (Providers文件夹) 中定义的服务容器中的服务,当然在设置这些服务时您可以更改此行为。
例如,在这里我们调用session服务,然后将用户身份存储在变量auth:
注意
有关 Di 服务的更多信息,请查阅依赖注入文档中指定的。
The startAction首先检查数据是否是通过POST提交的。如果不是,则用户将再次被重定向到同一个表单。我们正在检查是否通过POST实例,使用isPost()方法在请求对象上提交了表单。
然后我们从请求中获取已提交的数据。这些是在用户点击Log In时用于提交表单的文本框。我们使用request对象和getPost()方法设置容器。
现在,我们必须检查是否存在具有所提交的电子邮件和密码的有效用户:
<?php

$user = Users::findFirst(
    [
        "(email = :email: OR username = :email:) " .
        "AND password = :password: " .
        "AND active = 'Y'",
        'bind' => [
            'email'    => $email,
            'password' => sha1($password),
        ]
    ]
);
注意
注意,“绑定参数”的使用方法是,在值应出现的位置放置占位符:email:和:password:然后使用参数绑定这些值。这可以安全地替换这些列的值而不会产生 SQL 注入的风险。bind。
当在数据库中查找用户时,我们没有直接使用明文密码进行查找。应用程序使用sha1方法将密码存储为哈希值。虽然这种方法对于教程来说已经足够,但对于生产环境的应用程序,您可能需要考虑使用不同的算法。Phalcon\Encryption\Security组件提供了便利的方法来增强您的哈希值所使用的算法。
如果找到了用户,则我们会在会话中注册该用户(即登录用户),并将他们转发到仪表盘(Invoices控制器,index动作),并显示一条欢迎消息。
<?php

if ($user) {
    $this->registerSession($user);
    $this->flash->success('Welcome ' . $user->name);

    $this->dispatcher->forward([
        'controller' => 'invoices',
        'action'     => 'index',
    ]);

    return;
}
如果未找到用户,我们会将他们转发到登录页面,并显示一个Wrong email/password消息。
后端安全
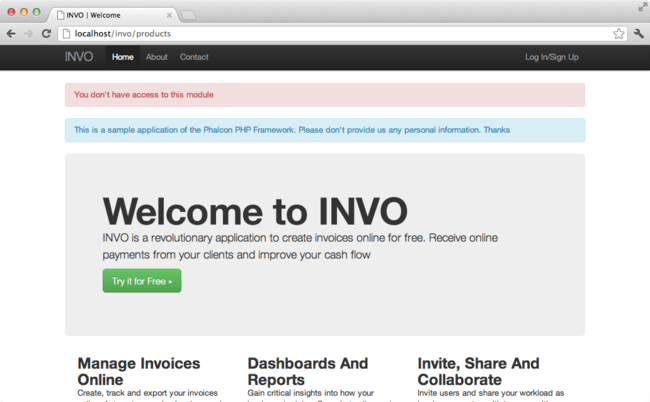
后端是一个私有区域,只有注册用户才能访问。因此,有必要确保只有注册用户才能访问这些控制器。如果您未登录并且尝试访问私有的区域,您将看到如下所示的消息:
每当用户尝试访问任何控制器/动作时,应用程序都会验证当前角色(保存在会话中)是否有权访问它,否则它将显示如上所示的消息,并将流程转发到主页。
为了实现这一点,我们需要使用分派器组件。当用户请求页面或URL时,应用程序首先使用路由地址组件识别所请求的页面。一旦路由被识别并与有效的控制器和动作匹配,这些信息就会传递给分派器,然后它加载控制器并执行相应的动作。
通常情况下,框架会自动创建调度器(Dispatcher)。在这种情况下,我们需要在路由被分发之前验证用户是否已登录。因此,我们需要替换DI容器中的默认组件,并在(Providers\DispatchProvider.php)中设置新的组件。我们在引导应用程序时完成这个操作:
<?php

use Phalcon\Mvc\Dispatcher;

// ...
$di->setShared(
    'dispatcher',
    function () {
        // ...
        $dispatcher = new Dispatcher();
        $dispatcher->setDefaultNamespace('Invo\Controllers');
        // ...

        return $dispatcher;
    }
);
通过创建一个[事件管理器][events]并将特定代码附加到dispatcher事件,我们现在拥有了更大的灵活性,并可以将我们的代码附加到调度循环或操作上。
事件
[事件管理器][events]允许我们将监听器附加到特定类型的事件。我们要附加的事件类型是dispatch。下面的代码将监听器附加到beforeExecuteRoute和beforeException事件。我们利用这些事件来检查404页面以及在我们的应用程序中执行访问权限校验。
<?php

use Invo\Plugins\NotFoundPlugin;
use Invo\Plugins\SecurityPlugin;
use Phalcon\Events\Manager as EventsManager;
use Phalcon\Mvc\Dispatcher;

$di->setShared(
    'dispatcher',
    function () {
        $eventsManager = new EventsManager();

        /**
         * Check if the user is allowed to access certain actions using
         * the SecurityPlugin
         */
        $eventsManager->attach(
            'dispatch:beforeExecuteRoute',
            new SecurityPlugin()
        );

        /**
         * Handle exceptions and not-found exceptions using NotFoundPlugin
         */
        $eventsManager->attach(
            'dispatch:beforeException',
            new NotFoundPlugin()
        );

        $dispatcher = new Dispatcher();
        $dispatcher->setDefaultNamespace('Invo\Controllers');
        $dispatcher->setEventsManager($eventsManager);

        return $dispatcher;
    }
);
当名为beforeExecuteRoute的事件触发时,SecurityPlugin插件将会收到通知:
当beforeException被触发时,NotFoundPlugin将会收到通知:
SecurityPlugin是位于Plugins目录(src/Plugins/SecurityPlugin.php)中的类。此类实现了方法beforeExecuteRoute。这是与调度器中产生的其中一个事件名称相同的:
<?php

use Phalcon\Di\Injectable;
use Phalcon\Events\Event;
use Phalcon\Mvc\Dispatcher;

class SecurityPlugin extends Injectable
{
    // ...

    public function beforeExecuteRoute(
        Event $event,
        Dispatcher $containerspatcher
    ) {
        // ...
    }
}
$containerspatcher)。插件类并不是必须继承自类Phalcon\Di\Injectable,但通过这样做,他们可以更方便地访问应用程序中可用的服务。 现在我们有了结构来验证当前会话中的角色。我们可以检查用户是否拥有[ACL][acl]的访问权限。如果用户没有访问权限,我们将重定向到主页。
<?php

use Phalcon\Di\Injectable;
use Phalcon\Events\Event;
use Phalcon\Mvc\Dispatcher;

class SecurityPlugin extends Plugin
{
    // ...

    public function beforeExecuteRoute(
        Event $event,
        Dispatcher $containerspatcher
    ) {
        $auth = $this->session->get('auth');
        if (!$auth) {
            $role = 'Guests';
        } else {
            $role = 'Users';
        }

        $controller = $dispatcher->getControllerName();
        $action     = $dispatcher->getActionName();

        $acl = $this->getAcl();

        if (!$acl->isComponent($controller)) {
            $dispatcher->forward(
                [
                    'controller' => 'errors',
                    'action'     => 'show404',
                ]
            );

            return false;
        }

        $allowed = $acl->isAllowed($role, $controller, $action);
        if (!$allowed) {
            $dispatcher->forward(
                [
                    'controller' => 'errors',
                    'action'     => 'show401',
                ]
            );

            $this->session->destroy();

            return false;
        }

        return true;
    }
}
auth值来自session服务。如果我们已经登录,则该服务已在登录过程中为我们设置好了。如果没有登录,我们只是一个访客。 接下来,我们获取控制器和动作的名称,并检索访问控制列表(ACL)。我们检查用户是否使用了组合isAllowed。如果是的话,方法将完成处理。role - controller - action如果是这样,方法就会结束执行。
如果我们没有访问权限,则方法将返回false在将用户转发到主页之后停止执行。
ACL
在上面的例子中,我们通过方法$this->getAcl()获取了ACL。构建ACL我们需要做以下操作:
<?php

use Phalcon\Acl\Enum;
use Phalcon\Acl\Role;
use Phalcon\Acl\Adapter\Memory as AclList;

$acl = new AclList();

$acl->setDefaultAction(Enum::DENY);

$roles = [
    'users'  => new Role(
        'Users',
        'Member privileges, granted after sign-in.'
    ),
    'guests' => new Role(
        'Guests',
        'Anyone browsing the site who is not signed in is considered to be a "Guest".'
    )
];

foreach ($roles as $role) {
    $acl->addRole($role);
}
Phalcon\Acl\Adapter\Memory对象。虽然默认访问权限是DENY,但我们仍然通过使用setDefaultAction()将其加入列表中。guests(未登录的用户)以及users。我们通过使用addRole注册这些角色。 现在角色已设置好,我们需要为列表设置组件。ACL组件映射到应用程序中的区域(控制器/动作)。通过这样做,我们可以控制哪个角色可以访问哪个组件。
<?php

use Phalcon\Acl\Component;

// ...

$privateComponents = [
    'companies'    => [
        'index',
        'search',
        'new',
        'edit',
        'save',
        'create',
        'delete',
    ],
    'products'     => [
        'index',
        'search',
        'new',
        'edit',
        'save',
        'create',
        'delete',
    ],
    'producttypes' => [
        'index',
        'search',
        'new',
        'edit',
        'save',
        'create',
        'delete',
    ],
    'invoices'     => [
        'index',
        'profile',
    ],
];

foreach ($privateComponents as $componentName => $actions) {
    $acl->addComponent(
        new Component($componentName),
        $actions
    );
}

$publicComponents = [
    'index'    => [
        'index',
        ],
    'about'    => [
        'index',
        ],
    'register' => [
        'index',
        ],
    'errors'   => [
        'show404',
        'show500',
    ],
    'session'  => [
        'index',
        'register',
        'start',
        'end',
    ],
    'contact'  => [
        'index',
        'send',
    ],
];

foreach ($publicComponents as $componentName => $actions) {
    $acl->addComponent(
        new Component($componentName),
        $actions
    );
}
现在角色和组件都已注册,需要将两者关联起来从而使ACL完整。Users角色可以访问公有(前端)和私有(后端)组件,而Guests只能访问公有(前端)组件。
<?php

// Grant access to public areas to both users and guests
foreach ($roles as $role) {
    foreach ($publicResources as $resource => $actions) {
        foreach ($actions as $action) {
            $acl->allow($role->getName(), $resource, $action);
        }
    }
}

// Grant access to private area to role Users
foreach ($privateResources as $resource => $actions) {
    foreach ($actions as $action) {
        $acl->allow('Users', $resource, $action);
    }
}
CRUD
应用程序的后端部分是提供表单和逻辑的代码,允许用户操作数据,例如执行CRUD操作。我们将探讨INVO如何处理此任务,并演示表单、验证器、分页器等的使用。
我们在INVO中有一个简单的CRUD(创建、读取、更新和删除)实现,用于操作数据(公司、产品、产品类型)。对于产品,使用以下文件:
└── invo
    └── src
        ├── Controllers
        │   └── ProductsController.php
        ├── Forms
        │   └── ProductsForm.php
        ├── Models
        │   └── Products.php
        └── themes
            └── invo
                └── products
                    ├── edit.volt
                    ├── index.volt
                    ├── new.volt
                    └── search.volt
Company前缀命名)可在如上所示的相同目录中找到。 每个控制器包含以下动作:
<?php

class ProductsController extends ControllerBase
{
    public function createAction();

    public function editAction($id);

    public function deleteAction($id);

    public function indexAction();

    public function newAction();

    public function saveAction();

    public function searchAction();
}
| 动作 | 描述 |
|---|---|
createAction | 根据在new动作中输入的数据更新产品 |
deleteAction | 删除现有的产品 |
editAction | 显示视图以edit一个现有产品 |
indexAction | 起始动作,显示search视图 |
newAction | 显示视图以创建一个new产品 |
saveAction | 根据在edit动作中输入的数据更新产品 |
searchAction | 执行search根据从index发送的条件筛选结果 |
搜索表单
我们的CRUD操作以搜索表单开始。此表单显示表中每个字段(products),允许用户为每个字段输入搜索条件。products表与products_types表存在关系。在这种情况下,我们之前查询了product_types表中的记录以提供此字段的搜索条件:
<?php

public function indexAction()
{
    $this->persistent->searchParams = null;

    $this->view->form = new ProductsForm();
}
ProductsForm表单(src/Forms/ProductsForm.php)被传递给视图。此表单定义了对用户可见的字段: <?php
use Phalcon\Forms\Form;
use Phalcon\Forms\Element\Text;
use Phalcon\Forms\Element\Hidden;
use Phalcon\Forms\Element\Select;
use Phalcon\Validation\Validator\Email;
use Phalcon\Validation\Validator\PresenceOf;
use Phalcon\Validation\Validator\Numericality;
class ProductsForm extends Form
{
public function initialize($entity = null, $options = [])
{
if (!isset($options['edit'])) {
$this->add((new Text('id'))->setLabel('Id'));
} else {
$this->add(new Hidden('id'));
}
/**
* Name text field
*/
$name = new Text('name');
$name->setLabel('Name');
$name->setFilters(['striptags', 'string']);
$name->addValidators([
new PresenceOf(
[
'message' => 'Name is required'
]
),
]);
$this->add($name);
/**
* Product Type ID Select
*/
$type = new Select(
'product_types_id',
ProductTypes::find(),
[
'using' => ['id', 'name'],
'useEmpty' => true,
'emptyText' => '...',
'emptyValue' => '',
]
);
$type->setLabel('Type');
$this->add($type);
/**
* Price text field
*/
$price = new Text('price');
$price->setLabel('Price');
$price->setFilters(['float']);
$price->addValidators([
new PresenceOf(
[
'message' => 'Price is required'
]
),
new Numericality(
[
'message' => 'Price is required'
]
),
]);
$this->add($price);
}
}
表单基于[Phalcon\Forms\Form][forms]组件提供的元素,采用面向对象的方式声明。每个定义的元素几乎遵循相同的设置流程:
<?php

$name = new Text('name');
$name->setLabel('Name');
$name->setFilters(
    [
        'striptags',
        'string',
    ]
);

$name->addValidators(
    [
        new PresenceOf(
            [
                'message' => 'Name is required',
            ]
        )
    ]
);

$this->add($name);
此表单中也使用了其他元素:
<?php

$this->add(
    new Hidden('id')
);

// ...

$productTypes = ProductTypes::find();

$type = new Select(
    'profilesId',
    $productTypes,
    [
        'using'      => [
            'id',
            'name',
        ],
        'useEmpty'   => true,
        'emptyText'  => '...',
        'emptyValue' => '',
    ]
);
id(如果有)。我们还通过使用ProductTypes::find()获取所有产品类型,然后使用该结果集通过[Phalcon\Tag][tag]组件及其select方法填充HTMLselect()元素。一旦表单传递给视图,就可以渲染并呈现给用户: <div class="row mb-3">
<div class="col-xs-12 col-md-6">
<h2>Search products</h2>
</div>
<div class="col-xs-12 col-md-6 text-right">
{{ link_to("products/new", "Create Product", "class": "btn btn-primary") }}
</div>
</div>
<form action="/products/search" role="form" method="get">
{% for element in form %}
{% if is_a(element, 'Phalcon\Forms\Element\Hidden') %}
{{ element }}
{% else %}
<div class="form-group">
{{ element.label() }}
<div class="controls">
{{ element.setAttribute("class", "form-control") }}
</div>
</div>
{% endif %}
{% endfor %}
{{ submit_button("Search", "class": "btn btn-primary") }}
</form>
这会产生如下HTML:
<form action='/invo/products/search' method='post'>

    <h2>
        Search products
        <div class="col-xs-12 col-md-6 text-right">
            <a href="products/new" "class=btn btn-primary">Create Product</a>
        </div>
    </h2>

    <fieldset>

        <div class='control-group'>
            <label for='id' class='control-label'>Id</label>

            <div class='controls'>
                <input type='text' id='id' name='id' />
            </div>
        </div>

        <div class='control-group'>
            <label for='name' class='control-label'>Name</label>

            <div class='controls'>
                <input type='text' id='name' name='name' />
            </div>
        </div>

        <div class='control-group'>
            <label for='profilesId' class='control-label'>
                profilesId
            </label>

            <div class='controls'>
                <select id='profilesId' name='profilesId'>
                    <option value=''>...</option>
                    <option value='1'>Vegetables</option>
                    <option value='2'>Fruits</option>
                </select>
            </div>
        </div>

        <div class='control-group'>
            <label for='price' class='control-label'>Price</label>

            <div class='controls'>
                <input type='text' id='price' name='price' />
            </div>
        </div>

        <div class='control-group'>
            <input type='submit'
                   value='Search'
                   class='btn btn-primary' />
        </div>

    </fieldset>

</form>
当提交表单时,控制器中的search动作将执行,根据用户输入的数据进行搜索。
搜索
The search动作有两个操作。当使用HTTP方法POST访问时,它将根据从表单发送的数据执行搜索。当使用HTTP方法GET访问时,它将移动分页器的当前页面。为了检查使用了哪种HTTP方法,我们使用[Request][request]组件:
<?php

public function searchAction()
{
    if ($this->request->isPost()) {
        // POST
    } else {
        // GET
    }

    // ...
}
利用Phalcon\Mvc\Model\Criteria的帮助下,我们可以基于从表单发送的数据类型和值创建搜索条件:
该方法验证哪些值不等于 ''(空字符串)且null并将它们考虑进去以创建搜索条件:
- 如果字段数据类型是
text或类似类型(char,varchar,text等),则使用SQLlike运算符来过滤结果。 - 如果数据类型不是
text或类似类型,则将使用=.
运算符。此外,Criteria忽略所有$_POST不匹配表中任何字段的变量。值会自动通过bound parameters.
进行转义。现在,我们将生成的参数存储在控制器的会话包中:
会话包(persistent属性)是控制器中的一个特殊属性,它使用会话服务在请求之间持久化数据。访问该属性时,会注入一个在每个控制器中独立的实例。Phalcon\Session\Bag实例,该实例在每个控制器中都是独立的。
然后,基于构建好的参数我们执行查询:
<?php

$products = Products::find($parameters);

if (count($products) === 0) {
    $this->flash->notice(
        'The search did not find any products'
    );

    $this->dispatcher->forward(
        [
            'controller' => 'products',
            'action'     => 'index',
        ]
    );
}
如果搜索没有返回任何产品,我们将用户转发到index操作。如果搜索返回了结果,我们会将它们传递给一个分页器对象,以便我们浏览结果集的各个部分:
<?php

use Phalcon\Paginator\Adapter\Model as Paginator;

// ...

$paginator = new Paginator(
    [
        'data'  => $products,
        'limit' => 5,
        'page'  => $numberPage,
    ]
);

$page = $paginator->paginate();
paginate()以获取相应部分的结果集。 然后我们将返回的页面传给视图:
在视图(themes/invo/products/search.volt)中,我们遍历当前页面对应的结果,将当前页面中的每一行显示给用户:
{% for product in page.items %}
    {% if loop.first %}
        <table class="table table-bordered table-striped" align="center">
        <thead>
        <tr>
            <th>Id</th>
            <th>Product Type</th>
            <th>Name</th>
            <th>Price</th>
            <th>Active</th>
        </tr>
        </thead>
        <tbody>
    {% endif %}
    <tr>
        <td>{{ product.id }}</td>
        <td>{{ product.getProductTypes().name }}</td>
        <td>{{ product.name }}</td>
        <td>${{ "%.2f"|format(product.price) }}</td>
        <td>{{ product.getActiveDetail() }}</td>
        <td width="7%">
            {{
                link_to(
                    "products/edit/" ~ product.id,
                    '<i class="glyphicon glyphicon-edit"></i> Edit',
                    "class": "btn btn-default"
                )
            }}
        </td>
        <td width="7%">
            {{
                link_to(
                    "products/delete/" ~ product.id,
                    '<i class="glyphicon glyphicon-remove"></i> Delete',
                    "class": "btn btn-default"
                )
            }}
        </td>
    </tr>
    {% if loop.last %}
        </tbody>
        <tbody>
        <tr>
            <td colspan="7" align="right">
                <div class="btn-group">
                    {{
                        link_to(
                            "products/search",
                            '<i class="icon-fast-backward"></i> First',
                            "class": "btn"
                        )
                    }}
                    {{
                        link_to(
                            "products/search?page=" ~ page.before,
                            '<i class="icon-step-backward"></i> Previous',
                            "class": "btn"
                        )
                    }}
                    {{
                        link_to(
                            "products/search?page=" ~ page.next,
                            '<i class="icon-step-forward"></i> Next',
                            "class": "btn"
                        )
                    }}
                    {{
                        link_to(
                            "products/search?page=" ~ page.last,
                            '<i class="icon-fast-forward"></i> Last',
                            "class": "btn"
                        )
                    }}
                    <span class="help-inline">
                        {{ page.current }} of {{ page.total_pages }}
                    </span>
                </div>
            </td>
        </tr>
        </tbody>
        </table>
    {% endif %}
{% else %}
    No products are recorded
{% endfor %}
观察上面的代码,值得注意的是:
当前页面中的活动项是通过Volt的for遍历的。Volt为PHP的foreach.
提供了更简洁的语法:
这与PHP中的一句语句等价:for块的内容是:
{% for product in page.items %}
    {% if loop.first %}
        // Executed before the first product in the loop
    {% endif %}

    // Executed for every product on `page.items`

    {% if loop.last %}
        // Executed after the last product in the loop
    {% endif %}
{% else %}
    // Executed if `page.items` does not have any products
{% endfor %}
整个product现在你可以回到视图中查看每个块的功能。中的每个字段都会被相应地打印出来:
<tr>
    <td>
        {{ product.id }}
    </td>

    <td>
        {{ product.getProductTypes().name }}
    </td>

    <td>
        {{ product.name }}
    </td>

    <td>
        {{ '%.2f'|format(product.price) }}
    </td>

    <td>
        {{ product.getActiveDetail() }}
    </td>

    <td width='7%'>
        {{ link_to('products/edit/' ~ product.id, 'Edit') }}
    </td>

    <td width='7%'>
        {{ link_to('products/delete/' ~ product.id, 'Delete') }}
    </td>
</tr>
正如我们之前所见,使用product.id等同于在PHP中这样做:$product->id,我们对product.name也做了同样的处理,依此类推。其他字段则以不同的方式渲染,例如,我们来看一下product.getProductTypes().name。要理解这一部分,我们需要检查Products模型(app/models/Products.php):
<?php

use Phalcon\Mvc\Model;

/**
 * Products
 */
class Products extends Model
{
    // ...

    public function initialize()
    {
        $this->belongsTo(
            'product_types_id',
            'ProductTypes',
            'id',
            [
                'reusable' => true,
            ]
        );
    }

    // ...
}
模型可以有一个名为initialize()的方法,这个方法在每个请求中仅调用一次,并用于ORM初始化模型。在这种情况下,Products是通过定义该模型与另一个称为ProductTypes.
product_types_id的调用Products这意味着,本地属性ProductTypes在其属性中与id存在一对其多的关系。 通过定义这种关系,我们可以使用以下方式访问产品类型的名称:price字段
使用格式化的Volt过滤器进行打印:
在纯PHP中,这相当于:
打印产品是否活动状态使用了一个辅助方法:
该方法在模型中实现。
创建/更新new和edit在创建和更新记录时,我们使用create和save操作将用户输入的数据发送到执行创建和更新产品的操作。
在创建的情况下,我们获取提交的数据并将其分配给一个新的Products实例:
<?php

public function createAction()
{
    if (true !== $this->request->isPost()) {
        $this->dispatcher->forward(
            [
                'controller' => 'products',
                'action'     => 'index',
            ]
        );
    }

    $form    = new ProductsForm();
    $product = new Products();

    $product->id = $this
        ->request
        ->getPost('id', 'int')
    ;

    $product->product_types_id = $this
        ->request
        ->getPost('product_types_id', 'int')
    ;

    $product->name = $this
        ->request
        ->getPost('name', 'striptags')
    ;

    $product->price = $this
        ->request
        ->getPost('price', 'double')
    ;

    $product->active = $this
        ->request
        ->getPost('active')
    ;

    // ...
}
<?php

// ...

$name = new Text('name');
$name->setLabel('Name');
$name->setFilters(
    [
        'striptags',
        'string',
    ]
);

$name->addValidators(
    [
        new PresenceOf(
            [
                'message' => 'Name is required',
            ]
        )
    ]
);

$this->add($name);
保存数据时,我们将知道在ProductsForm中实施的业务规则和验证是否通过(src/Forms/ProductsForm.php):
<?php

// ...

$form = new ProductsForm();

$product = new Products();

$data = $this->request->getPost();

if (true !== $form->isValid($data, $product)) {
    $messages = $form->getMessages();

    foreach ($messages as $message) {
        $this->flash->error($message->getMessage());
    }

    $this->dispatcher->forward(
        [
            'controller' => 'products',
            'action'     => 'new',
        ]
    );
}
调用$form->isValid()调用表单中设置的所有验证器。如果验证未通过,$messages变量将包含相关的验证失败消息。
如果没有验证错误,我们可以保存记录:
<?php

// ...

if ($product->save() === false) {
    $messages = $product->getMessages();

    foreach ($messages as $message) {
        $this->flash->error($message->getMessage());
    }

    $this->dispatcher->forward(
        [
            'controller' => 'products',
            'action'     => 'new',
        ]
    );
}

$form->clear();

$this->flash->success(
    'Product was created successfully'
);

$this->dispatcher->forward(
    [
        'controller' => 'products',
        'action'     => 'index',
    ]
);
我们正在检查模型上的save()方法的结果,如果有错误,它们将出现在$messages变量中,并且用户将被送回到products/new操作,并显示错误信息。如果一切正常,表单将被清空,并将用户重定向到products/index并显示相应的成功消息。
在更新产品的情况下,我们必须首先从数据库中获取相关记录,然后用现有数据填充表单:
<?php

public function editAction($id)
{
    if (true !== $this->request->isPost()) {
        $product = Products::findFirstById($id);

        if (null !== $product) {
            $this->flash->error(
                'Product was not found'
            );

            $this->dispatcher->forward(
                [
                    'controller' => 'products',
                    'action'     => 'index',
                ]
            );
        }

        $this->view->form = new ProductsForm(
            $product,
            [
                'edit' => true,
            ]
        );
    }
}
找到的数据通过将模型作为第一个参数传递绑定到表单。正因如此,用户可以更改任意值并通过save操作将其发送回数据库:
<?php

public function saveAction()
{
    if (true !== $this->request->isPost()) {
        $this->dispatcher->forward(
            [
                'controller' => 'products',
                'action'     => 'index',
            ]
        );
    }

    $id      = $this->request->getPost('id', 'int');
    $product = Products::findFirstById($id);

    if (null !== $product) {
        $this->flash->error(
            'Product does not exist'
        );

        $this->dispatcher->forward(
            [
                'controller' => 'products',
                'action'     => 'index',
            ]
        );
    }

    $form = new ProductsForm();
    $data = $this->request->getPost();

    if (true !== $form->isValid($data, $product)) {
        $messages = $form->getMessages();

        foreach ($messages as $message) {
            $this->flash->error($message->getMessage());
        }

        $this->dispatcher->forward(
            [
                'controller' => 'products',
                'action'     => 'new',
            ]
        );
    }

    if (false === $product->save()) {
        $messages = $product->getMessages();

        foreach ($messages as $message) {
            $this->flash->error($message->getMessage());
        }

        $this->dispatcher->forward(
            [
                'controller' => 'products',
                'action'     => 'new',
            ]
        );
    }

    $form->clear();

    $this->flash->success(
        'Product was updated successfully'
    );

    $this->dispatcher->forward(
        [
            'controller' => 'products',
            'action'     => 'index',
        ]
    );
}
动态标题
当你在应用程序中导航时,你会看到标题动态变化,指明我们当前的工作位置。这是在每个控制器的initialize()方法中实现的):
<?php

class ProductsController extends ControllerBase
{
    public function initialize()
    {
        parent::initialize();

        $this->tag->title()
                  ->set('Manage your products')
        ;
    }

    // ...
}
注意,还调用了parent::initialize()方法,它向标题添加了更多数据:
<?php

use Phalcon\Mvc\Controller;

class ControllerBase extends Controller
{
    protected function initialize()
    {
        $this->tag->title()
                  ->prepend('INVO | ')
        ;
        $this->view->setTemplateAfter('main');
    }

    // ...
}
最终,标题会在主视图中打印:themes/invo/views/index.volt):