
前言
本教程讲解了 Thymeleaf 如何与 Spring 框架集成,尤其是(但不仅限于)Spring MVC。
请注意,Thymeleaf 提供了针对 Spring 框架两个版本(5.x 和 6.x)的集成功能,分别由两个独立的库提供支持:thymeleaf-spring5和thymeleaf-spring6这些库被打包在单独的.jar文件(thymeleaf-spring5-{version}.jar和thymeleaf-spring6-{version}.jar)中,并且需要添加到您的类路径中,以便在应用程序中使用 Thymeleaf 的 Spring 集成功能。
本教程中的代码示例和演示应用程序使用的是Spring 6.x及其对应的 Thymeleaf 集成工具,但本文内容同样适用于 Spring 5.x。如果您的应用程序使用的是 Spring 5.x,您只需将代码示例中的org.thymeleaf.spring6包替换为org.thymeleaf.spring5即可。
1 将 Thymeleaf 与 Spring 集成
Thymeleaf 提供了一整套 Spring 集成功能,使您可以将其用作 Spring MVC 应用程序中 JSP 的完整替代方案。
这些集成功能使您能够:
- 使您的 Spring MVC
@Controller对象中的映射方法转发到由 Thymeleaf 管理的模板,就像使用 JSP 一样。 - 在 Tiles 定义中使用Spring 表达式语言(Spring EL)代替 OGNL 在模板中使用。
- 创建与表单支持 Bean 和结果绑定完全集成的模板表单,包括使用属性编辑器、转换服务和验证错误处理。
- 显示来自由 Spring 管理的消息文件的国际化消息(通过常用的
MessageSource对象)。 - 使用 Spring 自己的资源解析机制解析您的模板。
注意:为了完全理解本教程,您应该首先阅读“使用Thymeleaf”教程,该教程深入讲解了标准方言。
2 SpringStandard 方言
为了实现更容易且更完美的集成,Thymeleaf 提供了一个专门的方言,用于实现所有使 Thymeleaf 正常与 Spring 协同工作的必要功能。
该方言基于 Thymeleaf 标准方言,由一个名为org.thymeleaf.spring6.dialect.SpringStandardDialect的类实现,实际上它是从org.thymeleaf.standard.StandardDialect.
继承而来。
- 除了标准方言中已有的功能(因此被继承),SpringStandard 方言引入了以下特定功能:
${...}和*{...}使用 Spring 表达式语言(Spring EL 或 SpEL)作为变量表达式语言,而不是 OGNL。因此,所有 - 表达式都将由 Spring 的表达式语言引擎进行评估。同时注意,对 Spring EL 编译器的支持也是可用的。
${@myBean.doSomething()} - 使用 SpringEL 的语法访问应用上下文中的任何 Bean:
th:field,th:errors和th:errorclass新增用于表单处理的属性:th:object除此之外还提供了新的实现方式,使其可用于表单命令选择。 - 一个表达式对象和方法
#themes.code(...),它等价于spring:themeJSP 自定义标签。 - 一个表达式对象和方法
#mvc.uri(...),它等价于spring:mvcUrl(...)JSP 自定义函数。
请注意,大多数情况下您不应该在正常的TemplateEngine对象配置中直接使用此方言。除非您有非常特定的 Spring 集成需求,否则应创建一个执行所有必需配置步骤的新模板引擎类实例:org.thymeleaf.spring6.SpringTemplateEngine.
示例 Bean 配置:
@Bean
public SpringResourceTemplateResolver templateResolver(){
    // SpringResourceTemplateResolver automatically integrates with Spring's own
    // resource resolution infrastructure, which is highly recommended.
    SpringResourceTemplateResolver templateResolver = new SpringResourceTemplateResolver();
    templateResolver.setApplicationContext(this.applicationContext);
    templateResolver.setPrefix("/WEB-INF/templates/");
    templateResolver.setSuffix(".html");
    // HTML is the default value, added here for the sake of clarity.
    templateResolver.setTemplateMode(TemplateMode.HTML);
    // Template cache is true by default. Set to false if you want
    // templates to be automatically updated when modified.
    templateResolver.setCacheable(true);
    return templateResolver;
}

@Bean
public SpringTemplateEngine templateEngine(){
    // SpringTemplateEngine automatically applies SpringStandardDialect and
    // enables Spring's own MessageSource message resolution mechanisms.
    SpringTemplateEngine templateEngine = new SpringTemplateEngine();
    templateEngine.setTemplateResolver(templateResolver());
    // Enabling the SpringEL compiler with Spring 4.2.4 or newer can
    // speed up execution in most scenarios, but might be incompatible
    // with specific cases when expressions in one template are reused
    // across different data types, so this flag is "false" by default
    // for safer backwards compatibility.
    templateEngine.setEnableSpringELCompiler(true);
    return templateEngine;
}
或者,使用 Spring 的基于 XML 的配置:
<!-- SpringResourceTemplateResolver automatically integrates with Spring's own -->
<!-- resource resolution infrastructure, which is highly recommended.          -->
<bean id="templateResolver"
       class="org.thymeleaf.spring6.templateresolver.SpringResourceTemplateResolver">
  <property name="prefix" value="/WEB-INF/templates/" />
  <property name="suffix" value=".html" />
  <!-- HTML is the default value, added here for the sake of clarity.          -->
  <property name="templateMode" value="HTML" />
  <!-- Template cache is true by default. Set to false if you want             -->
  <!-- templates to be automatically updated when modified.                    -->
  <property name="cacheable" value="true" />
</bean>

<!-- SpringTemplateEngine automatically applies SpringStandardDialect and      -->
<!-- enables Spring's own MessageSource message resolution mechanisms.         -->
<bean id="templateEngine"
      class="org.thymeleaf.spring6.SpringTemplateEngine">
  <property name="templateResolver" ref="templateResolver" />
  <!-- Enabling the SpringEL compiler can speed up execution in most           -->
  <!-- scenarios, but might be incompatible with specific cases when           -->
  <!-- expressions in one template are reused across different data types, so  -->
  <!-- this flag is "false" by default for safer backwards compatibility.      -->
  <property name="enableSpringELCompiler" value="true" />
</bean>
3 视图和视图解析器
3.1 Spring MVC 中的视图和视图解析器
Spring MVC 中有两个接口构成了其模板系统的核心:
org.springframework.web.servlet.Vieworg.springframework.web.servlet.ViewResolver
Views 对我们的应用程序中的页面进行建模,并允许我们通过将其定义为 Bean 来修改和预定义其行为。View 负责渲染实际 HTML 界面,通常通过执行某种模板引擎(如 Thymeleaf)来完成。
ViewResolvers 是负责为特定操作和区域获取 View 对象的对象。通常,控制器会请求 ViewResolvers 转发到具有特定名称的视图(由控制器方法返回的字符串),然后按顺序链式执行应用程序中的所有视图解析器,直到其中一个能够解析该视图,在这种情况下将返回一个 View 对象并将其控制权传递给它以渲染 HTML。
注意,并非我们应用程序中的所有页面都必须定义为视图(View),只有那些希望其行为非标准或以特定方式配置的页面才需要这样做(例如,将一些特殊的bean与它关联)。如果一个ViewResolver被要求获取一个没有对应bean的视图——这是常见情况——它会临时创建一个新的View对象并返回。
以往,在Spring MVC应用中JSP+JSTL ViewResolver的典型配置如下所示:
<bean class="org.springframework.web.servlet.view.InternalResourceViewResolver">
  <property name="viewClass" value="org.springframework.web.servlet.view.JstlView" />
  <property name="prefix" value="/WEB-INF/jsps/" />
  <property name="suffix" value=".jsp" />
  <property name="order" value="2" />
  <property name="viewNames" value="*jsp" />
</bean>
快速浏览它的属性就足以了解它是如何配置的:
viewClass设定View实例的类。这对于JSP解析器来说是必需的,但在使用Thymeleaf时则完全不需要。prefix和suffix的作用方式与Thymeleaf的TemplateResolver对象中同名属性类似。order设定ViewResolver在解析链中被查询的顺序。viewNames允许通过模式匹配(支持通配符)来定义由该ViewResolver解析的视图名称。
3.2 Thymeleaf中的视图和视图解析器
Thymeleaf为上述两个接口提供了实现类:
org.thymeleaf.spring6.view.ThymeleafVieworg.thymeleaf.spring6.view.ThymeleafViewResolver
这两个类将负责处理控制器执行后产生的Thymeleaf模板。
Thymeleaf视图解析器的配置与JSP非常相似:
@Bean
public ThymeleafViewResolver viewResolver(){
    ThymeleafViewResolver viewResolver = new ThymeleafViewResolver();
    viewResolver.setTemplateEngine(templateEngine());
    // NOTE 'order' and 'viewNames' are optional
    viewResolver.setOrder(1);
    viewResolver.setViewNames(new String[] {".html", ".xhtml"});
    return viewResolver;
}
……或者使用XML配置:
<bean class="org.thymeleaf.spring6.view.ThymeleafViewResolver">
  <property name="templateEngine" ref="templateEngine" />
  <!-- NOTE 'order' and 'viewNames' are optional -->
  <property name="order" value="1" />
  <property name="viewNames" value="*.html,*.xhtml" />
</bean>这个templateEngine参数当然是我们在上一章中定义的SpringTemplateEngine对象。其他两个参数(order和viewNames)都是可选的,且作用与之前看到的JSP ViewResolver中的相同。
注意,我们不需要prefix或suffix参数,因为这些已经在模板解析器中指定(模板解析器会被传入模板引擎)。
如果我们想定义一个Viewbean并向其中添加一些静态变量怎么办?很简单,只需定义一个原型(prototype)bean即可:
@Bean
@Scope("prototype")
public ThymeleafView mainView() {
    ThymeleafView view = new ThymeleafView("main"); // templateName = 'main'
    view.setStaticVariables(
        Collections.singletonMap("footer", "The ACME Fruit Company"));
    return view;
}),执行这个特定的视图Bean。mainView在这个例子中是
4 Spring Thyme Seed Starter Manager
本指南本章及后续章节中所示示例的源代码可以在以下位置找到Spring Thyme Seed Starter Manager (STSM)示例应用:
4.1 概念
在Thymeleaf,我们非常喜爱百里香,每年春天我们都会准备好优质土壤和最喜欢的种子制作育苗包,把它们放在西班牙阳光下耐心等待新植物生长。
但今年我们厌倦了贴标签识别每个育苗格里的种子,于是决定用Spring MVC和Thymeleaf开发一个应用来帮助我们管理育苗包:Spring Thyme SeedStarter Manager.
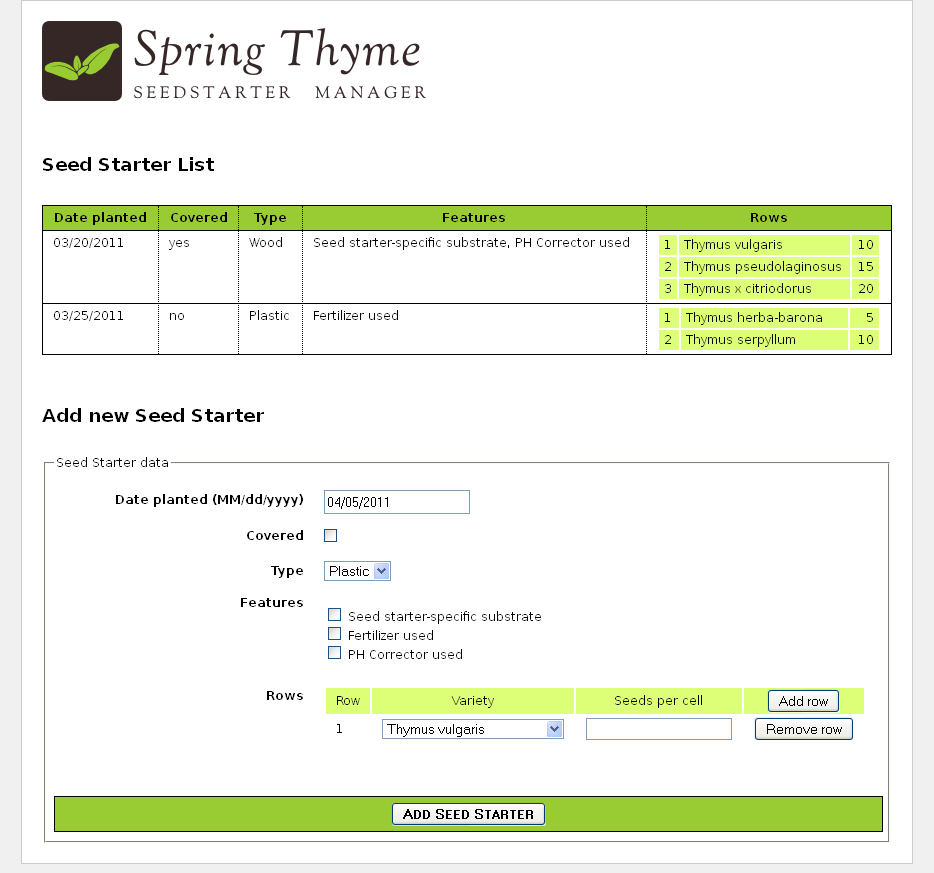
就像我们在使用 Thymeleaf教程中开发的Good Thymes Virtual Grocery应用一样,STSM将帮助我们展示作为Spring MVC模板引擎的Thymeleaf集成的最重要方面。
4.2 业务层
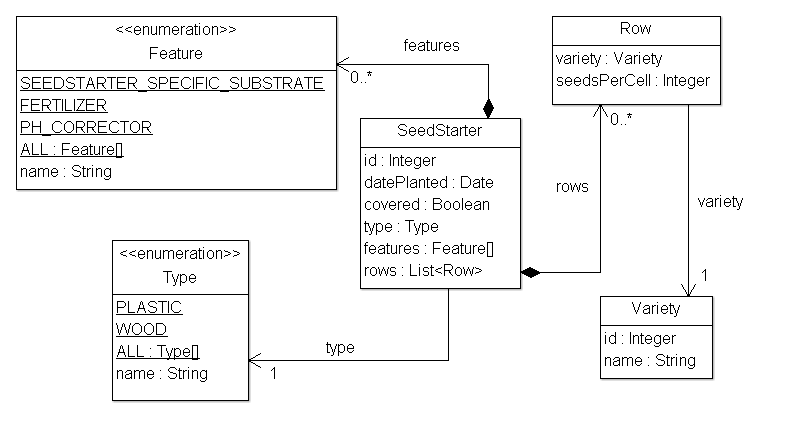
我们的应用程序需要一个非常简单的业务层。首先,我们来看看我们的模型实体:
几个非常简单的服务类将提供所需的业务方法,比如:
@Service
public class SeedStarterService {

    @Autowired
    private SeedStarterRepository seedstarterRepository;

    public List<SeedStarter> findAll() {
        return this.seedstarterRepository.findAll();
    }

    public void add(final SeedStarter seedStarter) {
        this.seedstarterRepository.add(seedStarter);
    }

}
和:
@Service
public class VarietyService {

    @Autowired
    private VarietyRepository varietyRepository;

    public List<Variety> findAll() {
        return this.varietyRepository.findAll();
    }

    public Variety findById(final Integer id) {
        return this.varietyRepository.findById(id);
    }

}
4.3 Spring MVC配置
接下来我们需要设置应用程序的Spring MVC配置,这不仅包括标准的Spring MVC组件(如资源处理或注解扫描),还包括创建模板引擎和视图解析器实例。
@Configuration
@EnableWebMvc
@ComponentScan
public class SpringWebConfig
        extends WebMvcConfigurerAdapter implements ApplicationContextAware {

    private ApplicationContext applicationContext;


    public SpringWebConfig() {
        super();
    }


    public void setApplicationContext(final ApplicationContext applicationContext)
            throws BeansException {
        this.applicationContext = applicationContext;
    }


    /* ******************************************************************* */
    /*  GENERAL CONFIGURATION ARTIFACTS                                    */
    /*  Static Resources, i18n Messages, Formatters (Conversion Service)   */
    /* ******************************************************************* */

    @Override
    public void addResourceHandlers(final ResourceHandlerRegistry registry) {
        super.addResourceHandlers(registry);
        registry.addResourceHandler("/images/**").addResourceLocations("/images/");
        registry.addResourceHandler("/css/**").addResourceLocations("/css/");
        registry.addResourceHandler("/js/**").addResourceLocations("/js/");
    }

    @Bean
    public ResourceBundleMessageSource messageSource() {
        ResourceBundleMessageSource messageSource = new ResourceBundleMessageSource();
        messageSource.setBasename("Messages");
        return messageSource;
    }

    @Override
    public void addFormatters(final FormatterRegistry registry) {
        super.addFormatters(registry);
        registry.addFormatter(varietyFormatter());
        registry.addFormatter(dateFormatter());
    }

    @Bean
    public VarietyFormatter varietyFormatter() {
        return new VarietyFormatter();
    }

    @Bean
    public DateFormatter dateFormatter() {
        return new DateFormatter();
    }


    /* **************************************************************** */
    /*  THYMELEAF-SPECIFIC ARTIFACTS                                    */
    /*  TemplateResolver <- TemplateEngine <- ViewResolver              */
    /* **************************************************************** */

    @Bean
    public SpringResourceTemplateResolver templateResolver(){
        // SpringResourceTemplateResolver automatically integrates with Spring's own
        // resource resolution infrastructure, which is highly recommended.
        SpringResourceTemplateResolver templateResolver = new SpringResourceTemplateResolver();
        templateResolver.setApplicationContext(this.applicationContext);
        templateResolver.setPrefix("/WEB-INF/templates/");
        templateResolver.setSuffix(".html");
        // HTML is the default value, added here for the sake of clarity.
        templateResolver.setTemplateMode(TemplateMode.HTML);
        // Template cache is true by default. Set to false if you want
        // templates to be automatically updated when modified.
        templateResolver.setCacheable(true);
        return templateResolver;
    }

    @Bean
    public SpringTemplateEngine templateEngine(){
        // SpringTemplateEngine automatically applies SpringStandardDialect and
        // enables Spring's own MessageSource message resolution mechanisms.
        SpringTemplateEngine templateEngine = new SpringTemplateEngine();
        templateEngine.setTemplateResolver(templateResolver());
        // Enabling the SpringEL compiler with Spring 4.2.4 or newer can
        // speed up execution in most scenarios, but might be incompatible
        // with specific cases when expressions in one template are reused
        // across different data types, so this flag is "false" by default
        // for safer backwards compatibility.
        templateEngine.setEnableSpringELCompiler(true);
        return templateEngine;
    }

    @Bean
    public ThymeleafViewResolver viewResolver(){
        ThymeleafViewResolver viewResolver = new ThymeleafViewResolver();
        viewResolver.setTemplateEngine(templateEngine());
        return viewResolver;
    }

}
4.4 控制器
当然,我们的应用程序还需要一个控制器。由于STSM只包含一页显示育苗包列表以及新增育苗包的表单,因此我们只需编写一个控制器类来处理所有服务器交互:
@Controller
public class SeedStarterMngController {

    @Autowired
    private VarietyService varietyService;

    @Autowired
    private SeedStarterService seedStarterService;

    ...

}
现在让我们看看可以在这个控制器类中添加什么内容。
模型属性
首先我们将添加一些页面需要用到的模型属性:
@ModelAttribute("allTypes")
public List<Type> populateTypes() {
    return Arrays.asList(Type.ALL);
}

@ModelAttribute("allFeatures")
public List<Feature> populateFeatures() {
    return Arrays.asList(Feature.ALL);
}

@ModelAttribute("allVarieties")
public List<Variety> populateVarieties() {
    return this.varietyService.findAll();
}

@ModelAttribute("allSeedStarters")
public List<SeedStarter> populateSeedStarters() {
    return this.seedStarterService.findAll();
}
映射的方法
接下来就是控制器最重要的部分——映射方法:一个用于显示表单页面,另一个用于处理新增操作。SeedStarter对象的形式,在完整的元素及其内容上执行。
@RequestMapping({"/","/seedstartermng"})
public String showSeedstarters(final SeedStarter seedStarter) {
    seedStarter.setDatePlanted(Calendar.getInstance().getTime());
    return "seedstartermng";
}

@RequestMapping(value="/seedstartermng", params={"save"})
public String saveSeedstarter(
        final SeedStarter seedStarter, final BindingResult bindingResult, final ModelMap model) {
    if (bindingResult.hasErrors()) {
        return "seedstartermng";
    }
    this.seedStarterService.add(seedStarter);
    model.clear();
    return "redirect:/seedstartermng";
}
4.5 配置转换服务
为了使视图层能够轻松地格式化Date和Variety对象,我们配置了应用程序,使其创建并初始化了一个SpringConversionService对象(由我们继承的类WebMvcConfigurerAdapter完成),并加入了几个我们需要的格式化器(formatter)对象。再看一次:
@Override
public void addFormatters(final FormatterRegistry registry) {
    super.addFormatters(registry);
    registry.addFormatter(varietyFormatter());
    registry.addFormatter(dateFormatter());
}

@Bean
public VarietyFormatter varietyFormatter() {
    return new VarietyFormatter();
}

@Bean
public DateFormatter dateFormatter() {
    return new DateFormatter();
}Spring格式化器是org.springframework.format.Formatter接口的实现。有关Spring类型转换机制的工作原理,请参阅spring.io.
上的文档。让我们看一下DateFormatter,它根据date.format消息键中设定的格式字符串来格式化日期。Messages.properties:
public class DateFormatter implements Formatter<Date> {

    @Autowired
    private MessageSource messageSource;


    public DateFormatter() {
        super();
    }

    public Date parse(final String text, final Locale locale) throws ParseException {
        final SimpleDateFormat dateFormat = createDateFormat(locale);
        return dateFormat.parse(text);
    }

    public String print(final Date object, final Locale locale) {
        final SimpleDateFormat dateFormat = createDateFormat(locale);
        return dateFormat.format(object);
    }

    private SimpleDateFormat createDateFormat(final Locale locale) {
        final String format = this.messageSource.getMessage("date.format", null, locale);
        final SimpleDateFormat dateFormat = new SimpleDateFormat(format);
        dateFormat.setLenient(false);
        return dateFormat;
    }

}这个VarietyFormatter自动在我们的Variety实体和我们希望在表单中使用的方式之间进行转换(基本上是通过它们的id字段值):
public class VarietyFormatter implements Formatter<Variety> {

    @Autowired
    private VarietyService varietyService;


    public VarietyFormatter() {
        super();
    }

    public Variety parse(final String text, final Locale locale) throws ParseException {
        final Integer varietyId = Integer.valueOf(text);
        return this.varietyService.findById(varietyId);
    }


    public String print(final Variety object, final Locale locale) {
        return (object != null ? object.getId().toString() : "");
    }

}
后面我们会更深入地学习这些格式化器如何影响数据的显示方式。
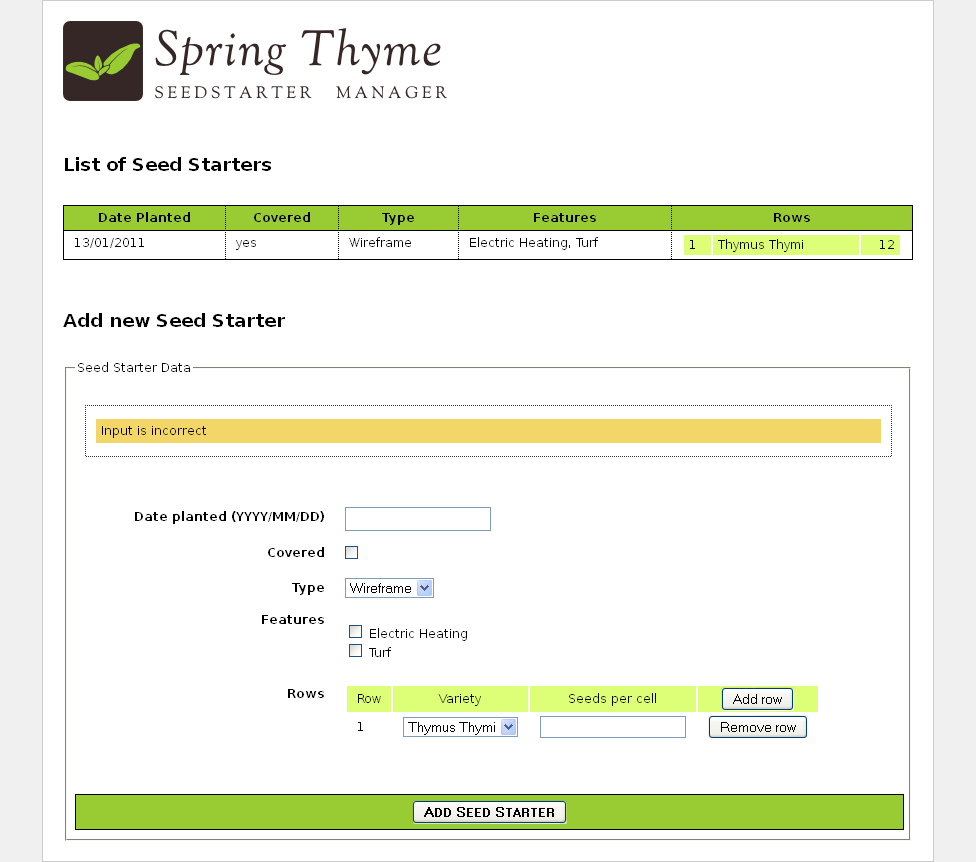
5 列出育苗包数据
我们的/WEB-INF/templates/seedstartermng.html页面首先会显示当前存储的所有育苗包列表。为此,我们需要一些外部化的消息以及对模型属性的表达式求值。就像这样:
<div class="seedstarterlist" th:unless="${#lists.isEmpty(allSeedStarters)}">

  <h2 th:text="#{title.list}">List of Seed Starters</h2>

  <table>
    <thead>
      <tr>
        <th th:text="#{seedstarter.datePlanted}">Date Planted</th>
        <th th:text="#{seedstarter.covered}">Covered</th>
        <th th:text="#{seedstarter.type}">Type</th>
        <th th:text="#{seedstarter.features}">Features</th>
        <th th:text="#{seedstarter.rows}">Rows</th>
      </tr>
    </thead>
    <tbody>
      <tr th:each="sb : ${allSeedStarters}">
        <td th:text="${{sb.datePlanted}}">13/01/2011</td>
        <td th:text="#{|bool.${sb.covered}|}">yes</td>
        <td th:text="#{|seedstarter.type.${sb.type}|}">Wireframe</td>
        <td th:text="${#strings.arrayJoin(
                           #messages.arrayMsg(
                               #strings.arrayPrepend(sb.features,'seedstarter.feature.')),
                           ', ')}">Electric Heating, Turf</td>
        <td>
          <table>
            <tbody>
              <tr th:each="row,rowStat : ${sb.rows}">
                <td th:text="${rowStat.count}">1</td>
                <td th:text="${row.variety.name}">Thymus Thymi</td>
                <td th:text="${row.seedsPerCell}">12</td>
              </tr>
            </tbody>
          </table>
        </td>
      </tr>
    </tbody>
  </table>
</div>
此处有很多需要注意的地方。让我们逐个片段来看。
首先,只有当存在育苗包时,才会显示此部分。我们通过th:unless属性和#lists.isEmpty(...)函数实现了这一效果。
<div class="seedstarterlist" th:unless="${#lists.isEmpty(allSeedStarters)}">注意,像#lists这样的所有工具对象在Spring EL表达式中都可以像在标准方言的OGNL表达式中那样直接使用。
接下来要看到的是大量的国际化(外置)文本,比如:
<h2 th:text="#{title.list}">List of Seed Starters</h2>

<table>
  <thead>
    <tr>
      <th th:text="#{seedstarter.datePlanted}">Date Planted</th>
      <th th:text="#{seedstarter.covered}">Covered</th>
      <th th:text="#{seedstarter.type}">Type</th>
      <th th:text="#{seedstarter.features}">Features</th>
      <th th:text="#{seedstarter.rows}">Rows</th>
      ...
这是一个 Spring MVC 应用程序,我们已经在 Spring 配置中定义了一个MessageSourcebean (MessageSource对象是 Spring MVC 中管理外置文本的标准方式):
@Bean
public ResourceBundleMessageSource messageSource() {
    ResourceBundleMessageSource messageSource = new ResourceBundleMessageSource();
    messageSource.setBasename("Messages");
    return messageSource;
}……以及那个basename属性表明我们会有类似以下的文件Messages_es.properties或Messages_en.properties在我们的类路径中。让我们看一下西班牙语版本:
title.list=Lista de semilleros

date.format=dd/MM/yyyy
bool.true=sí
bool.false=no

seedstarter.datePlanted=Fecha de plantación
seedstarter.covered=Cubierto
seedstarter.type=Tipo
seedstarter.features=Características
seedstarter.rows=Filas

seedstarter.type.WOOD=Madera
seedstarter.type.PLASTIC=Plástico

seedstarter.feature.SEEDSTARTER_SPECIFIC_SUBSTRATE=Sustrato específico para semilleros
seedstarter.feature.FERTILIZER=Fertilizante
seedstarter.feature.PH_CORRECTOR=Corrector de PH在表格列表的第一列中,我们将展示种子启动器准备的日期。但是我们会以格式化的方式显示它就像我们在DateFormatter中定义的一样。为此,我们将使用双括号语法 (${{...}}),这将自动应用 Spring 转换服务,包括我们在配置时注册的DateFormatter。
<td th:text="${{sb.datePlanted}}">13/01/2011</td>接下来是显示种子启动器容器是否被覆盖,通过将布尔值 covered 属性转换为国际化的“yes”(是)或和使用字面替换表达式来显示
<td th:text="#{|bool.${sb.covered}|}">yes</td>现在我们要显示种子启动器容器的类型。Type 是一个包含两个值的 Java 枚举 (WOOD和PLASTIC)Messages文件中定义了两个属性seedstarter.type.WOOD和seedstarter.type.PLASTIC.
。seedstarter.type.前缀添加到枚举值上,通过表达式生成的结果将作为消息键使用:
<td th:text="#{|seedstarter.type.${sb.type}|}">Wireframe</td>这个列表中最困难的部分是features(特性)列。在这一列中,我们想要显示我们容器的所有功能——它们是以Feature枚举数组形式呈现的——并用逗号分隔。例如:“Electric Heating, Turf”(电加热、草皮).
注意这尤其困难,因为这些枚举值也需要像 Types 一样进行外置。流程如下:
- 给
features数组中的所有元素加上相应的前缀。 - 获取步骤1中所有键对应的外置消息。
- 将步骤2中获取的所有消息用逗号作为分隔符连接起来。
为了实现这一点,我们创建了以下代码:
<td th:text="${#strings.arrayJoin(
                   #messages.arrayMsg(
                       #strings.arrayPrepend(sb.features,'seedstarter.feature.')),
                   ', ')}">Electric Heating, Turf</td>
实际上,我们列表的最后一列将会非常简单。尽管它有一个嵌套表格用于显示容器中每一行的内容:
<td>
  <table>
    <tbody>
      <tr th:each="row,rowStat : ${sb.rows}">
        <td th:text="${rowStat.count}">1</td>
        <td th:text="${row.variety.name}">Thymus Thymi</td>
        <td th:text="${row.seedsPerCell}">12</td>
      </tr>
    </tbody>
  </table>
</td>
6 创建表单
6.1 处理命令对象
命令对象是 Spring MVC 为表单支持 Bean 所起的名称,即表示建模表单字段的对象,并提供由框架用来设置和获取用户在浏览器端输入值的 getter 和 setter 方法。
Thymeleaf 要求你通过使用th:object属性在你的<form>标签中指定命令对象:
<form action="#" th:action="@{/seedstartermng}" th:object="${seedStarter}" method="post">
    ...
</form>这与其他用途的th:object,是一致的,但在此特定场景中为了与 Spring MVC 的基础设施正确集成而增加了一些限制:
- Values for
th:object属性值必须是仅指定模型属性名称的变量表达式 (${...}),不能包含属性导航。这意味着像${seedStarter}这样的表达式是有效的,但${seedStarter.data}是无效的。 - 一旦进入
<form>标签内,就不能再指定其他th:object属性。这与 HTML 表单不能嵌套的事实是一致的。
6.2 输入框
现在我们来看看如何向表单中添加输入框:
<input type="text" th:field="*{datePlanted}" />正如你所见,我们在这里引入了一个新属性:th:field.这一功能对于 Spring MVC 的集成非常重要,因为它完成了将输入与表单支持 Bean 中的属性绑定的大部分繁重工作。你可以将其视为 Spring MVC JSP 标签库中
这个th:field属性的行为取决于它是否附加在<input>, <select>或<textarea>标签上(也取决于具体的<input>类型)。在这种情况下(input[type=text]),上面的代码行类似于:
<input type="text" id="datePlanted" name="datePlanted" th:value="*{datePlanted}" />……但实际上它的功能更强大一些,因为th:field还将应用已注册的 Spring 转换服务,包括我们之前看到的DateFormatter(即使字段表达式没有使用双重方括号)。正因如此,日期将以正确的格式显示。
Values for th:field属性值必须是选择表达式 (*{...}),鉴于这些表达式将在表单支持 Bean 上而不是上下文变量(或 Spring MVC 术语中的模型属性)上评估,这是合理的。
与th:object中的不同,<form:input> JSP tag will be allowed here).
注意th:field还理解 HTML5 新增的<input>元素类型,例如<input type="datetime" ... />, <input type="color" ... />等,有效地为 Spring MVC 添加了完整的 HTML5 支持。
6.3 复选框字段
th:field同样允许我们定义复选框输入。来看我们 HTML 页面中的一个例子:
<div>
  <label th:for="${#ids.next('covered')}" th:text="#{seedstarter.covered}">Covered</label>
  <input type="checkbox" th:field="*{covered}" />
</div>注意除了复选框本身之外还有一些细节,比如一个外置的标签,以及使用了#ids.next('covered')函数来获取应用于复选框输入 id 属性的值。
为什么我们需要动态生成此字段的 id 属性?因为复选框可能是多值的,因此其 id 值始终会附加一个序列号(内部使用#ids.seq(...)函数),以确保同一属性下的每个复选框输入具有不同的 id 值。
如果我们查看一个多值复选框字段,这个机制会更容易理解:
<ul>
  <li th:each="feat : ${allFeatures}">
    <input type="checkbox" th:field="*{features}" th:value="${feat}" />
    <label th:for="${#ids.prev('features')}"
           th:text="#{${'seedstarter.feature.' + feat}}">Heating</label>
  </li>
</ul>注意这次我们添加了th:value属性,因为 features 字段不是一个像 covered 那样的布尔值,而是一个值数组。
让我们看一下此代码生成的 HTML 输出:
<ul>
  <li>
    <input id="features1" name="features" type="checkbox" value="SEEDSTARTER_SPECIFIC_SUBSTRATE" />
    <input name="_features" type="hidden" value="on" />
    <label for="features1">Seed starter-specific substrate</label>
  </li>
  <li>
    <input id="features2" name="features" type="checkbox" value="FERTILIZER" />
    <input name="_features" type="hidden" value="on" />
    <label for="features2">Fertilizer used</label>
  </li>
  <li>
    <input id="features3" name="features" type="checkbox" value="PH_CORRECTOR" />
    <input name="_features" type="hidden" value="on" />
    <label for="features3">PH Corrector used</label>
  </li>
</ul>
我们可以看到,序列后缀如何被添加到每个输入框的 id 属性中,并且#ids.prev(...)该函数允许我们检索为特定输入框 id 生成的最后一个序列值。
不必担心那些隐藏的输入框
name="_features":它们会被自动添加以避免浏览器在表单提交时不会发送未选中的复选框值到服务器的问题。
还要注意,如果我们的 features 属性在表单支持 bean 中包含一些已选值,th:fieldThymeleaf 会自动处理并为对应的输入标签添加一个checked="checked"selected 属性。
6.4 单选按钮字段
单选按钮字段与非布尔型(多值)复选框指定方式相似 —— 当然,除了它不是多值的之外:
<ul>
  <li th:each="ty : ${allTypes}">
    <input type="radio" th:field="*{type}" th:value="${ty}" />
    <label th:for="${#ids.prev('type')}" th:text="#{${'seedstarter.type.' + ty}}">Wireframe</label>
  </li>
</ul>
6.5 下拉列表选择器
选择字段有两个部分:外层的<select><select> 标签及其内部嵌套的<option><option> 标签。创建这类字段时,只需在外层<select><select> 标签中包含一个th:fieldth:field 属性即可,但嵌套的th:value<option> 标签中的<option>value 属性将非常重要,因为它们提供了确定当前选中选项的方式(与非布尔型复选框和单选按钮类似)。
让我们将 type 字段重构为下拉选择器:
<select th:field="*{type}">
  <option th:each="type : ${allTypes}"
          th:value="${type}"
          th:text="#{${'seedstarter.type.' + type}}">Wireframe</option>
</select>到目前为止,理解这段代码应该相当容易。请注意属性优先级如何允许我们在th:each<select><option>标签本身上设置 th:field 属性。
6.6 动态字段
多亏了 Spring MVC 提供的高级表单字段绑定功能,我们可以使用复杂的 Spring EL 表达式将动态表单字段绑定到我们的表单支持 bean 上。这将允许我们在SeedStarterbean 中创建新的 Row 对象,并根据用户请求将其字段添加到我们的表单中。
要实现这一点,我们需要在控制器中增加几个新的映射方法,这些方法将根据是否存在特定请求参数来从我们的SeedStarterbean 中添加或删除行:
@RequestMapping(value="/seedstartermng", params={"addRow"})
public String addRow(final SeedStarter seedStarter, final BindingResult bindingResult) {
    seedStarter.getRows().add(new Row());
    return "seedstartermng";
}

@RequestMapping(value="/seedstartermng", params={"removeRow"})
public String removeRow(
        final SeedStarter seedStarter, final BindingResult bindingResult,
        final HttpServletRequest req) {
    final Integer rowId = Integer.valueOf(req.getParameter("removeRow"));
    seedStarter.getRows().remove(rowId.intValue());
    return "seedstartermng";
}
现在我们可以在表单中添加一个动态表格:
<table>
  <thead>
    <tr>
      <th th:text="#{seedstarter.rows.head.rownum}">Row</th>
      <th th:text="#{seedstarter.rows.head.variety}">Variety</th>
      <th th:text="#{seedstarter.rows.head.seedsPerCell}">Seeds per cell</th>
      <th>
        <button type="submit" name="addRow" th:text="#{seedstarter.row.add}">Add row</button>
      </th>
    </tr>
  </thead>
  <tbody>
    <tr th:each="row,rowStat : *{rows}">
      <td th:text="${rowStat.count}">1</td>
      <td>
        <select th:field="*{rows[__${rowStat.index}__].variety}">
          <option th:each="var : ${allVarieties}"
                  th:value="${var.id}"
                  th:text="${var.name}">Thymus Thymi</option>
        </select>
      </td>
      <td>
        <input type="text" th:field="*{rows[__${rowStat.index}__].seedsPerCell}" />
      </td>
      <td>
        <button type="submit" name="removeRow"
                th:value="${rowStat.index}" th:text="#{seedstarter.row.remove}">Remove row</button>
      </td>
    </tr>
  </tbody>
</table>这里涉及了许多内容,但现在我们已经可以理解大部分……除了一个strange问题:
<select th:field="*{rows[__${rowStat.index}__].variety}">

    ...

</select>如果你回想一下前面的“使用Thymeleaf”教程,那个__${...}__语法是预处理表达式,这是一个在评估整个表达式之前先进行求值的内嵌表达式。但是为什么要用这种方式指定行索引?直接使用下面这种写法不够吗:
<select th:field="*{rows[rowStat.index].variety}">

    ...

</select>
……实际上并不够。问题是 Spring EL 并不会在数组索引方括号中解析变量,因此当我们执行上面的表达式时,我们会得到一个错误提示,告诉我们类似rows[rowStat.index](而不是rows[0], rows[1],等等)在 rows 集合中不是一个有效位置。这就是为什么这里需要预处理的原因。
我们来看一下按下“Add Row”几次之后生成的 HTML 片段:
<tbody>
  <tr>
    <td>1</td>
    <td>
      <select id="rows0.variety" name="rows[0].variety">
        <option selected="selected" value="1">Thymus vulgaris</option>
        <option value="2">Thymus x citriodorus</option>
        <option value="3">Thymus herba-barona</option>
        <option value="4">Thymus pseudolaginosus</option>
        <option value="5">Thymus serpyllum</option>
      </select>
    </td>
    <td>
      <input id="rows0.seedsPerCell" name="rows[0].seedsPerCell" type="text" value="" />
    </td>
    <td>
      <button name="removeRow" type="submit" value="0">Remove row</button>
    </td>
  </tr>
  <tr>
    <td>2</td>
    <td>
      <select id="rows1.variety" name="rows[1].variety">
        <option selected="selected" value="1">Thymus vulgaris</option>
        <option value="2">Thymus x citriodorus</option>
        <option value="3">Thymus herba-barona</option>
        <option value="4">Thymus pseudolaginosus</option>
        <option value="5">Thymus serpyllum</option>
      </select>
    </td>
    <td>
      <input id="rows1.seedsPerCell" name="rows[1].seedsPerCell" type="text" value="" />
    </td>
    <td>
      <button name="removeRow" type="submit" value="1">Remove row</button>
    </td>
  </tr>
</tbody>
7 验证与错误信息
我们的大多数表单都需要显示验证信息,以便告知用户所犯的错误。
Thymeleaf 提供了一些工具来完成这个功能:在#fields#fields 对象中有两个函数。th:errors和th:errorclass属性中填充值。
7.1 字段错误
我们来看看如何为某个字段添加特定的 CSS 类,前提是它有错误:
<input type="text" th:field="*{datePlanted}"
th:class="${#fields.hasErrors('datePlanted')}? fieldError" />如您所见,#fields.hasErrors(...)#fields.hasErrors()datePlanted函数接收字段表达式作为参数(如 "name"),并返回一个布尔值,表示该字段是否存在任何验证错误。
我们还可以获取该字段的所有错误并遍历它们:
<ul>
  <li th:each="err : ${#fields.errors('datePlanted')}" th:text="${err}" />
</ul>除了遍历之外,我们也可以使用th:errors#fields.errors()<br />:
<input type="text" th:field="*{datePlanted}" />
<p th:if="${#fields.hasErrors('datePlanted')}" th:errors="*{datePlanted}">Incorrect date</p>这个专门的函数,它会使用指定选择器对应的所有错误生成一个列表,各个错误之间由换行符分隔:th:errorclass
简化基于错误的 CSS 样式:上面看到的例子——当字段出错时为其表单输入加上 CSS 类,这种做法非常常见,以至于 Thymeleaf 提供了一个专用属性来完成该功能:th:errorclass.
将其应用于一个表单字段标签(input、select、textarea 等)时,它会从该标签中存在的任何name或th:fieldth:field 属性读取要检查的字段名称,然后如果该字段有关联错误,则追加指定的 CSS 类:
<input type="text" th:field="*{datePlanted}" class="small" th:errorclass="fieldError" />如果datePlantedname 字段存在错误,这会渲染为:
<input type="text" id="datePlanted" name="datePlanted" value="2013-01-01" class="small fieldError" />7.2 所有错误
如果我们想要显示表单中的所有错误怎么办?我们只需要调用#fields.hasErrors(...)和#fields.errors(...)#fields 的方法并传入'*'或'all'"*" 通配符常量(作用相同)即可:
<ul th:if="${#fields.hasErrors('*')}">
  <li th:each="err : ${#fields.errors('*')}" th:text="${err}">Input is incorrect</li>
</ul>
正如上面示例所示,我们可以获取所有错误并遍历它们……
<ul>
  <li th:each="err : ${#fields.errors('*')}" th:text="${err}" />
</ul>……或者构建一个由换行符分隔的列表:<br />-separated list:
<p th:if="${#fields.hasErrors('all')}" th:errors="*{all}">Incorrect date</p>最后注意,#fields.hasErrors('*')th:each="err : ${#fields.allErrors()}"#fields.hasAnyErrors()和#fields.errors('*')th:each="err : ${#fields.allErrors()}"#fields.allErrors()是等效的。您可以使用任一语法:
<div th:if="${#fields.hasAnyErrors()}">
  <p th:each="err : ${#fields.allErrors()}" th:text="${err}">...</p>
</div>
7.3 全局错误
在 Spring 表单中还存在第三种类型的错误:全局错误。这些错误不与表单中的任何特定字段相关联,但仍然存在。
Thymeleaf 提供了global#fields.globalErrors 常量来访问这些错误:
<ul th:if="${#fields.hasErrors('global')}">
  <li th:each="err : ${#fields.errors('global')}" th:text="${err}">Input is incorrect</li>
</ul>
<p th:if="${#fields.hasErrors('global')}" th:errors="*{global}">Incorrect date</p>……以及等效的便捷方法:#fields.hasGlobalErrors()和#fields.globalErrors() convenience methods:
<div th:if="${#fields.hasGlobalErrors()}">
  <p th:each="err : ${#fields.globalErrors()}" th:text="${err}">...</p>
</div>
7.4 在表单外部显示错误
使用变量(variable,${...}*{...})而非选择(selection,*{...}${...})表达式,并且在表单支持 bean 名称前加上前缀,也可以实现在表单外部显示表单验证错误:
<div th:errors="${myForm}">...</div>
<div th:errors="${myForm.date}">...</div>
<div th:errors="${myForm.*}">...</div>

<div th:if="${#fields.hasErrors('${myForm}')}">...</div>
<div th:if="${#fields.hasErrors('${myForm.date}')}">...</div>
<div th:if="${#fields.hasErrors('${myForm.*}')}">...</div>

<form th:object="${myForm}">
    ...
</form>
7.5 富错误对象
Thymeleaf 提供了一种功能,可以以 Bean 形式(而不仅仅是字符串)获得表单错误信息,字符串,提供fieldNamecode (String)、messagemessage (String) 和globalerror (boolean) 属性。
这些错误可以通过#fields.detailedErrors()#fields.error 拾取器来获取:
<ul>
    <li th:each="e : ${#fields.detailedErrors()}" th:class="${e.global}? globalerr : fielderr">
        <span th:text="${e.global}? '*' : ${e.fieldName}">The field name</span> |
        <span th:text="${e.message}">The error message</span>
    </li>
</ul>
8 它仍然可以作为原型使用!
我们的应用现在已经准备好了。但我们再仔细看一下我们创建的.html页面……
使用 Thymeleaf 带来的最棒的结果之一就是:即使我们给 HTML 添加了这么多功能,它依然可以作为原型使用(我们称之为一个自然模板)。让我们直接在浏览器中打开seedstartermng.html而无需运行我们的应用程序:
看到了吗!它不是一个可运行的应用程序,也不是真实的数据……但它是一个完全有效的原型,由完全可以显示的 HTML 代码组成。
9 转换服务
9.1 配置
如前所述,Thymeleaf 可以使用在应用上下文中注册的转换服务。我们的应用配置类通过继承 Spring 自己的WebMvcConfigurerAdapter辅助类,将自动注册这样的转换服务,我们可以通过添加所需的格式化器来进行配置。让我们再来看看它的样子:
@Override
public void addFormatters(final FormatterRegistry registry) {
    super.addFormatters(registry);
    registry.addFormatter(varietyFormatter());
    registry.addFormatter(dateFormatter());
}

@Bean
public VarietyFormatter varietyFormatter() {
    return new VarietyFormatter();
}

@Bean
public DateFormatter dateFormatter() {
    return new DateFormatter();
}
9.1 双花括号语法
转换服务可以轻松地应用于将任何对象转换/格式化为字符串。这可以通过双花括号表达式语法来实现:
- 对于变量表达式:
${{...}} - 对于选择表达式:
*{{...}}
因此,例如,假设有一个将整数转换为字符串的转换器,并在千位处添加逗号分隔符,如下代码:
<p th:text="${val}">...</p>
<p th:text="${{val}}">...</p>
…应该显示为:
<p>1234567890</p>
<p>1,234,567,890</p>
9.2 在表单中的使用
我们之前看到每个th:field属性都将始终应用转换服务,因此以下代码:
<input type="text" th:field="*{datePlanted}" />…实际上等价于:
<input type="text" th:field="*{{datePlanted}}" />注意,根据 Spring 的要求,这是唯一一个在表达式中使用单花括号语法时应用转换服务的场景。
9.3#conversions工具对象
这个#conversions表达式工具对象允许在需要的地方手动执行转换服务:
<p th:text="${'Val: ' + #conversions.convert(val,'String')}">...</p>此工具对象的语法:
#conversions.convert(Object,Class):将对象转换为指定的类。#conversions.convert(Object,String):与上面相同,但将目标类作为字符串指定(注意java.lang.包名可以省略)。
10
Thymeleaf 提供了只渲染模板的一部分作为执行结果的功能:片段.
这可以作为一个有用的组件化工具。例如,可以在处理 AJAX 请求的控制器中使用该功能,返回已经在浏览器中加载页面的部分标记(用于更新下拉框、启用/禁用按钮等)。
片段式渲染可以通过使用 Thymeleaf 的片段规范实现:实现了接口的对象。org.thymeleaf.fragment.IFragmentSpec接口定义。
这些实现中最常见的是org.thymeleaf.standard.fragment.StandardDOMSelectorFragmentSpec,它允许使用 DOM 选择器指定片段,选择器的写法正好类似于th:include或th:replace.
中所使用的那样。
View beans are beans of the org.thymeleaf.spring6.view.ThymeleafView class declared at the application context (@Bean declarations if you are using Java configuration). They allow the specification of fragments like this:
@Bean(name="content-part")
@Scope("prototype")
public ThymeleafView someViewBean() {
    ThymeleafView view = new ThymeleafView("index"); // templateName = 'index'
    view.setMarkupSelector("content");
    return view;
}
给定上面的 bean 定义,如果我们的控制器返回content-part(上面 bean 的名称)…
@RequestMapping("/showContentPart")
public String showContentPart() {
    ...
    return "content-part";
}
…Thymeleaf 将只返回content的index模板中的片段——当加上前缀和后缀后,其位置可能类似于/WEB-INF/templates/index.html。所以,结果将完全等价于指定index :: content:
<!DOCTYPE html>
<html>
  ...
  <body>
    ...
    <div th:fragment="content">
      Only this div will be rendered!
    </div>
    ...
  </body>
</html>
另外还要注意,得益于 Thymeleaf 标记选择器的强大功能,我们可以选择模板中的片段而完全不需要任何th:fragment属性。例如,使用id属性:
@Bean(name="content-part")
@Scope("prototype")
public ThymeleafView someViewBean() {
    ThymeleafView view = new ThymeleafView("index"); // templateName = 'index'
    view.setMarkupSelector("#content");
    return view;
}
…这将完美地选择以下部分:
<!DOCTYPE html>
<html>
  ...
  <body>
    ...
    <div id="content">
      Only this div will be rendered!
    </div>
    ...
  </body>
</html>
10.2 在控制器返回值中指定片段
除了声明视图 Bean之外,也可以在控制器中通过片段表达式的语法来指定片段。就像th:insert或th:replace属性:
@RequestMapping("/showContentPart")
public String showContentPart() {
    ...
    return "index :: content";
}中一样。id="content":
@RequestMapping("/showContentPart")
public String showContentPart() {
    ...
    return "index :: #content";
}
And we can also use parameters, like:
@RequestMapping("/showContentPart")
public String showContentPart() {
    ...
    return "index :: #content ('myvalue')";
}
11 Advanced Integration Features
11.1 Integration with RequestDataValueProcessor
Thymeleaf seamlessly integrates with Spring’s RequestDataValueProcessor interface. This interface allows the interception of link URLs, form URLs and form field values before they are written to the markup result, as well as transparently adding hidden form fields that enable security features like e.g. protection agains CSRF (Cross-Site Request Forgery).
An implementation of RequestDataValueProcessor can be easily configured at the Application Context. It needs to implement the org.springframework.web.servlet.support.RequestDataValueProcessor interface and have requestDataValueProcessor as a bean name:
@Bean
public RequestDataValueProcessor requestDataValueProcessor() {
  return new MyRequestDataValueProcessor();
}
…and Thymeleaf will use it this way:
th:href和th:srccallRequestDataValueProcessor.processUrl(...)before rendering the URL.th:actioncallsRequestDataValueProcessor.processAction(...)before rendering the form’sactionattribute, and additionally it detects when this attribute is being applied on a<form>tag —which should be the only place, anyway—, and in such case callsRequestDataValueProcessor.getExtraHiddenFields(...)and adds the returned hidden fields just before the closing</form>tag.th:valuecallsRequestDataValueProcessor.processFormFieldValue(...)for rendering the value it refers to, unless there is ath:fieldpresent in the same tag (in which caseth:fieldwill take care).th:fieldcallsRequestDataValueProcessor.processFormFieldValue(...)for rendering the value of the field it applies to (or the tag body if it is a<textarea>)。
Note there are very few scenarios in which you would need to explicitly implement
RequestDataValueProcessorin your application. In most cases, this will be used automatically by security libraries you transparently use, like e.g. Spring Security’s CSRF support.
11.1 Building URIs to controllers
Since version 4.1, Spring allows the possibility to build links to annotated controllers directly from views, without the need to know the URIs these controllers are mapped to.
In Thymeleaf, this can be achieved by means of the #mvc.url(...) expression object method, which allows the specification of controller methods by the capital letters of the controller class they are in, followed by the name of the method itself. This is equivalent to JSP’s spring:mvcUrl(...) custom function.
For example, for:
public class ExampleController {

    @RequestMapping("/data")
    public String getData(Model model) { ... return "template" }

    @RequestMapping("/data")
    public String getDataParam(@RequestParam String type) { ... return "template" }

}
The following code will create a link to it:
<a th:href="${(#mvc.url('EC#getData')).build()}">Get Data Param</a>
<a th:href="${(#mvc.url('EC#getDataParam').arg(0,'internal')).build()}">Get Data Param</a>
你可以通过此链接了解有关该机制的更多信息:http://docs.spring.io/spring-framework/docs/4.1.2.RELEASE/spring-framework-reference/html/mvc.html#mvc-links-to-controllers-from-views
12 Spring WebFlow 集成
12.1 基本配置
Thymeleaf + Spring 集成包包含了与 Spring WebFlow 的集成。
注意:当 Thymeleaf 与 Spring 6 一起使用时,需要 Spring WebFlow 3.0+;而与 Spring 5 一起使用时,则需要 Spring WebFlow 2.5。
WebFlow 包含了一些 AJAX 功能,用于在特定事件(转换(transitions))被触发时渲染页面的部分内容。为了启用 Thymeleaf 处理这些 AJAX 请求,我们必须使用不同的实现方式,配置如下:ViewResolver实现方式的配置如下:
@Bean
public FlowDefinitionRegistry flowRegistry() {
    // NOTE: Additional configuration might be needed in your app
    return getFlowDefinitionRegistryBuilder()
            .addFlowLocation("...")
            .setFlowBuilderServices(flowBuilderServices())
            .build();
}

@Bean
public FlowExecutor flowExecutor() {
    // NOTE: Additional configuration might be needed in your app
    return getFlowExecutorBuilder(flowRegistry()).build();
}

@Bean
public FlowBuilderServices flowBuilderServices() {
    // NOTE: Additional configuration might be needed in your app
    return getFlowBuilderServicesBuilder()
            .setViewFactoryCreator(viewFactoryCreator())
            .build();
}

@Bean
public ViewFactoryCreator viewFactoryCreator() {
    MvcViewFactoryCreator factoryCreator = new MvcViewFactoryCreator();
    factoryCreator.setViewResolvers(
            Collections.singletonList(thymeleafViewResolver()));
    factoryCreator.setUseSpringBeanBinding(true);
    return factoryCreator;
}

@Bean
public ViewResolver thymeleafViewResolver() {
    AjaxThymeleafViewResolver viewResolver = new AjaxThymeleafViewResolver();
    // We need to set a special ThymeleafView implementation: FlowAjaxThymeleafView
    viewResolver.setViewClass(FlowAjaxThymeleafView.class);
    viewResolver.setTemplateEngine(templateEngine());
    return viewResolver;
}
注意以上配置并非完整:你仍需配置你的处理器等。请参考 Spring WebFlow 文档以了解更多。
从此以后,你可以在 view-state 中指定 Thymeleaf 模板:
<view-state id="detail" view="bookingDetail">
    ...
</view-state>在上面的示例中,bookingDetail是以通常方式指定的 Thymeleaf 模板,所有已配置的模板解析器(Template Resolvers)都能理解它。TemplateEngine.
12.2 Spring WebFlow 中的 AJAX 片段
请注意此处所解释的内容只是创建用于 Spring WebFlow 的 AJAX 片段的方法。如果你未使用 WebFlow,则只需像创建其他返回模板的控制器一样创建一个响应 AJAX 请求并返回 HTML 片段的 Spring MVC 控制器即可,唯一的不同是你可能希望从控制器方法中返回类似如下的一个片段:
"main :: admin"从你的控制器方法中返回。
WebFlow 允许使用<render>标签来定义要通过 AJAX 渲染的片段,例如:
<view-state id="detail" view="bookingDetail">
    <transition on="updateData">
        <render fragments="hoteldata"/>
    </transition>
</view-state>这些片段(hoteldata,在此例中)可以是在标记中使用th:fragment:
<div id="data" th:fragment="hoteldata">
    This is a content to be changed
</div>属性指定的一个逗号分隔的片段列表。id请始终记得指定的片段必须具有
<render> tags can also be specified using DOM selectors:
<view-state id="detail" view="bookingDetail">
    <transition on="updateData">
        <render fragments="[//div[@id='data']]"/>
    </transition>
</view-state>
…and this will mean no th:fragment is needed:
<div id="data">
    This is a content to be changed
</div>
As for the code that triggers the updateData转换的代码如下所示:
<script type="text/javascript" th:src="@{/resources/dojo/dojo.js}"></script>
<script type="text/javascript" th:src="@{/resources/spring/Spring.js}"></script>
<script type="text/javascript" th:src="@{/resources/spring/Spring-Dojo.js}"></script>

  ...

<form id="triggerform" method="post" action="">
    <input type="submit" id="doUpdate" name="_eventId_updateData" value="Update now!" />
</form>

<script type="text/javascript">
    Spring.addDecoration(
        new Spring.AjaxEventDecoration({formId:'triggerform',elementId:'doUpdate',event:'onclick'}));
</script>